WooCommerce FreshBooks integration allows one to create WooCooomnerce customers as FreshBooks clients. You can link FreshBooks products to WooCommerce products in order to get better reporting.
Your clients can immediately download PDF invoices if the data is entered automatically into FreshBooks. It also allows you to send invoices automatically using “Snail Mail”.
Before we go through the process of WooCommerce FreshBooks integration, let us get deeper insights.
Introduction
A. FreshBooks
FreshBooks is an efficient software for accounting. It is geared for up to 50 workers at small enterprises. FreshBooks has got alluring dashboard from where you can manage all types of operations easily. This software is highly regarded for its user-friendly design and is highly sought after for WooCommerce FreshBooks integration. A person with minimal accounting knowledge can easily manage FreshBooks.
It is the best tool for freelancers who manage easy-to-use accounting systems and invoicing.
B. WooCommerce
One of the most prominent e-Commerce plugins for CMS, WordPress. Large or small-sized businesses that are using WordPress can use WooCommerce. Since its launch in 2011, it has attained popularity among merchants for its simplicity.
Eminent features
A. FreshBooks
This software offers comprehensive support for each aspect of accounting and invoicing. Some of FreshBook’s eminent features are as follows:-
1. Invoicing
You can personalize the layout for each invoice like:-
- Select alternative currencies
- Opt for the option to charge late penalties
- Set reminders to establish automatic payment
- Add line items
- Add the logo of your company
- You can bill a client from the list of your stored clients
We would be recommending generating the categories of tax. For each line item, you have to implement the tax. You also need to specify the tax choices related to your services and goods.
You can also manage prerequisites like:-
- Terms of Payment
- Notes
- Discounts
- Plans of Payment
- Attachments to your invoices
- Deposit requests
Businesses can share the invoices through an email or shareable link. In addition, you can even do the modification of the email by using dynamic fields. It will automatically enter the detail into the email and invoice. FreshBooks is quite easy to set bills on autopilot.
You can craft one invoice in a single go. You can even design templates for recurring invoices in the following cases:-
- Limit how many invoices are to be sent
- Schedule the issue dates
- Invoices that are Issued on a regular basis
- How frequently do you send the invoices
2. Time Tracking
You can track the timing and charge your clients as per the hours you worked for them. Even though, it is a basic component but is an excellent and great relief for small businesses. Crafting and sending invoices quickly will cut down the time that you will spend on navigating various sections.
3. Expenses
With FreshBooks, you will be able to monitor the finances that you spend on your services/ products. Similarly, it can also track sales via invoices. The process is quite straightforward for adding new costs since you will be including the following:-
- Classify spending using the pre-selected categories of FreshBooks
- Taxes
- Receipt’s picture as evidence of purchase
- Description
- Details of the merchant
B. WooCommerce
1. Open-Source
This WordPress plugin is open-source. Hence, you get complete store ownership. It is scalable and flexible. You can access the stored data anytime and anywhere with 100% security.
2. Multilingual website
You can have a user-friendly multilingual website with few clicks. It can translate into 24 different languages. Hence, you can run a global business effectively with WooCommerce FreshBooks integration.
3. Offers secure and flexible payments
WooCommerce can accept bank transfers, credit cards, and COD. Apart from this, you can do WooCommercre integration with prominent payment gateways.
Using WooCommerce FreshBooks integration, one can manage their accounting and do their business instantly.
Steps for WooCommerce FreshBooks integration
In order to do WooCommerce FreshBooks integration, you need to create FreshBooks Classic Account.
In case you are using FreshBooks’ updated version, contact customer support of FreshBooks for shifting your account.
1. Preparing the FreshBooks for smooth running
Browse to the dashboard and download the extension’s ZIP file for WooCommerce FreshBooks integration. On your WP, pick “Plugin” and hit “Add New” for WooCommerce FreshBooks integration. Tap “Install Now” and activate FreshBooks.
To get your FreshBooks ready, you need to adjust some settings.
Go to “WooCommerce” and click “Settings” for WooCommerce FreshBooks integration. Next, hit “**FreshBooks&”.
Sign In to “FreshBooks”. Hit “My Account” and click the option “FreshBooks API” to attain the API URL. In the Settings of WooCommerce, you need to enter the API for WooCommerce FreshBooks integration.
In the image below, you will see the FreshBooks Setting window. It has plenty of fields. In case of any confusion, you can check the explanation or the guide by hovering your mouse over the Question Mark.

Fields that you may see:-
In the previous step, you may have received this URL from your FreshBooks account.
You will attain the details in a similar way as the API URL.
This mode can give you assistance if you are facing troubleshooting with this plugin. All sensitive details are not included in the debugging messages before any display. It is recommended to keep the mode off.
It is a section where you can choose a client for whom you wish to create all invoices. Choose the option “None” if you are wishing to establish a new customer for each client.
It is a place where you pick your default language for your site and invoices.
Through which medium one wishes to send their invoices (Snail Mail or Email)? For the option of “Snail Mail”, you need to have a specific stamp number in the FreshBooks account.
- Implement Order Number as Invoice Number
You can have your order number as an invoice number generated automatically or do it manually.
In this section, you can enter a prefix or blankly leave the field. In the option, “Prefix + Order number”, just ensure that the characters are not more than 10.
-
- Automatically Create Invoices
The invoices are manually or automatically generated here.
-
- Automatically Send Invoices
You can automatically submit the invoice and send them manually. You can also save them as drafts for sending automatically/ manually.
-
- Automatically Apply for Payments
Manually or automatically apply for invoice payments.
You have to pick how each method of WooCommerce payment must be reported as the payment type in FreshBooks. Check the window below:-

2. Use Gravity Forms, a third-party plugin
Other than the traditional method for WooCommerce FreshBooks integration, you can try this option. Here, we are using Gravity Forms for reference.
You need to fulfill the small requirements with Gravity Forms FreshBooks Elier plans and add-on on Pro.
Step #1: Start with Gravity Forms
Skip the steps if you already have Gravity Forms.
You cannot access Gravity Forms in the WordPress plugin repository because it is a premium plugin. Hence, you cannot download it from the WP dashboard.
Make sure to download the updated version of the Gravity Forms core plugin for WooCommerce FreshBooks integration. Download the plugin from the Gravity Forms account.

You will get Gravity Forms in the file form.
Go to the WP dashboard and browse “Add Plugins”. Upload the ZIP file and hit “Install” to do WooCommerce FreshBooks integration.

Do not forget to activate Gravity Forms for WooCommerce FreshBooks integration.

Next, enter the license key. This you can attain by browsing the Gravity Forms site’s My Account.

Step #2: Get hold of the FreshBooks add-on
As soon as Gravity Forms is ready, it’s time for WooCommerce FreshBooks integration. You have select “Add-Ons” from the dashboard of Gravity Forms.
Search for “FreshBooks Add-On” and hit the button “Install” for WooCommerce FreshBooks integration.

Step 3: Prepare FreshBooks
You need to take actions like getting it prepared to use before you start using this accounting software for your WooCommerce store.
Install FreshBooks and activate it.

Navigate to FreshBooks Settings for WooCommerce FreshBooks integration.
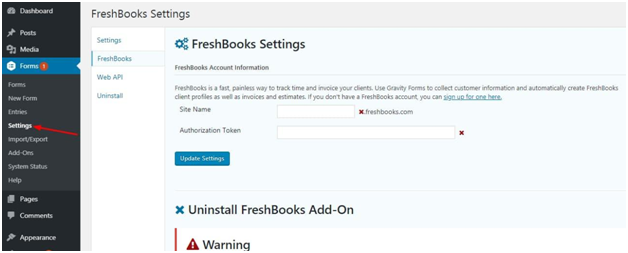
Next, enter the Authorization Token and your Site Name. This you will get under the section My Account from the FreshBooks API section.
Note:- Accurately enter the details.
Next, hit “Update Settings” for WooCommerce FreshBooks integration.
You are done!!
In a conclusion!!
FreshBooks, since its invention has been a great support for small businesses. It is a great tool that can help you with accounting and invoicing issues if you are a newcomer to WooCommerce. It is cost-friendly. Hence, the best options for businesses with minimal capital.
WP Video Tutorial is a leading WooCommerce support service provider with a reach all across the globe. We are proficient in developing and handling complex tasks and troubleshooting. Our WooCommerce is trained on a regular basis to work on advanced updates and innovation.
For any integration or customization, you can reach us at 888 602-0119

