Call Us Toll Free - US & Canada : +1-(888) 602-0119

How to Setup Ogone Payment Gateway in WooCommerce?

Ogone Payment Gateway or WooCommerce Ingenico is a popular plugin allowing online sellers to accept both local and international payments from their online customers. The best part is that it facilitates the customers with multiple payment options. They can choose a payment mode as per their convenience. The platform helps in improving the graph of conversions while ensuring complete satisfaction of the customers.

What is the WooCommerce Ingenico or Ogone Platform?

Ogone Platform is rebranded as WooCommerce Ingenico. The major reason behind rebranding of the platform is to highlight Ingenico (Ogone platform plugin works in integration with it). However, it is to be noted that only its name has been changed and not the features.

Ingenico comes with a wide range of versatile reporting options making it easier for merchants to manage and monitor their payments accounts without any hassles. Plus, the platform also uses a flexible approach. Merchants can customize the channels, payment modes, and functionality according to their business needs.

Why choose WooCommerce Ingenico?

  • It is accepted in more than 40 international and local payment options
  • It meets all the security standards as the payments are routed via its own servers
  • Ingenico can be easily customized and users can add as many payment modes as required
  • The payment page is customizable
  • Ingenico accepts all types of Debit and Credit Cards such as Diner’s Club, MasterCard, Visa, Maestro, American Express, etc.

What countries support Ingenico?

The platform is supported in many nations including Belgium, US, Netherlands, France, Germany, Austria, United Kingdom, Switzerland, and Luxembourg.

What plugin is used to set up WooCommerce Ingenico?

PayTrace Payment Gateway plugin is used for setting up WooCommerce Ingenico. It can be downloaded using this link – https://woocommerce.com/products/ogone/.

Requirements

  • WooCommerce website version 3.0.0
  • Merchants need to purchase the extension.
  • Sign in to Ingenico platform and get your Secure Hash Algorithm (SHA) credentials.

Steps to Setting up and Configuring WooCommerce Ingenico plugin

Installation

Step 1- Sign in to your WordPress account.


Step 2 – Click on WordPress admin I plugins I add new I upload plugin I choose a file. Select the downloaded zip file. Next, select install now I activate to enable the extension.

Setting up the plugin

  • Click on WooCommerce I Settings I Payments > WooCommerce Ingenico
  • Select “Enable plugin” and then press “Manage” button

Configuring the plugin

Step 1 – Sign in to Ingenico account

Step 2 – Click on Configuration I Technical Information I Global Security Parameters. Now, set SHA-256 as the platform’s Hash algorithm. Now, scroll down to the page’s bottom and select “Save”.


Step 3 – Select Configuration I Technical Information I Data and Origin Verification. Now add “URL of the merchant page containing the payment form that will call the page: order standard.asap” in the given sandbox. Next, fill in “SHA-IN passphrase”. Lastly, click on “Save”.

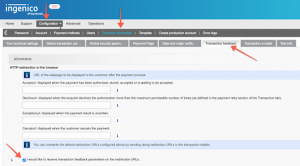
Step 4 – Click on Configuration I Technical Information I Transaction Feedback. Tick the checkbox related to receiving redirection related transaction feedback parameters later on (check image).


Ogone Payment Gateway

Step 5 – Go to “Direct HTTP server-to-server request” and select “No request” as the “Timing of the request”.

Ogone Payment Gateway

Step 6 – Next, on the same page you’ll find the “Dynamic e-Commerce parameters” section. Check the “Selected” list and make sure it has NCERROR, COMPLUS, STATUS, PAYID, and ORDERID.

Ogone Payment Gateway

Note – The customers who have already purchased WooCommerce Ingenico plugin but failed to add COMPLUS in the “Setting” may find a notification (on the admin page) for setting configuration within WooCommerce Ingenico. Once you configure the setting click on “Complete” (which is there on the notification). These steps are crucial to ensure uninterrupted processing of credit cards.

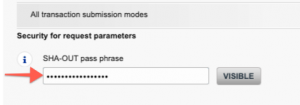
Step 7 – On scrolling down the page (towards Transaction Feedback) you’ll find the “Security for request parameters” section with SHA-OUT passphrase mentioned under it. Add a phrase in the box of your choice. Finally, click on “Save”.

Ogone Payment Gateway

Customize Ingenico (Ogone Platform) Extension

After completing customization of Ingenico settings (back office) Sign in to your Ingenico dashboard for configuring the plugin. You may customize all the elements listed on the page including the ones highlighted below –


Ogone Payment Gateway

  • Check or uncheck “Ingenico (Ogone Platform)” box – Enabling the payment gateway will allow the customers to use it during the checkout process.
  • “Testing” – Select “Yes” from the dropdown list if you want to add the test feature in your account. You may add a “No” here as well if you have already planned to make your site public and accept the payments from customers.
  • “Title” – Fill in the “Title” in the given box. Keep in mind this title will be displayed before your customers on the checkout page.
  • “Description” – here you can add detailed information for your purchasers.
  • “Ingenico PSPID” – Add the PSPID sourced from your Ingenico account. The PSPID should be different from testing mode and live mode.
  • “SHA-IN” – Fill in the SHA-IN passcode created during account configuration in the step mentioned above in Step 3 above.
  • “SHA-OUT” – Add SHA-OUT passcode created during account configuration in the step mentioned above in Step 7 above.
  • “Template Page” – Add a URL similar to the one on your site’s server.
  • “Debug Mode” – This option should be enabled only if you are facing any problem with WooCommerce Ingenico plugin.

Conclusion

Integrating your WooCommerce online shop with Ingenico (Ogone Platform) will make things easier for you. From accepting payments through credit card to ensuring complete security of your customers’ sensitive data the advanced servers of Ingenious will meet all your unique business requirements (related to payments particularly) efficiently. Hire WooCommerce experts if you are sceptical about doing it on your own.

PayPal Checkout Explained for WooCommerce Store Owners

PayPal Checkout for WooCommerce allows online store owners to accept instant online payments through PayPal. The checkout is featured with personalized advanced Payment Buttons. This latest and PayPal extension is indeed one of its best payment methods.

When you use PayPal checkout for your store, the feel and look of the checkout page can be customized according to your unique requirements. Plus, you’ll get the complete protection from fraud and theft. The WooCommerce extension also benefits the users with real-time updates automatically. So, it is always a better idea to adopt it. Most of your customers must have PayPal too, right?

In this article, we will introduce you to PayPal properly and tell you how to enable PayPal checkout for your store. Meanwhile, you can also take expert advice and services from WPCustomify regarding this integration and other WooCommerce issues/tasks.

Features of PayPal

Advanced servers for high-end security

PayPal uses secure servers for processing the payments. It means you need not to be concerned about safety and security of sensitive info of your customers shared on checkout. PayPal Checkout allows individuals to  focus more on making their business successful.

Easy to set-up

PayPal onboarding offers the added advantage of free extension facilitating the users with easy ways of setting up and using the PayPal account for the business. Just select “Setup your PayPal account” and you will not have to deal with the hassle of copy/pasting the PayPal credentials.

Seamless and Secure Checkout

PayPal comes with In-Context Express Checkout  feature benefitting the buyers with speedy, seamless, and secure checkout while staying on the website. The business website provides streamline experience to the customers.

WooCommerce One Touch check out

WooCommerce PayPal Checkout comes with One Touch feature designed for seamless experience of the customers. They need not to enter card details or password for at least six months. It enhances their overall checkout experience on the site.

Direct capturing of charges in WooCommerce

The extension facilities users to maintain record of the previous transactions from the website’s Edit Order page. You’ll be saved from the extra efforts that otherwise go singing in to the PayPal account.

Personalized checkout page

With this extension in use you may ensure that the payment experience matches your brand’s unique style. The extension offers the flexibility of changing the size, layout, and color for a customized experience during the checkout process.

How to set up a PayPal checkout?

Requirements

  1. A PayPal account (in the name of your business). If you don’t have an account you may register one at PayPal.com.
  2. PayPal Reference Transactions for Subscriptions. You may opt for Reference Transactions for using/selling Subscriptions at WooCommerce.

Which Plugin used for setting up PayPal Checkout?

First of all you need to download PayPal Checkout Payment Gateway for WooCommerce using this link.

Setting up and configuring WooCommerce PayPal Checkout

Here are the steps –

PayPal Checkout Plugin Installation

    • Sign in to WooCommerce account
      • Find ‘Plugin’ and then click on ‘Add new’
        1. Activate the plugin once it’s installed in your system.
        2. Now you need to Setup and configure
        3. Find WooCommerce, then click on Settings, then Payments and then on PayPal Checkout
        4. After Enabling the plugin and select ‘Manage’

PayPal Checkout Integration with WooCommerce

      1. Tick the ‘Enable PayPal Checkout’ box
      2. Select ‘Live’ from Environment sandbox’s dropdown menu
      3. Enter Live API Username, Live API Password, and Live API Signature
        • Select ‘Save Changes’


      • PayPal Checkout is successfully integrated with WooCommerce
      • Check your final Checkout page once a product is added to the cart.

How to find the API of PayPal?

        • Sign in to your PayPal account using this link.
        • Click on Setting > Account access > API Access (select Update)

        • Select ‘Mange API credential’

      • Select show Signature, API Username, and API Password to access the API keys.

How to Customize Button on Checkout, Cart or Product Page?

Customization of Checkout Button

        • Click WooCommerce > Settings > Payments > PayPal Checkout
        • Select the ‘Button Settings’ to personalize Button Color, Button Shape, Button Label, Button Layout, and Button Size.

      • Click ‘Save Changes’

Customizing Direct Checkout

        • Tick ‘Enable Paypal Checkout On The Cart Page’ box
        • Tick ‘ Configure Settings Specific to Mini-Cart’ box
        • Customize the Button label, size, and layout

      • Select ‘Save Changes’

Check Cart Page of your site

Personalization of Direct Checkout Page

        • Tick on the ‘Checkout On Single Product’
        • Select ‘Configure Settings Specific To Single Product View’
        • Customize Button Label, Button Layout, and Button Size

      • Select ‘Save Change’
      • Check the single product page look of your website

How to Use Direct Checkout?

Direct Checkout on the Site’s Cart Page

Direct Checkout on the Site’s Single Product Page

How to set up a PayPal reference transaction for recurring payment?

Users are required to email their queries to PayPal support for enabling reference transaction

For sending Email Application

      • Sign in to PayPal account
      • Find Email Contact Form
      • Select Business solutions as your topic
      • Select PayPal payment solutions as your sub-topic
      • Select PayPal Express
      • Checkout as your sub-topic

Write your message in the given space. Don’t forget to add your PayPal account name and email address. Send the message.

Wait for the response.

Customize reference transaction setting

        • Select WooCommerce > Settings > Payments > PayPal
        • Customize the credentials
        • Click on the ‘Enable PayPal Reference Transaction’ link as in the image below.

      • Enable Reference transaction

Once you are done with all the above-listed steps recurring payment will be enabled for your PayPal account.

PayPal Checkout Support Subscription

Recurring payments are supported when WooCommerce Subscriptions are integrated with PayPal Checkout supports. Users can use Express Checkout when applying for Reference Transactions to enable this PayPal plugin with Checkout Subscription support.

PayPal Credit Checkout

This option is available primarily for U.S. users. It is one of the Checkout stack parts of PayPal. It allows the users to offer payment flexibility to their customers when shopping on the site. Merchants get full payment of the merchandise instantly but customers are allowed to pay for it over time.

Troubleshooting

Go to Advanced plugin settings to ‘Enable logging’ for Debug Log

You can find Logs by clicking on WooCommerce and then on System Status and lastly on Logs.

Conclusion

Paypal Checkout extension allows merchants to accept Credit Card, Debit Card, and PayPal. Plus, it supports payment subscription as well. The best part is that it can be set up without any hassle. Customers are benefited with Checkout directly from cart page and product page without getting redirected to third party website.