Call Us Toll Free - US & Canada : +1-(888) 602-0119

How to Setup and Configure PayPal for Digital Goods with WooCommerce?

PayPal is one of the most preferred payment gateways in the world that most businesses trust for eCommerce solutions. So, it doesn’t necessarily need any introduction. However, you might be curious about the ‘digital goods’ parts, thinking how it could help your business.

Of course, we will provide brief information about the same, the WooCommerce, and integration of PayPal plugin to your online. After that, we will dive into the installation and configuration part. Oh, and if you want PayPal for Digital goods Integration support, consider WPCustomify for that. For those willing to handle it on their own, we have written this guide with sufficient details.

Understanding WooCommerce and the Plugin

For those who have a little knowledge of WooCommerce, it is an eCommerce module for WordPress sites. So, assuming you are a small business, you can sell your products or services using the WooCommerce payment solutions in WordPress. However, WooCommerce is a free plugin which has limited functions. Nowadays, sellers do need a lot to convert a sale.

PayPal, on the other hand, has been providing gateway solutions for a lot of time. So, it makes sense that they work with WooCommerce. Now, there are more than one plugin that PayPal offers that you can use with WooCommerce. The one we will discuss today is the PayPal Digital Goods gateway. For those who are wondering why this specific plugin, this one exclusively used for selling Digital Products using WooCommerce platform.

How to find the PayPal API?

One of the first things that you should do is to create a PayPal account and then, make sure you update that to a Business account. Look for the option to make it a Business account. You can seek help from the PayPal support team. Once the Business account is ready, follow the steps below:

  • From the regular PayPal Dashboard, click on Tool, which should give you some more options. Then, click on “All Tools.”
  • Now, you should see all the tools and resources available. Now, there is a search bar on the left, where you need to type ‘API.’
  • You should see “API Credential” popping up in the middle of the screen. Click on ‘Open.’
  • After that, scroll down the page and find an option “Manage Credentials.” Click on that.
  • Now, it may ask you to verify your account once. Do that, and it will take you to a page, where you will find a button called “Agree and Submit.” Click on that.
  • Then you should see a page where you can find all the API key information. Click on ‘Show’ to acquire that piece of data.
  • We request you to keep it safe somewhere else as we need those later.

What are the prerequisites?

For the installation and configuration, we need the following prerequisites:

  • As we just mentioned, you need to create a Business PayPal account, and the API Credentials.
  • Check the PHP version whether the latest one is installed or not. If not, upgrade that.
  • Watch out for the theme compatibility with the WooCommerce module.

Installation and Configuration steps

Installation:

  1. First and foremost, PayPal Digital Goods gateway is a paid WooCommerce extension, which will cost you $79 per year. So, you need to buy the plugin first.
  2. Once you acquire the plugin, the next step is to download the .zip file and save it in your system.
  3. Then, head back to WP Dashboard. Find the option ‘Plugins’ and hover your mouse pointer over, and you should see an option, “Add New.”
  4. The page will route to the plugin’s library page. At the top, you should see “Upload Plugin.” Click on that.
  5. Then you should see the option to upload a file. What you need to do is to upload the .zip file that you have purchased and downloaded before.
  6. Then, click on “Install Now.” After a few seconds, you will get the option ‘Activate.’ Click on that to activate the plugin. You can then use it.

Configuration:

  1. From the WP Dashboard, go to WooCommerce Settings and click on ‘Payments.’ Then, you should see PayPal listed there.
  2. First, you need to type down PayPal’s registered email address, and if you scroll a bit further down, you can see all the API fields.
  3. From the saved API information that you have acquired before, fill out the respective fields. You need to type down the API Username, the Password, and the Signature key in the respective fields.
  4. Then you need to type down the Receiver email, as well.
  5. You can try the Sandbox mode for demo transactions, or if you are ready, go live and accept payment to your PayPal Digital Goods gateway.

The Conclusion

PayPal Digital Goods gateway is a standard plugin, and most digital goods sellers prefer to use this plugin for more conversions. It will definitely work wonders for your WooCommerce store too. Give it a try.

Which is the Best Subscription Payment Gateway for WordPress?

With a WooCommerce store in place, you must be sure that your store offers all of the features necessary and as expected by your customers. In other words, the store must offer a simple interface and an excellent buying experience.

While entrepreneurs do all that’s needed to enhance their store functionality, one aspect that often goes unnoticed is that of a subscription payment gateway. Regular customers come back to purchase the same item after a certain time. Offering them the ease to subscribe to the product improves the store experience.

What happens here is that once a product is subscribed, the same order automatically repeats after, say a month. Meaning that the customer need not manually place the order. The store will do the job of ensuring that the customer receives the product at the right time.

In case you have been planning to add a similar feature, this article will help you decide on the best subscription payment gateway plugin. Also, you can opt for WPCustomify support services to get the assistance and deployment help regarding the same.

Global Payments Gateway

Introduction

The first in our list is Global Payments for WooCommerce. It is one of the best payment gateway plugins enabling the store to accept credit card payments from the customers. The Global Payments Gateway is compatible with various options such as Diners Card, Visa, American Express, MasterCard, Switch, and Laser. All that a customer must do is enter their details and leave the rest to the gateway.

Down the Global Payment Gateway plugin here.

Information & Requirements

Before you set out to integrate the gateway within your WooCommerce store, you must have:

  • The Global Payments merchant account.
  • An SSL certificate to confirm that the user details are encrypted and secured.

Why Use Global Payments?

True that there are multiple payment gateways available over the web. What separates them is the features offered. The main offerings of the Global Payment Gateway include:

  • Fully integrated checkout experience.
  • Supports all major credit cards.
  • Flexibility to pick from authorize charges/ authorize and settle funds.
  • Save card details for future reference.
  • Supports 3D Security for transactions.

Full Support for Subscriptions

Another fascinating feature offered by the gateway is WooCommerce Subscriptions support.

  • Simplify Repeat Transactions

The gateway has a simple interface allowing businesses to opt for subscription-based services enabling users to automate their purchase.

  • Scalable Subscription Management

It allows customers to have their credentials saved in a secured environment allowing them to process payments as and when needed.

  • Fast Set-Up

Integration of the gateway is simple and doesn’t require one to be a coding expert.

  • API Integration

In addition to all of the above, the gateway also renders support for third-party API integration. Whether you want to create, edit or manage schedules through the backend system incorporating an API, the gateway supports all.

Global Payments HPP

Introduction

Global Payments is among the fastest and the largest online payment gateway across Europe. The WooCommerce Global Payments HPP plugin (also known as “Realex HPP”) enables the store customers to initiate payments using their debit cards, credit cards or even other payment options. The plugin has 3D Secure v2 facilitating a better and a secured environment.

Download the gateway here.

Information & Requirements

Before you integrate the gateway in your WooCommerce store, make sure you have:

  • A Global Payments merchant account
  • PHP version 5.6 or above
  • SSL Certificate

The Global Payments HPP Gateway provides support for Strong Customer Authentication (SCA), which is a must for all the transactions made in European Economic Area (EEA).

Why Used Global Payments HPP?

Features of the Global Payments HPP include:

  • Accepts all types of card: Visa®, Diners Club, MasterCard®, American Express®, and Discover®.
  • Supports more than 150 currency making shopping easier for people across the globe.
  • With 30+ language support, it is PCI level one compliant.
  • Equipped with tools for fraud management.
  • Enables refunds from the store.
  • Additional fees on virtual products.
  • Select from on-site payment or redirecting to the merchant site.
  • Ability to save details for faster checkout.
  • Support for WooCommerce Subscriptions and Pre-Orders.

Full Support for Subscriptions

In addition to the above, the gateway also renders support for WooCommerce Subscriptions. It also supports tokenization option facilitating a secured environment to store the card details of the user. Being compatible with the Subscriptions option, it allows you to edit the payment date, the subscription date, etc.

Merchant Warrior

Introduction

The Merchant Warrior Gateway acts as the credit card processor. With this, you can, by default, process both MasterCard and Visa. The Integration Gateway accepts payment in multiple currencies and is compatible with major cards such as Diners Club, American Express and JCB. It is based out of Australia and offers a vast range of payment solutions to online store merchants.

Download the extension here.

Information & Requirements

Prerequisites:

  • You must have a Merchant Warrior account. Visit their official website here.
  • Standard payment currency as AUD or NZD.
  • SSL certificate.

Full Support for Subscriptions

The Merchant Warrior gateway extends its support towards Refunds and WooCommerce Subscriptions. The entire job of storing and processing the recurring payments is handed over to the Merchant Warrior gateway and the merchants need not store any of the user data locally. Note that the information stored is encrypted and under no circumstances can one breach in the system.

In addition to the above, billing is also done by the Merchant Warrior enabling the merchants to make changes, if required, in the recurring payments. The plugin also has a dedicated Token Payment solution for merchants that prefer processing transactions by themselves.

Moneris

Introduction

WooCommerce Moneris is a simple and straightforward payment gateway allowing customers to quickly pay at the time of checkout via cards directly on the store. To ensure maximum security, the extension has Hosted Tokenization. Additionally, it is compatible with WooCommerce Subscriptions and Pre-Orders with payments made through credit cards.

Download the WooCommerce Moneris extension here.

Information & Requirements

  • Meant only for the merchants in Canada.
  • Mandatory SSL certification ensuring safety and privacy of user data.

Why Moneris?

Being a Canadian-only payment gateway, Moneris still has a lot to offer to its users. The main features include:

  • Accepts both US dollars and Canadian dollars.
  • Automated payments and refunds through the portal.
  • Get information directly from the WooCommerce dashboard.
  • Supports mobile-friendly checkout.
  • Save card information for future purchases.
  • Faster checkout options, save payment method and card details.
  • 10: Supports eFraud tools / address and card verification.
  • Accepts Major Credit Cards / Debit Cards – Visa®, MasterCard®, American Express®, Discover®, Diner’s Club, JCB

Full Support for Subscriptions

End to end support offered by the payment gateway for WooCommerce Subscriptions and Pre-orders. This helps associate recurring payments within the online store.

To successfully use the Moneris Gateway extension, one must have the following: Please note that in order to use these plugins with Moneris’ credit card gateway, you must:

  • A vault enabled and activated with your Moneris account.
  • Tokenization enabled. Visit credit card settings to do the same.
  • Deactivating the option that says: Require Card Verification. Visit the credit card settings to turn off the same.

NAB Direct Post Gateway

Introduction

Use NAB Transact as a gateway to process credit card information with the NAB Direct Post Gateway. Irrespective of the type of card you are using, the gateway accepts customer information and does all that’s important to authenticate and pass a transaction. The gateway encompasses features such as automating refunds, supporting subscriptions, allowing risk management, inducing 3D Security and pre-authorization, etc.

Recent updates made in the plugin have added additional support for integration methods as Direct Post and XML API.

Direct Post

This directs the customers to a different page on the site, one that takes the card details of the user to process it further.

XML API

The XML API method is one where the details are entered directly at the store page during checkout. Considered to be a better option, it requires you to have PCI-DSS compliance. Note the method doesn’t support UnionPay (UPOP) or 3D Secure.

Download the plugin here.

Information & Requirements

  • A merchant account active in NAB Transact.
  • An SSL certificate.
  • AUD: payment currency

Full Support for Subscriptions

  • Subscriptions: Total support is given to WooCommerce.
  • Refunds: Integrating the gateway, store owners can have a system where refunds are automatically generated as and when needed.
  • Risk Management: End to end support given to functionalities related to risk management.
  • Pre-authorization: Automated capturing of payments as and when a transaction is initiated.
  • Recurring transactions: Allow customers to subscribe and pay in a recurring manner.

Paysafe Gateway

Introduction

One of the safest payment processing gateway, Paysafe relieves the merchants from the need to have PCI compliance. Merchants can accept payments via all types of debit and credit cards. In addition to this, it also renders support to third-party payments methods. Along with WooCommerce, Paysafe provides an integrated payment solution that facilitates online transactions in a safe and secured manner.

Download the extension here.

Information & Requirements

  • WooCommerce version 3.0.0 or above.
  • PHP version 5.3 or above.
  • WooCommerceSubscriptions version 2.0 or above.

Why use Paysafe Gateway?

With multiple plugins in place, selecting one is surely difficult. Given below are some of the unique features of the extension that will help you decide better:

  • Provides support to Paysafe Checkout JS API and Paysafe Hosted Payments API
  • Accepts both debit card and credit card payments.
  • Option to save card details for future reference.
  • Compatible with WooCommerce Subscriptions and Pre-orders.

Full Support for Subscriptions and Pre-Orders

The Paysafe gateway as seen provides support to the WooCommerce Subscriptions. Whether you want to charge subscriptions or alter the dates or even cancel one, the gateway renders support for all. Take orders and automatically deduct payments as and when the product is back in stock processing pre-orders without any hassle.

NETbilling Payment Gateway

Introduction

Another extension in our list is the NETbilling Payment Gateway. This plugin is pretty easy to use offering support to all major credit cards. With this, customers can easily save their card details without having to worry about their privacy and safety. Like others, the NETbilling Gateway renders support to both Subscriptions and WooCommerce Pre-orders.

Download the extension here.

Information & Requirements

Preliminary requirements suggest that you must have:

  • WooCommerce version 3.0.0 or above.
  • PHP version 5.3 or more.
  • WooCommerce Subscriptions version 2.0 or more.

Why use NETbilling Payment Gateway?

The NETbilling Payment Gateway offers the following features:

  • Manual capturing of data once the customer has authorized the amount during the checkout process.
  • Allow customers to keep tabs on their payment methods. Visit the My Account Page and click on Payment Methods to do the same.
  • Enable tokenization so as to create a secured environment for storing card details and encrypting the payment process.

WooCommerce Subscriptions/Pre-Orders Suppor

The Paysafe gateway as seen provides support to the WooCommerce Subscriptions. Whether you want to charge subscriptions or alter the dates or even cancel one, the gateway renders support for all. Take orders and automatically deduct payments as and when the product is back in stock processing pre-orders without any hassle.

NETbilling Payment Gateway

Introduction

Another extension in our list is the NETbilling Payment Gateway. This plugin is pretty easy to use offering support to all major credit cards. With this, customers can easily save their card details without having to worry about their privacy and safety. Like others, the NETbilling Gateway renders support to both Subscriptions and WooCommerce Pre-orders.

Download the extension here.

Information & Requirements

Preliminary requirements suggest that you must have:

  • WooCommerce version 3.0.0 or above.
  • PHP version 5.3 or more.
  • WooCommerce Subscriptions version 2.0 or more.

Why use NETbilling Payment Gateway?

The NETbilling Payment Gateway offers the following features:

  • Manual capturing of data once the customer has authorized the amount during the checkout process.
  • Allow customers to keep tabs on their payment methods. Visit the My Account Page and click on Payment Methods to do the same.
  • Enable tokenization so as to create a secured environment for storing card details and encrypting the payment process.

WooCommerce Subscriptions/Pre-Orders Support

The NETbilling gateway renders total support to the needed features of WooCommerce Subscriptions as well as WooCommerce Pre-Orders. Not to mention that the gateway is compatible with all types of payments including credit cards and eChecks. Visit the recurring billing section to be sure that your account supports the feature.

Paypal Checkout

Introduction

WooCommerce PayPal Checkout is another option when it comes to accepting payments through smart portals. When you want to set payments via PayPal, leveraging it’s Smart Payment Buttons, PayPal Checkout is the best bet.

Download the extension here.

Information & Requirements

  • You must have a PayPal account to process the setup.
  • To use the WooCommerce Subscriptions, you must have activated PayPal Reference Transactions via Express Checkout for Subscriptions.

Why use PayPal Checkout?

Features offered by the plugin include:

  • Accepts all major credit and debit cards. The plugin also supports PayPal credit and Venmo for US buyers.
  • Customers without a PayPal account can also use the portal.
  • Direct integration on the checkout and the sale page.
  • Supports recurring payments through WooCommerce.
  • Supports nearly every currency.
  • Quick capture from the WooCommerce store.
  • One-click integration and setup.

PayPal Checkout support Subscription

As mentioned above, PayPal Checkout extends its support towards the option of recurring payments as needed when opting for WooCommerce Subscriptions. It is important that you apply for the same and activate it via the Express Checkout to allow PayPal plugin to seamlessly function with WooCommerce Subscriptions.

PayPal Standard (included with Subscriptions)

Introduction

PayPal Standard is another plugin that allows you to set up PayPal payments with the WooCommerce store. The PayPal Standard extension will redirect your store customers to the official website of PayPal enabling customers to pay via their account. Once the payment is done and the transaction is complete, customers are redirected to the WooCommerce site.

Information & Requirements

All you need to have is a PayPal business account to get started with the Integration.

Why use PayPal Checkout?

  • PayPal checkout is both free and safe.
  • Quick and simple onboarding.
  • One-click integration and installation.
  • Top-notch security protocols.

PayPal Standard Support Subscription

When it comes to Subscriptions, PayPal Standard does offer support. However, there are a few things that might not be compatible with the PayPal standard extension. From multiple subscriptions to billing data modifications, recurring modifications and currency limitations, you might find it hard to modify settings with PayPal standard.

Peach Payments

Introduction

Peach Payments extension for WooCommerce is another Payment Gateway that enables the merchants to make payments accepting all major cards. What’s best about the plugin is that this also supports bank transfers, e-wallets, mobile wallets, and mobile operator billing for seamless payment.

Download the gateway here.

Information & Requirements

  • You must have a merchant account inPeach Payments Merchant.
  • The site currency must be “South African Rand (R)”.

Why use Peach Payments?

  • Secure infrastructure to store card details.
  • Supports all types of payment methods.
  • Total support to WooCommerce Subscriptions.
  • PCI compliant.
  • 3DSecure ready

Countries Supported

  • South Africa
  • Kenya
  • Mauritius

WC Peach Payments Gateway support Subscription

Fully supports WooCommerce Subscriptions (separate purchase).

The above were the top 10 WooCommerce Subscriptions Payment Gateway. We also have a few others in the list.

PsiGate Payment Gateway

PsiGate is another secure payment system, one that accepts all of the credit cards. Customers can enter information directly from the checkout page of the WooCommerce store. With PsiGate payment gateway for WooCommerce plugin, you can not only process but also authorize sale transactions. The gateway supports currency in US and Canadian dollars.

With this, you can initiate real-time order processing and order updating, selecting the right Payment method. Note that the gateways don’t store any of the card information within their database.

RedSys Gateway

Redsys happens to be one of the widely used payment gateways in Spain (98%). The said Redsys Payment Gateway is compatible with SHA-1 and new SHA-256 in the version 3.0 and above. This enables store owners to integrate Redsys, Sermepa, Servired Gateway and Iupay with the WooCommerce store.

One thing to note here is that the RedSys Gateway extends support to the WPML plugin. The extension adds a Sequential Invoice Number along with a CSV exporter. This is primarily because it is a mandatory for the Spanish WooCommerce store owners to have a Sequential Invoice Number.

Sage Payments USA

Sage Payments USA Payment Gateway accepts major cards including debit and credit cards for processing online payment. It offers the entire suite of payment solutions important for businesses of all types. Irrespective of whether you are planning to accept donations in person or payments online, the Sage Payment Gateway supports all.

TrustCommerce Payment Gateway

TrustCommerce is a payment processing company that is based out of the USA. It provides an entire suite of payment solutions to WooCommerce companies across the globe. The plugin is equipped with all of the standard features and provides a seamless payment experience to the customers. The plugin is backed by a strong security protocol which ensures that the customer’s privacy is not compromised. The gateway supports all types of card payments including e-check and third-party payments.

Chase Paymentech

Lastly, we have the Chase Paymentech Payment Gateway extension. It is a premium rated WooCommerce extension with powerful options to accept online payments. With an intuitive interface and a user-friendly onboarding process, the Chase payment integration portal renders total support to WooCommerce Subscriptions and Pre-Orders.

Conclusion:

Having said all of the above, the decision lies in your court. Go through all of the payment gateways, compare their features and then select one that meets your purpose best.

EXTENSION SUBSCRIPTION SUSPENSION SUBSCRIPTION CANCELLATION SUBSCRIPTION REACTIVATION
Chase Paymentech
Global Payments Gateway
Global Payments HPP
Merchant Warrior
Moneris
NAB Direct Post Gateway
NETbilling
PayPal Checkout (reference transactions required)
PayPal Standard (included with Subscriptions)
Peach Payments
PsiGate
RedSys
SagePay Direct
Sage Payments USA
TrustCommerce

Advanced Features

EXTENSION MULTIPLE SUBSCRIPTIONS MODIFICATIONS PAYMENT METHOD CHANGES
RECURRING TOTAL PAYMENT DATE CUSTOMER ADMINISTRATOR
Chase Paymentech
Global Payments Gateway
Global Payments HPP
Merchant Warrior
Moneris
NAB Direct Post Gateway
NETbilling
PayPal Checkout (reference transactions required)
PayPal Standard (included with Subscriptions)
Peach Payments
PsiGate
RedSys
SagePay Direct
Sage Payments USA
TrustCommerce

Introduction to WooCommerce Subscriptions Payment Gateway – Every Detail That You Need to Know

Running a WooCommerce store can cause a lot of duress given the need to upgrade your site every now and then. It isn’t only about adding the right products or setting the right price. Instead, there is a bundle of things that you must take into consideration when operating an online store.

An important thing here is the need to serve your customers in a way they expect it. Given that there are thousands of other online stores, one wrong thing and you might lose a customer. Hence, it is necessary that your store offers all of the necessary features and services that a customer would want. You can even take WooCommerce Payment Gateway support services if you are not good at handling the technical part of your online store.

Not sure what are we implying?

Well, this article is about WooCommerce Subscription Payment Gateway. Customers who purchase essential items are often bogged down by the need to revisit the site and repeat the order. An alternative here is a concept called WooCommerce Subscriptions. What this does is, after you subscribe for a product, it will be delivered to you at the decided date and the money is automatically deducted from your account.

For example, suppose that you have software or say an app that requires users to pay monthly/yearly to access it. Instead of having the customer purchase the subscription every month, give them the option to subscribe and automate the renewal process. Sounds good, right?

But how will you create such a system? This is where the idea of WooCommerce Subscriptions Payment Gateway comes into play.

What is WooCommerce Subscriptions Payment Gateway?

Like any other payment gateway, the WooCommerce Subscriptions payment gateway is also a WooCommerce extension that is equipped with a unique feature facilitating recurring payments. The plugin or the gateway is premium software. With this, you can easily create as well as manage products that fall under the recurring purchase category.

Irrespective of whether you have a store with virtual offerings or one with physical products, or a combination of both, the WooCommerce Subscriptions Payment Gateway works flawlessly in all cases.

Track your residual revenues, segment products into different categories, section them based on whether they are available for weekly purchase or yearly renewal, etc. In addition to the above, the payment gateway gives you the flexibility to onboard fees, set the due date, and even provide free trials before purchase.

In simple terms, the subscription-based model enables you to keep tabs on your sales and capture more residual revenue.

Why Use WooCommerce Subscriptions?

Even though you have heard a lot, there are many more reasons to convince you that WooCommerce Subscriptions aren’t an option but a necessity for your store.

Advantages of using WooCommerce Subscriptions

  • Set up one or more billing schedules depending upon the product, the price, and the customer.
  • Facilitates recurring payments and compatible with nearly 25 other payment gateways.
  • Extended support for manual renewal payments via WooCommerce payment gateway. In addition to the above, it also sends automated notifications in the form of email invoices and receipts.
  • Offers automatic rebilling on failed subscription payments helping you to keep track of your revenue.
  • Empowers subscribers with the flexibility to track and change their plans. Whether they want to keep it the same or upgrade or downgrade it, the WooCommerce Subscriptions payment gateway supports all.
  • It has an inbuilt renewal notifications system. The automated emails allow both the customers and the store managers to get all of the details of subscription payments.
  • Generates reports and renders in-depth information enabling you to keep an eye on your overall revenue, along with the active subscriber’s list, and more.

WooCommerce Subscriptions Features

Wondering what are the features offered by the payment gateway?

Free Trials & Sign-Up Fees: With WooCommerce Subscriptions Payment Gateway, you can set up a 30-day or a one-week free trial option. You can also set a signup fee followed by the subscription fee to be charged on a particular date.


Variable Subscriptions:- Have one or more subscriptions giving your customers the ease to pick one from the list.

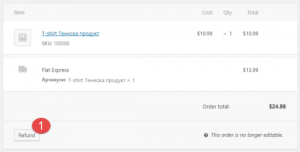
Subscription Management:- Visit WooCommerce > Edit to make changes on the Subscription. You can either cancel a Subscription or suspend it for a while or change the settings.

Subscriber Account Management:- Empower your customers with the ease to manage their subscriptions. They can too cancel an existing Subscription or change the delivery address or even the payment method for future references.

Multiple Subscriptions:- Have multiple subscriptions in the same transaction. This helps eliminate extra shipment fees, reducing overall expenses.

Subscription Coupons:- Offer your customers discounts or recurring coupons to lure them and convince them to make a purchase.

Customer Emails:- Set up the store operations in a way that automates the process of sending emails once the customers have subscribed for a particular product. Notifications can also be sent reminding customers of their dues.

Payment gateway which Support for Subscriptions?

WooCommerce Subscriptions is one plugin that is compatible with the standard payment gateways equipped with all of the features required to process recurring payments.

From Global Payments Gateway to Global Payments HPP, Merchant Warrior, Moneris, NAB Direct Post Gateway, Paysafe Gateway, NETbilling, Peach PaymentsPsiGate, RedSys, Sage Payments USA, TrustCommerce, and Chase Paymentech, each of these are compatible with the WooCommerce Subscriptions extension.

No matter which of these gateways you have installed within your WooCommerce store, you can simply add the WooCommerce Subscriptions extension and your store is all set to provide subscription features to your customers.

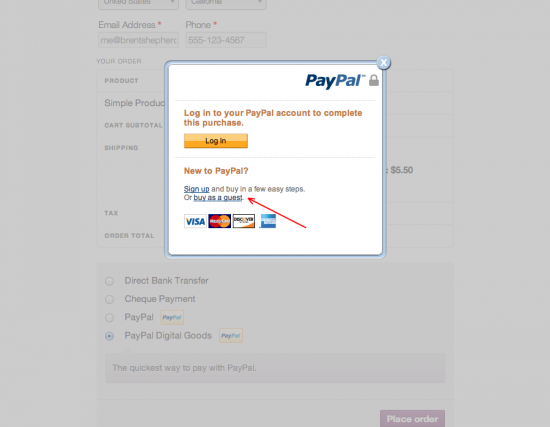
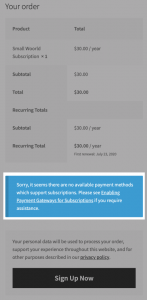
In case, you have a payment gateway other than the above and the one that doesn’t support Subscriptions, you will get s warning during the checkout process. Below, in the section where all the gateways are listed, a message would appear as a payment gateway not supported.

For Customers: They would receive the message and then be guided to the contact page to get in touch and have the issue fixed.

WooCommerce Subscriptions Payment Gateway

The above image shows the information being displayed on the checkout page.

For store administrators and managers: There would be a link that would direct them to a page that best describes the issues related to the setting up of payment gateways.

WooCommerce Subscriptions Payment Gateway

Add a Payment Gateway:-

Considering that there are no payment gateways installed that is compatible with the WooCommerce Subscriptions extension, you can check the guide on choosing the right payment option and get started with the process. You can also refer to the WooCommerce Subscriptions guide on payment methods indicating the various features offered by Subscriptions.

Enable a Payment Gateway:-

As mentioned above, there are tons of payment gateways that support and are compatible with the WooCommerce Subscriptions extension. Most of these have added support for automatic payments.

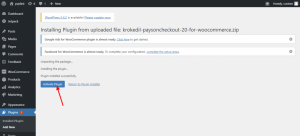
Once you have decided on which payment gateway to choose, you need to first install it within your WooCommerce store. Begin with logging in to the WooCommerce dashboard. Move down to the plugin section and here click on add new. In the search bar, enter the name of the payment gateway. Download the plugin and then install and activate the same.

Now that you have the payment gateway, we next need to enable the same to work along with the WooCommerce Subscriptions extension.

To enable the payment gateway, follow the steps given below:

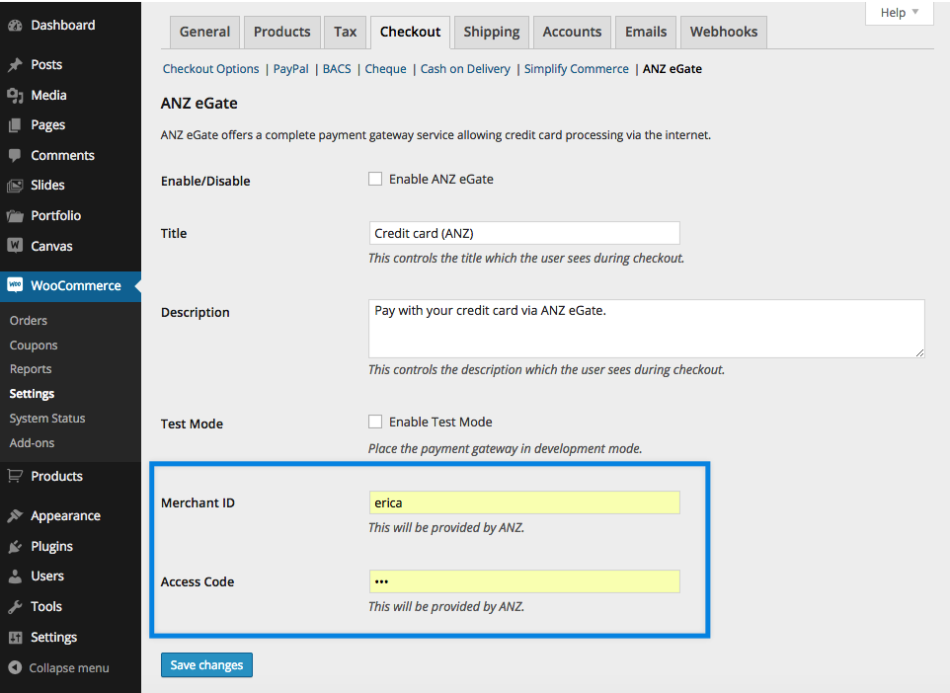
  • Move to WooCommerce, click on Settings and then tap on Payments.
  • The page has multiple fields. Scroll down to the part that says Enable a payment gateway. Here, toggle the button adjacent to the name of the downloaded payment gateway to activate it, telling your store that it can use the said gateway.

WooCommerce Subscriptions Payment Gateway

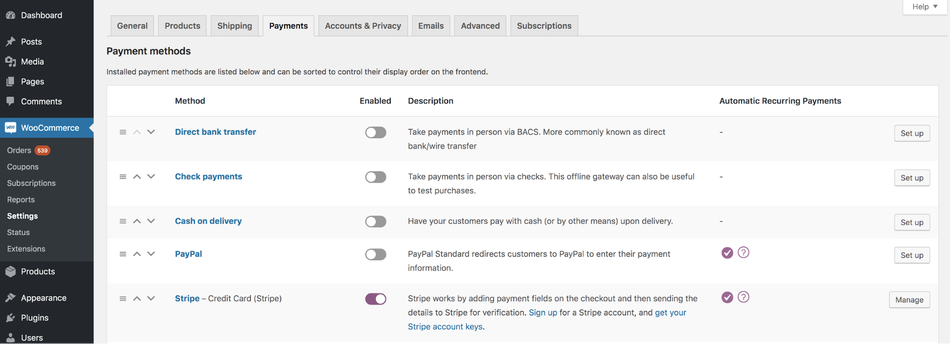
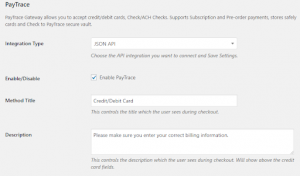
If you have the WooCommerce Subscriptions extension activated, you will find another column just adjacent to the description one on the payment method page. The column would have a header as Automatic Recurring Payments. If the column is checked, it implies that the given payment method supports recurring payments. Besides the tick, you will have a question mark. Click on it to find all of the subscription features offered by the payment gateway.

Third-Party Extensions with Automatic Payment Support:-

In addition to the payment gateways mentioned above, there are multiple third-party extensions that are compatible with the WooCommerce Subscriptions extension. However, the fact that they have been developed by third-party developers, you won’t find them in the WooCommerce store or the plugin list provided on the WooCommerce plugin page. In order to install or integrate these third-party plugins within your WooCommerce store, you have to connect to their immediate authors or the official website to download them and integrate them into your WooCommerce store.

The commonly used third-party extensions with the WooCommerce Subscription extensions are:

  • Fat Zebra
  • Inspire Commerce
  • Pay like
  • Quick Pay
  • Xendit

What type of subscriptions can I sell with WooCommerce Subscriptions?

Having said the above, one thing that might confuse you is what type of subscriptions you can sell using the WooCommerce Subscriptions extension? Or say, you have your store ready, the payment gateway is working and the subscription extension is all set, so what’s next?

What type of subscriptions does the extension support and which of these would help you level up your store operations?

To answer the first question, WooCommerce Subscriptions are designed in a way that you can use to sell any or every type of product or any service. For example, consider customers that purchase food items. It is known that they would need these products regularly. It could be tea, coffee, or any kind of edible food. The main idea being physical products that are shipped directly to the users can have a subscription option.

In addition to that, you can also have virtual products, say a video subscription or software that needs to be paid for gaining access, WooCommerce Subscriptions extension supports all of these options as a subscription. Note that you can also set up virtual subscriptions as and when needed to serve your customers the best.

How the buyer’s information and Payment details are collected and used by/through WooCommerce?

WooCommerce doesn’t have a flexible payment system and hence, the need for a payment gateway. It can also be said that these payment gateways are largely encrypted and all types of transactions done via them are totally secured. Now all of this sounds good but how does the two interoperate, exchanging data and ensuring that nothing goes wrong midway?

That’s what the beauty of WooCommerce is. It allows you to set up desirable payment gateways. The site, at first, collects all of the customer information, which is then shared with the payment gateway, one that you have enabled within the WooCommerce site.

For instance, consider that you are using a manual payment gateway, say BACS. Once the customer proceeds to the checkout page, all of the information is gathered and then sent to the payment gateway so that they can process the payment.

Few payment gateways support automatic payment. In simple terms, an automatic payment gateway is one application that will gather the information from the customer, and the same is sent to the third-party payment processing service. It could be a credit card processor or any payment portal such as PayPal. The information is authenticated and once the payment is confirmed, the user is directed back to the WooCommerce store with a message stating order complete.

It is seen that a few payment gateways have a unique feature where they are bundled with the WooCommerce store. In case you are looking for payment gateway plugins, look no further as we have an array of premium gateway plugins.

To sum up, having a payment gateway enables the third-party payment portal to:

Step 1: Authenticate and validate all of the billing information of the customer.
Step 2: Check the customer account to confirm that there’s a sufficient balance to process the payment.
Step 3: Deduct payment from the customer’s account and add it to the store account.
Step 4: Once the payment has been complete, a confirmation is sent back to the WooCommerce site suggesting that the payment has been successful.

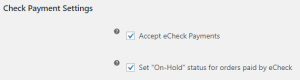
An important thing to note here is that online payments aren’t the only mode of payment. A few payment gateways provided extended support for methods such as C.O.D. and Cheque. As and when needed, the payments can be made offline either in cash or via a cheque.

Does my WooCommerce shop keep credit card data of my store users?

Security is of paramount importance. Entering private details on the website, customers often worry about their privacy and wonder if the website would retain the credit card information.

To answer that, there’s nothing to worry about as under no circumstances will the store or the payment gateway ever store the card details or the security code. Enough measures are undertaken and all of the data is directly sent to the processor.

However, entering the credit card information every time a purchase is made, seems to be troublesome. To deal with that, there are a few integrated payment gateway plug-ins which when embedded allow customers to store their card details without harming their privacy. This is done using a secure method named tokenization. With this, users can easily opt for recurring paymentspre-orders, or simply for their convenience, saving the pain of remembering the details for their future purchases.

e-Check tokens have the final four digits of the e-Check numbers. On the other hand, the credit card tokens show the four digits of the corresponding card, along with the expiry details, the type, and the brand of the card. This is done to ensure that the customer can verify their details before making the payment.

How to choose a payment gateway?

The next thing to talk about is how can you select the right payment gateway? Given that there are tons of gateways available, here’s a quick checklist to pick the one that suits your purpose best.

  • Cost
  • Location
  • Security

Payment method:

    • Redirect: One way of processing payments is where the customers are forwarded to the Payment Gateway and once the process is complete, they are redirected to the WooCommerce site.
    • Direct: A second way here is when the customer pays on the WooCommerce site. it is important that the site has an SSL certificate as part of PCI Compliance.

Get more information here.

Cost: Cost is an important thing to consider when selecting the payment gateway. Note that the cost would include:

  • Amount to be paid to buy the payment gateway, given that it is not free
  • Any Signup fees as charged by the company of the payment gateway.
  • Transaction fees
  • Any yearly, or monthly subscription fees

Location

The next thing is the currency and the shop location. There are a few companies that serve stores located in specific nations. Also, a few provide support to only US dollars or Euros. Before deciding on the payment gateway, you must be sure that the payment gateway supports the required currency and is functional in the said nation.

Security

Finally, security is something that you need to keep tabs on when selecting a payment gateway. The fact that customers share all of their credentials, make sure that the chosen payment gateway has an SSL certificate.

An SSL certificate encrypts all of the data shared between the customers and the website. More info is available here – SSL FAQ.

In case you wish to know more about how to choose a payment gateway, please visit this link.

Conclusion

Now that you are aware of all the aspects of WooCommerce Subscriptions and the payment gateway, move ahead to pick on and enhance your store functionality to increase sales. For WooCommerce support services related to payment gateways, you can also contact WPCustomify.

How to Setup Klarna to WooCommerce?

Klarna is one of the most trending online payment gateways, based in the United States. The main USP of the company is its “Buy Now – Pay Later” option. As a payment gateway, the company is getting a lot of hype. The fact that they are getting so many international clients at such a short span is a testament to their success. Meanwhile, the article is not about what Klarna is offering.

Today, we will discuss how to integrate Klarna payment solution to the WooCommerce platform, which is a part of a WordPress website. We will discuss WooCommerce briefly, but this article is primarily about a plugin called Klarna Checkout (ask for support services using this link). With this WooCommerce supported plugin, you can integrate the Klarna payment solution along with all its features in a WordPress site.

WooCommerce and the Klarna Plugin – A Quick Intro

WooCommerce is the most popular eCommerce module that you can find for a WordPress site. With the help of this open-source plugin, you can integrate a payment solution for your business. So, you can sell your products or services in a WordPress site using WooCommerce.

Now, with the passing days, selling products has become more robust. That is why people look for more features inside WooCommerce. The 3rd-Party companies then introduced their products as they wish to inject their business into the WordPress platform. Klarna also followed this trend and built two different plugins, which you can use with the WooCommerce platform. The names of the plugin are Klarna Checkout and Klarna Payments. We will learn more about the plugins now.

Understanding Klarna Checkout

Klarna Checkout essentially replaces the current WooCommerce layout and functionalities and gives a modern look alongside additional payment checkout options. You can use the “Buy Now, Pay Later” option as well as the “Pay later in Instalment” option. Of course, you can set up the direct payment option too. Overall, when you need some extra features while you want to sell your product or service, we recommend you to use Klarna Checkout.

Understanding Klarna Payments

Klarna Payments is, as you can say, a conventional payment gateway that you can use with WooCommerce. You should know that this plugin doesn’t change the layout, neither it adds any additional features at the time of checkout. If you are looking for a simple payment gateway solution that accepts most modes of payments, then Klarna Payments is ideal for you. You can also add PayPal working together with the plugin.

Some significant reasons to integrate Klarna into WooCommerce:

There are several significant reasons to use Klarna instead of conventional WooCommerce modules. Some of the notable features are as follows:

  • Both the plugins add robust payment features which you will not get in the regular WooCommerce module. That would apparently boost sales by 15% to 20%.
  • Klarna is a user-friendly payment solution that approaches customers with a more interactive manner. So, the chance of conversion is getting high every time you use Klarna.
  • Of course, the payment gateway offers the Buy Now, Pay Later feature which has its own appeal to a particular set of customers.
  • The platform offers a wide range of payment modes which a customer can use to make a payment. Nowadays, everybody wants these flexibilities as there are loads of promotional offers and deals that people love to implement while they make a payment.
  • Klarna is a secured platform that comes with features like Post-purchase support. So, it gives the customers an extra layer of safety while they make any payment; something they will not get if you choose to use WooCommerce’s default modules.
  • It does amazing order management – you can read more about the same on their official website here.

What are the charges involved?

At the time of writing this article, the costs involved in transactions through Klarna checkout for your end-users (that you must know about) are:

  • For an onsite transaction, they charge £0.20 along with 2.49% of the transaction.
  • In case it is an offsite payment, the fee is £0.20 plus 2.99% of the transaction.
  • Apart from that, there is a monthly fee involved – £30.00.

What are the prerequisites in using Klarna Checkout?

Before we go deep into procedures, it would be best to know what we need before the installation and configuration of Klarna Checkout:

  • The first thing that you need is an account with Klarna. For that, visit the official and create one.
  • It would be best if you update WooCommerce to the latest version available.
  • We advise an SSL certificate attached with the domain.
  • We also recommend upgrading the PHP version to the latest one available.

Klarna Checkout Installation and Configuration

  • From the WP Dashboard, move the mouse pointer over Plugins, and click on “Add New.

  • On the search bar, type “Klarna Checkout,” and you should see it. Then you need to click on install. After a few moments, you will see Activate, which you need to click. We hope you did that right which means the plugin is installed and activated.
  • After that, from the WP Dashboard menu, hover the mouse pointer on to WooCommerce now, and you should see Settings. Click on that. Once you see further options, click on “Payments,” which should give you all the payment gateway options.
  • Find “Klarna Checkout,” and enable the feature using the toggle switch.
  • Then, on the right-hand side, click on ‘Setup.’
  • You need to provide some basic information – a Title, a payment description, order confirmation email address, shipping address if any, product URLs, customers types, and of course, the merchant credentials. Note that you will get these data from Klarna. You also need to put down the API keys, which you will also acquire from Klarna.

  • Then, you should make a test transaction to know if everything is working fine or not. After that, you can go live and accept payments.

Klarna Payments Installation and Configuration

The prerequisites to install and configure Klarna Payments are the same as the other plugin. So, without repeating the same thing, let us go straight into the installation process:

  • The first step is to find the correct plugin and install it. For that go to the “Add New” section of the Plugin option. In the search bar, this time type “Klarna Payments,” and you should see the plugin is flashing first. Please make sure you are installing the right one as there two plugins with almost the same name.
  • Install and activate the plugin accordingly.
  • From the WP Dashboard menu, go to the Settings section of WooCommerce. Click on ‘Payments,’ which should route you to the page where you can see all the gateways listed. Find Klarna Payments, and click on it enable toggle switch to avail the service.
  • Then, click on ‘Setup,’ which will again route you to the page where you need to put all the data to make the payment gateway work.
  • The information includes Title, Description, Test mode options, Product URLs if any, Production Username & Password, and a few more. You need to provide all this information correctly. Of course, you will get all the details from Klarna’s original account dashboard. If not, then we suggest you contact the support team.
  • The next step is to test the payment gateway with test transactions. If everything is done correctly, you can receive payments.

The Conclusion

It can take up to 3 business days from the day the product gets shipped to receiving the amount to your bank account with this payment gateway. To conclude, Klarna is an incredible payment gateway with an approach to target modern-day customers, and both the WooCommerce plugins provide every bit of support to attain that goal.

How to Integration Bambora Payment Gateway in WooCommerce?

Bambora is a next-level eCommerce payment solution that has gained a lot of fame recently. Prior to its In-store and Enterprise solutions, this payment gateway has tons of robust features when it comes to accepting eCommerce payments. The integration process is simple, and the pricing is transparent. The clean design also contributes to higher conversions.

Even though you can use the payment gateway in several web-platforms, we will only discuss the WordPress platform today. More precisely, WooCommerce. Now, there are several segments we need to discuss here – what is the name of the plugin that will integrate Bambora payment solution to WordPress sites? How to set up this platform with WooCommerce? We will discuss everything in this article today, or you can hire Bambora configuration support experts for its quick deployment.

WooCommerce and the Bambora Plugin

If you run a business and have a website built in WordPress, you can add the eCommerce functionalities in a matter of minutes. You will need a plugin named WooCommerce for that, which simply adds all the features to let you sell your products or service online. It is a WordPress plugin that you can use for free. However, it doesn’t come with the modern-day features to convert more sales.

So, that gives other 3rd-party companies to build add-ons and extensions, which can integrate with the core WooCommerce platform. Now, as we have mentioned about the Bambora payment gateway; they too created a dedicated plugin which you can integrate with the WooCommerce plugin. Its name is Bambora Online Checkout. So, with the help of this plugin, you can accept payments from customers using the Bambora payment gateway integrated into the WordPress site.

How to acquire the access keys?

One of the prerequisites to make Bambora Online Checkout work with WooCommerce module is to find some access keys. These keys are pivotal to make it functional so that you can receive payments. So, here are the steps to get those keys:

  • The first is to open an account with Bambora. Of course, if you already own an account, you simply need to log in instead.
  • Once you are in the Bambora Dashboard, at the top right corner, click on the account dropdown and click on ‘Settings.’
  • Now, on your screen, you should see an option on the left ‘API.’ Click on that.
  • After that, you should see a button named “Generate New.” Click on that.
  • Then, type a desired API key name, and click on “Copy info.”
  • We suggest you save this information to a doc file to use it later. You can paste the API information that you have copied earlier.

Install and Configure Bambora

Now once you have the access keys, keep it safe with you for future use. First, you need to install the plugin. There is an important thing that you need to check before you go on to the installation procedure. Make sure the PHP version is upgraded to the latest one. Now, let us carry on with the steps:

  • It starts with finding the right plugin for installation. So, go to the “Add New” section of Plugins. On the search bar, type in ‘Bambora.”
  • In a few moments, you should see a plugin named “Bambora Online Checkout” has popped-up.
  • On its right-hand side, you will see “Install Now.” Click on that, and then click on ‘Activate.’
  • Once you activate the plugin, go to the WooCommerce Settings section. You should get an option ‘Checkout’ there. Click on that, and you should find a particular “Bambora Online Checkout” option over there. Click on that.
  • Now, the next step is to copy and paste all the access keys that you have acquired from the main Bambora dashboard before.

  • You need to also check the box named, “Activate Module.” After that, Save the changes.
  • We recommend testing a payment before you start accepting payments.

You can also download the plugin .zip file and install the plugin separately. Rest of the procedure remains the same as before. One other thing that you should remember is to upgrade the version of WooCommerce before you install the plugin.

How to add a Subscription Payment module using Bambora Online Checkout?

Sometimes the sellers charge a monthly subscription typically for a service. WooCommerce has an ideal extension by which you can add this feature in a WordPress site. On the other hand, Bambora Online Checkout is an adept platform too where you can seamlessly integrate the subscription feature.

For that, the steps are pretty straight forward. You must install Bambora Online Checkout first, just as we mentioned before. After that, you need to get the WooCommerce Subscription Extension. Please note that this WooCommerce extension requires an annual subscription amount of $199 every year. Once you purchase the license, install the extension.

Now once WooCommerce Subscription and Bambora Online Check is ready as well, go to the Subscription module, and create plans. You will get all the gateway’s features. So, you can tweak it to what you need. Now, you are ready to accept subscription-based payments using the Bambora Online Checkout plugin.

Conclusion

Bambora is one of the most trending payment gateways right now, which has global reach now. So, it is always a worthy choice to use it in your WordPress site. The options the payment gateway is offering backed by its encrypted security level make it a trustworthy option while you accept payments online. So, you can now receive payments from most countries in the world without a hint of worry.

How to Setup and Configure ANZ eGate Payment Gateway for WooCommerce?

ANZ eGate is a payment gateway solution, based in Australia. The company has a global appeal today and has a client base scattered all around the world. Primarily, the company offers a wide range of financial services for both personal and business entities. Of course, the payment gateway is a feature which is relatively new compared to its banking services.

Meanwhile, we are here to explore one particular segment today, which is the ANZ eGate WooCommerce extension plugin. However, there are several elements that we will cover first like what is WooCommerce? Why would ANZ like to work with WooCommerce? How to configure the plugin? So, in this article, we will reveal all this information.

Understanding WooCommerce and ANZ eGate

WooCommerce is the default payment solution that you can use while you own a WordPress site. Not that you have to use WooCommerce, but the fact that it is primarily free to use, most WordPress users build the eCommerce functions putting this plugin in the centre. Now, the significant drawback of using only WooCommerce is that the plugin is backdated.

Sellers today want higher conversion rates, which the default modules’ feature would never suffice. That is why WooCommerce tied up with various 3rd-party companies and created paid extensions to fulfil modern-day requirements. That is how they develop the ANZ eGate plugin extension. Using this app, sellers can receive the payment on the ANZ eGate payment gateway. We will discuss how to set it up.

How to find the access keys?

Before you set up the ANZ eGate payment gateway, you need to find the access key from the merchant account. You need that beforehand so that you can seamlessly configure the plugin. So, here are the steps:

  • The first step is to visit the official ANZ site and create a Merchant account. We suggest you check out the details of what you are signing up for.
  • Once the account is ready, go to the settings section, where you should see ‘API’ or “Access Keys.” Click on that.
  • Then, it should ask you to generate a new key. Once you get the new key, copy and save it to a document somewhere.
  • If you face any problem finding or generating the key, contact ANZ support. They will assist with that.

Prerequisites of ANZ eGate

Before we elaborate the steps to install the plugin, there are some elements that you need to take care of first:

  • The first thing is to create the Merchant account, which you already did. Keep the access key safe with you for now.
  • Check out the WordPress theme you are using, whether it is compatible with WooCommerce or not. Nowadays, most WP themes do support
  • WooCommerce, but you still should verify that.
  • One other thing that you should confirm is the PHP version. Please ensure you are using the latest one. If not, we suggest you upgrade that as well.

Installing and Configuring ANZ eGate

Now once everything is set, let us begin the installation process. Here are the steps:

  • As ANZ eGate is a paid WooCommerce extension, you need to subscribe for the service first. To do that, you need to pay $79.00, which is an annual subscription amount.
  • Once you own the extension, you must download the setup .zip file in your computer.
  • Now, go back to the WP Dashboard. Click ‘Plugins,’ and then at the top, you will get the “Add New” button. Click on that.
  • Again, at the top, you should see a button, “Upload Plugin.” Click on that too. Over there, you need to browse and upload the .zip file which you have downloaded earlier. Click ‘Install.’
  • In a few moments, you should see an option called ‘Activate.’ Click on that to activate the ANZ eGate plugin in WordPress.

Assuming you did everything correctly, it is time to configure the plugin and start accepting payments online. So, here are the steps:

  • Hover your mouse pointer over WooCommerce. You should see ‘Settings.’ Click on that.
  • Now, on the current menu, you should see, ‘Checkout’ on there. Click on that.
  • Now, you should see all the listed payment gateways, and of course, ANZ eGate should be there, typically the last option. Click on that.
  • Then, there are some steps that you need to follow. We mean you should provide some inputs to get it done. The first thing is a checkbox to enable the plugin, which, of course, you must do. Then you need to type down a suitable Title and a one-line Description on the respective fields. Check the test mode box to give a test-drive of the payment gateway before you go live. Finally, you need to input the last two options – the Merchant ID, which is the ANZ username that you have used to create your account, and the Access Code, which you have generated before. Put down all the information in the right fields and click on Save Changes.

  • Now, if you have selected the test mode, you need to uncheck it, then save it, and accept payments.

How to set up Auto-Refund?

ANZ eGate does support automated refunds at just one click. For that:

  • Go to Orders from WooCommerce option.
  • Then choose the payment you wish to refund.
  • Now, on the bottom-right, you should see the Refund option.
  • Then choose the amount, and click on “Refund with ANZ eGate.” That’s it the refund will get processed.

The Conclusion

ANZ eGate is an excellent payment gateway, and WooCommerce is a useful WordPress plugin. So, if you are wondering whether to spend $79 every year or not, the price is really worth it. However, there are times when new WooCommerce sellers find it difficult to perform the configuration even after the guidance. If you are worried or troubled too, don’t worry. You can always take WooCommerce support services to perform this deployment for your online shop.

What is Pin Payments Gateway & How to set up in WooCommerce?

The Pin Payments Gateway plugin allows the users to reap the benefit of credit card processors through Pin Payments even if they don’t have a bank account (registered in the name of their business).

Using this safe and protected payment gateway form empowers the merchants to process the amount in multiple currencies (Pin.js supported). Plus, card re-use and subscriptions will be also supported by this extension. Once the customer pays for the online purchase, Pin Payments records the details for future use. Pin Payment Gateway can be purchased using this link.

Also, you can take WooCommerce Payment Gateway integration services from WPCustomify regarding Pin or other similar gateway.

WooCommerce Pin Payments offers the following benefits –

  • With Pin Payments merchants can enable reuse of card features. This means if customers pay the amount online their card details are recorded in Pin Payments (as Customer Token) for future transactions.
  • If the customer returns to your website and makes a purchase then they can use Customer Token at Checkout. This means they aren’t required to fill in all the details again.
  • Pin Payments offers the added advantage of Multi-Currency.
  • Merchants need to have a business account necessarily for receiving their sale proceeds as the extension works according to the bank account of the users.
  • Your customers need not leave the site for when paying with the cards.
  • Sale proceeds are credited to the merchant’s bank account automatically.
  • Pin Payment Gateway works with Xero.

Difference between Payment Gateways and Pin Payments Gateway

Online payment gateway is a technology that allows consumers to make their payments online using any payment card. It is easier for both customers and small businesses to make and receive the amount. However, in case of payment gateway businesses need to manage multiple accounts with different service providers.

On the other hand, Pin Payments Gateway serves as a single account combining both online business owner’s account and payment gateway. It can be easily set up and maintained as it’s an ideal solution for accepting customer’s payment online.

What are the Requirements for Pin Payment Gateway Enabling for WooCommerce?

  • Pin Payments account
  • Pin Payments supported online store
  • A valid SSL certificate

Steps to Pin Payments Gateway Installation

  1. Get started with downloading the WooCommerce account’s .zip file.
  2. Now go to WordPress Dashboard > Plugins > Add New > Choose File. You can now Upload Plugin using the downloaded file.
  3. Next, proceed to extension installation and activation.
  4. Update settings in Pin Payment Gateway for WooCommerce.

Setting up and Configuring Pin Payments Gateway

  • Sign in to Pin Payments admin board and select ‘Account’.
  • Find the API Keys of your account (both Secret and Publishable). These keys will be used for calls (server based) and Pin.js.

Note – After completing the process of account activation users get live and test API keys. In case you don’t have the necessary details repeat the process using activated API keys.

  • Now sign in to your WordPress account.
    Select WooCommerce > Settings (located towards the left side of the page) > Payment Gateways.
  • Select “Pin Payments” from the option list.
  • Account holders may find “Pin Payments” link towards the page’s top corner. Select the link for plugin configuration. Plus, you’ll find the following option list which can be customized according to your requirements –
    1. Select “Enable this payment method” for activating this feature on your WooCommerce.
    2. “Title” sandbox – where you can fill in the payment option title that you want to be seen by your website users on the checkout page. Merchants may choose “Credit card”, “Pin Payments” or anything similar.
    3. “Enable Test mode” checkbox – On activating this feature you may test multiple transactions through the pin payment gateway.
    4. Sandbox for entering “Secret API Key” and “Publishable API Key”.
  • Select “Save changes” to complete the process.

Conclusion

WordPress account features two different keys – “Secret API Key” and “Publishable API Key”. The former is used for API settings. It is important to keep Secret API key details confidential as it allows users to set refunds and charges. On the other hand, a publishable key is used for creating cards. This key is used for creating payment forms.

Pin Payment Gateway is indeed one of the best options receiving payments. Advanced features like seamless integration, fast reconciliation, detailed reporting, etc. makes it one of a kind option for processing the payments.

How to set up a Payson Payment Gateway in WooCommerce?

Payson is a popular plugin that enhances the features of a merchant’s WooCommerce site, allowing them to make payments using this payment gateway. The platform not only integrates with MasterCard and Visa, but also with Swedish banks including Handelsbanken, Swedbank, Nordea and SEB.

Read this article ahead in case you want to set up this gateway for your online store. If you want to get support services for Payson configuration in your WooCommerce shop, take our services.

Which plugin is used for Payson Payment Gateway?

You may download the plugin using this link.

Steps to Payson Gateway Plug-In Installation

Step 1 – Sign in to your WooCommerce Payson account. Select Plug-in > Add New

Step 2 – Select “Upload Plugin” button.

Step 3 – Click on “Choose File” and then on “Browse” to upload the file.

Step 4 – After selecting the file, click on “OK” > “Install Now”.

Step 5 – Click on “Activate plug-in”.

Steps to Payson Gateway Plug-In Configuration

Step 1 – Select WooCommerce > Settings

Step 2 – Click on the “Payments” button and then enable “Payson” from the given list. Next, select “Manage” for plug-in configuration.

Step 3 – Configure the different options listed on the page including “Title”, “Description” “Payson email address”, “Agent ID”, “API Key”, Order Management, “Debug Log” among others.

Step 4 – Click on “Save Changes”

How to Take Payments in Payson?

The plug-in features two payment options –

Payson Direct

Payson Direct Payments allows merchants to take payments through direct transfer online (via an associated bank) and credit card. It also integrates with Payson Guarantee. Purchasers have the option of inspecting/approving/denying the product before making the final payment.

Payson Invoice

In this method the buyers receive the item and then give the payment through invoice.

Installation Process

  • Purchase the plug- in from WooCommerce.com and then download the zip file.
  • Sign in to the WordPress dashboard.
  • Select Plug-ins > Add New > Upload > Browse for selecting the downloaded zip file.
  • Click on OK > Install Now > Activate plug-in

Payson Direct Configuration

  • For Payson Direct plug-in configuration select WooCommerce > Settings > Payment Gateways. Select “Payson Direct” option from the given list.
  • Alternatively, you’ll find the “Payson Direct” link on top of the Settings page. Select this link for configuring Payson Direct plug-in.
  • Configure the options according to your needs –
  1. Select “Enable this payment method” for activating this Payson Direct feature on your WooCommerce.
  2. “Title” option – where you can fill title in the payment option which you want to be seen by your website users on the checkout page.
  3. “Description” option – controls the message that appears under the payment fields on the checkout page.
  4. “Payson email address” – Add the email ID used for Payson account registration.
  5. “Agent ID”– Sourced from your account. For this you need to sign in to your Payson account and then select My account > Integration (for retrieving the info).
  6. “MD5” – Sourced from your account. For this you need to sign in to your Payson account and then select My account > Integration (for retrieving the info).
  7. “Payson Guarantee”
  8. “Language” – Select the language for your Payson Direct account page. The page will be displayed before the customers in the same language.
  9. “Debug” – Check or uncheck this option. Selecting this option means the customer info and card details will be stored in a Payson account.
  10. Finally, click on “Save changes”.

Payson Invoice Configuration – How does Payson Invoice works?

    • Go to Woo Commerce > Settings > Payment Gateways option.
    • Find the “Payson Invoice” option – it is on the top corner of the settings page. It would be in the form of a link as well. Select this option for plug-in configuration.
    • Customize the options featured on the page including the ones listed below –
        1. Tick the checkbox to enable Payson Invoice option on your WooCommerce.
        2. “Title” option – where you can fill in the payment option title that you want to be seen by your website users on the checkout page.
        3. “Description” option – controls the message that appears under the payment fields on the checkout page.
        4. “Payson email address” – Add the email ID used for Payson account registration.
        5. “Agent ID”– As retrieved from your account. For this you need to sign in to your Payson account and then select My account > Integration (for retrieving the info).
        6. “MD5” – As retrieved from your account. For this you need to sign in to your Payson account and then select My account > Integration (for retrieving the info).
        7. “Language” – Select the language for your Payson Direct account page. The page will be displayed before the customers in the same language.
        8. “Invoice fee” – Add Invoice fee for the product in the given sandbox.
        9. “Debug” – Check or uncheck this option. Selecting this option means the customer info and card details will be stored in your account.
        10. Select “Save changes”.

      Conclusion

      Payson Payment Gateway is one of the best options for receiving the payments given by the buyers for their purchases on the site. It comes with high-end features such as receiving payment via cards, invoice, and online transfer.

How to Set Up eWAY Payment Gateway in WooCommerce?

The WooCommerce eWAY extension is an ideal option for the merchants to accept card payments from their store without. It eliminates the need to redirect the customers to the partner sites for making the payment. The payment gateway easily integrates with Refunds API and Subscriptions for WooCommerce. Additionally, merchants can also receive token payments through this extension.

The WooCommerce eWAY payment gateway uses version 3.1 API of eWAY which is not only PCI compliant but also offers the benefit of 3D security. It processes the payments much faster and allows purchasers to save their card details for future reference.

Buyers with billing addresses in Singapore, Australia, Macau, and Hong Kong can reap the benefits of eWAY. So, your WooCommerce store must have it configured. Want WooCommerce support services to set up? Use this link. Otherwise, learn How to set up an eWAY payment gateway in WooCommerce by reading ahead.

Requirements

  1. A WooCommerce version 3.5.0 website
  2. A verified SSL certificate
  3. eWAY account
  4. The currency in the account should be MYR, AUD, SGD, NZD, or HKD (corresponding to the nation an individual signs up for) so that you can easily receive the payment.

How eWAY Payment Gateway is a better option?

  • Quick setup – eWAY can be set up in a single day (for the merchant accounts that are approved).
  • Matchless data security – With this payment gateway in use the data of customers’ is completely safe as eWAY is PCI-DSS compliant.
  • Customer support – The customer representatives of the platform are available 24/7 to handle relevant issues.
  • No chance of fraudulent activities – eWAY has high-end fraud protection capabilities. You need not to worry about any kind of theft.

eWAY Payment Gateway Features

  • It is capable of hosting flash sales instantaneously.
  • Helps in generating discount coupons so that customers can get the best deals.
  • Allows customers to publish product reviews on site.
  • Allows Cross-Selling and Up-Selling of the products.

Which plugin is used for the eWAY Payment Gateway?

You may download using this link – https://woocommerce.com/products/eway/ .

Setting up and Configuration of eWAY Gateway

eWAY Plugin Installation

  • Sign in to your WordPress account.

  • Select WordPress Admin > Plugins > Add New and then click on “Upload Plugin” and then “Choose File” buttons. Use the downloaded file for uploading on the site.
  • Now click on “Install Now” and “Activate”.

Setting up and configuration process

  • Select WooCommerce > Settings > Payments > eWay
  • Disable/Enable the eWAY plugin
  • Select “Manage”

Setting up eWAY on the website

  • Click on WooCommerce > Settings > Payments
  • Select eWAY.
  • Click on “Set Up/Manage” and you’ll be redirected to the settings page.

Configure the settings

  • Check/Uncheck to Enable/Disable use of eWAY.
  • Add “Title” in the given sandbox. Keep in mind this title will be displayed before your customers on the checkout page.
  • Next add “Description” – here you can add detailed information for your purchasers.
  • Now enter the “eWay Customer Password” and “eWay Customer API Key” in the given space.
  • Deselect or Select the different “Allowed Card Types” – JCB, Visa, Discover, Mastercard, Diners, AmEx, Laser, Maestro, and UnionPay.
  • Check the “Enable Saved Cards” box.
  • Check “Enable eWay Sandbox” to test the settings before making your site available for public.
  • If you want to enable troubleshooting then turn on the “Debug Mode”.
  • Click on “Save changes”.

After entering the credentials the checkout gateway page will feature the credit card form where the customers can add their details for making the payment.

How many Payment methods are there in eWAY?

eWAY facilitates both customers and merchants with Direct Debit through Credit Card and Bank Account. Plus, Direct Deposit is another payment method featured on eWAY that allows customers to pay directly through their bank account.

Where can the users check eWay transaction history?

eWAY Transaction history allows the individuals to filter transaction dates ranging from a year. Run the report for every particular year if you need transaction data for multiple years. Use export option for obtaining the data in a spreadsheet. Read on to know how you can access the report –

  • Sign in to your MYeWAY account
  • Go to Reporting > Transaction Report

Now you can view all the transactions that have been processed on the platform. You can enhance the scope of your search using “Search Transactions”. Personalize the Duration, Start Date, End Date, Currency, and Transaction ID to filter your search. After entering all the details click on the “Search” button.

Once you are done with the above step you’ll find a detailed list of payments. You may now review and compare the details. Note that the reports can be exported in the file type of your choice. Use the “Export/Print Report” option for the same.

Conclusion

WooCommerce eWAY extension offers countless benefits to both customers as well as merchants. From easy checkout to secure data storing the extension can meet all your unique requirements efficiently. The best part is that it’s accessible through any device. It’s one of the top online payments solution providers indeed. Now you can accept payments anytime, anywhere.

Complete introduction to WooCommerce PayTrace Payment Gateway

Planning to integrate a payment gateway within your online store but not sure if you should go with a free version or a paid. Wondering which plugin to choose for either of the cases?

Don’t worry, as this article is prepared by WooCommerce support experts to introduce a premium payment gateway plugin. Throughout the article, we will talk about the plugin, features offered followed by the step-by-step guide to integrate the plugin within your WooCommerce store.

Without further ado, let’s get started.

What plugin is used?

When setting up a WooCommerce store, you are bound to have a payment portal. However, you cannot pick any gateway as this might threaten the privacy and security of Customer information. Don’t have any plugin in mind? Well you don’t have to scour the web to find the best payment gateway plugin.

PayTrace is one of the paid payment gateway plugins offering all that you need to set up a hassle-free payment system within your store.

As an online payment processing company, PayTrace is one that offers a robust, and secured infrastructure facilitating seamless payment processes. No matter which type of card your customers prefer, PayTrace is compatible with all including Visa, American Express, MasterCard, Discover, and JCB. Additionally, the portal also accepts payments made in US dollars.

When making online payments, it is important that your site has SSL certificates installed and activated. This will encrypt the network ensuring that your customer’s data is safe and protected. With respect to the PayTrace plugin, it renders support to both PayTrace JSON API and PayTrace Post API.

Features:

  • Promotes Sales or Authorization Only transaction
  • Renders support for Subscription-based product payments.
  • Has a system with automated refunds on order cancellation.
  • Pre-Order product payments.
  • Captures information from the past transactions reducing the time taken to process payments.
  • Click Here to download the PayTrace Payment Gateway plugin.


How to connect with WooCommerce?
Now that we have enough information about the plugin, let’s see how we can integrate the same within a WooCommerce store.

Setup and Configuration
Setting up the plugin isn’t as simple as it has been with other WooCommerce plugins. Find below the step-by-step process to install and configure the PayTrace plugin.

Integration Type Settings
Integration Type: To begin with, select the Integration API that would be used. When you land on the Settings page, this one appears at the top and is an important field. Select the right API and save the settings before moving ahead

General Settings

Important note: Only if you select Together in the Payment Forms Display Settings, will you need to fill the Method Title and Description. See “Forms Display Settings” for more information.

  • Enable/Disable: Select the checkbox to activate the plugin and enable the same.

  • Method Title: Add a specific tile. Note that this would be visible to the users.
  • Description: This is the description as viewed by the users.

Credentials Settings

  • PayTrace User Name: This is related to your accessibility. Add a username that you will use to login in.
  • PayTrace Password: Make sure you have a strong password set for the validation.

Form Display Settings

The last section is related to form display settings.

Payment Forms Display: Depicts the manner in which the form is shown on the page.

  • Together‘ shows both Card and Check forms in a single payment method, within the method description.
  • Separate‘ will have separate forms displayed as different methods.

  • Card Method Title (separate only): Determines the title of the method displayed during checkout.
  • Card Method Description (separate only): Regulated the card method description as visible to the users at the time of checkout.

  • Check(ACH) Method Title (separate only): Regulates the title of the Check method visible to users at the time of checkout.
  • Check(ACH) Method Description (separate only): Regulates the description of the Check method visible to users at the time of checkout.

Card Payment Settings

Accepted Cards: You can enter the different types of credit cards that will be displayed at the time of payments.

Check Payment Settings

  • Accept eCheck Payments: Allow the store customers to make payments through eChecks.
  • Set “On-Hold” status for orders paid by eCheck: Displays ‘On-Hold’ for orders that are paid by eChecks. However, if you do not select this, orders are referred to as ‘Processing’.

Vault Settings

  • Enable Payment Vault: To save the Payment information for future references. This will keep saving the last 4 digits of the Credit Card, along with the expiration date, and custom-generated user ID. Users will have the ease to check their information by visiting their ‘My Account’ Page from the dashboard.
  • Require CVC when paying with saved cards: Allow users to enter their CVC number to complete the payment.
  • Save Your Payment Method Text: Display a message on the screen asking customers to save their card information.

Transaction Settings

  • Transaction Type: The transaction type shows whether it is sales or authorization.
  • Send Order Description with Transaction: Selecting this would dispatch the order details to the PayTrace portal.

Client-side encryption:

Enabling client-side encryption means that the card data is encrypted at the client’s end. PayTrace JavaScript Encryption Library is used for the same. What’s important to note here is that the data once encrypted can only be read by PayTrace. None but the PayTrace portal can decrypt the information in a way reducing exposure to PCI compliance.

Note that data encryption is specifically meant for credit or debit card information. In order to set up the feature, do the following:

  • Visit the Paytrace Dashboard and enter your login credentials to validate the same.
  • Next move to the “Integration > Download Public Key“ to get access to the public key.

  • Next, go to WooCommerce, Settings, and then click on Payment (Checkout for WC < 3.4). Here select PayTrace.
    1. Click on plugin settings and then select “Use Client-Side Encryption” setting
    2. Here, enter the Public Key and also the location.

WooCommerce PayTrace Payment Gateway

Process Refunds

In order to automate the order refund process, you can do it using the plugin. Follow the steps given below to see how to process refunds.

  • Move to the Order Edit Page of the Admin.
  • Here, under the meta box of Order Items, select the Refund button.

WooCommerce PayTrace Payment Gateway

  • Now add the amount that you want to return to the users. It could either be a partial amount or the total order amount. Finally, click on the button of Refund.

WooCommerce PayTrace Payment Gateway

  • Once you do that, you will see a prompt on the screen to confirm that you want to refund the said amount to the user. Click on it to start the refund process.
  • In case the refund is successfully transferred, an order line item appears along with an informatory note.

WooCommerce PayTrace Payment Gateway

Process Capture

Lastly, we see how to capture a transaction. To process a transaction capture, there are two different ways.

Capture from “Order Actions”:

  • Move to the “Order Actions”
  • Click on the drop-down to select “Capture Payment (xx.xx)”
  • Either update or click on the arrow just below the drop-down.

Capture from the “Order Items” meta box:

  • Here, tap on the Capture button

WooCommerce PayTrace Payment Gateway

  • Add the figure that you need to capture and click on the Capture Payment button.

WooCommerce PayTrace Payment Gateway

  • You can select “Cancel Capture” to stop the process.

Conclusion

With that being said, you can now get started with the process of downloading the plugin and adding it to your WooCommerce store.