
Setting up tax rates within your WooCommerce store isn’t a choice you make but a mandate necessary for all store owners. When operating in multiple regions across multiple countries, it is important that the tax rates comply with the standard guidelines. This is where you must abide by the law and align your store tax rates accordingly.
In case you are just starting out or to say, you aren’t aware of the process to set up tax rates, this article will help you set up tax rules, calculate sales tax and find tax reports for your store.
Setting up tax rules
Setting up tax rules within your WooCommerce store is pretty easy.
Prerequisites:
- Log in to the WooCommerce dashboard.
- Click on settings and then select Tax.
- Here, you will find all of the tax options listed.
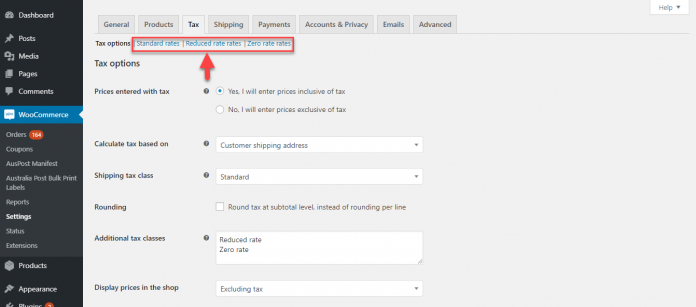
- Click on the name of the tax option to configure the same, set up tax rules, and get started.
Note: In case you wish to have a separate tax class, move down to the field of Additional Tax Classes. Here, in the next line, enter the name of the Tax Class. Click on save settings. Once you do this, you will find the name listed at the top along with other tax options.
Configuring the tax option
Now that you have the tax class, click on the name and the next page that opens will have multiple fields to be filled up. This is where we set up tax rates for different regions depending upon the need.
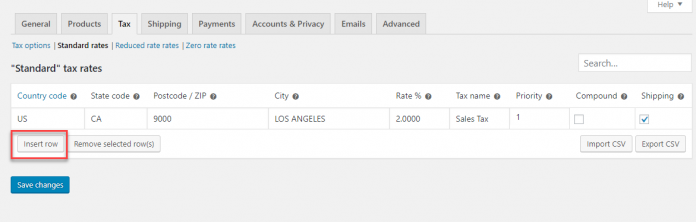
If you click on the newly created tax class, you wouldn’t find any row. Either way, click on the tab of Insert Row. As evident from the image above, there are 9 columns for the single row. To set up the custom-fit tax rule, the spaces are to be filled with the appropriate option.
Country Code – The first column asks you to enter the 2 digit country code. For example, if you want the rate to apply in the USA. Enter the US in the country code.
State Code – The second column asks you to enter the 2 digit state code. For example, if you want the rate to apply in California. Enter CA in the country code. In case you wish the rate to apply in all states of the country, leave the box blank.
ZIP/Postcode – Similar to the state code, we have the zip code. To specify the particular areas, you can simply enter the postal code and separate them with a semicolon. Also, you can enter a range of codes together. For example, for all zip codes starting with 90, you can enter ’90*’.
City – The fourth column asks you to enter the city. For example, if you want the rate to apply in Los Angeles. Enter Los Angeles under the city column. In case you wish the rate to apply to all cities of the country, leave the box blank.
Rate % – Here is where you specify the tax rate for the chosen city in the given country. Remember that the field requires you to enter the rate in four decimal places. For example, if you want the tax rate to be 9%, the value to be entered is 9.0000.
Tax Name – Enter the name of the tax.
Priority –It may happen that a particular checkout page has more than one tax rate applicable, accounting for a conflict. To resolve the same, you must set a priority.
Compound – Considering the above, if you want the mentioned rate to take over others, simply click on the checkbox here.
Shipping – Finally, if you want the tax rate to be applied after the addition of the shipping fee, check this box. If not, leave it as it is.
Once done, click on save changes to reflect them in the store.
Calculating Sales Tax
Now that we have the tax rate created, let’s run down a few examples to see how the above works.
Example One: Set up a sales tax of 6% for all of the US.
As evident, we need to calculate sales tax at 6%. Click open the tax option and in the find column, enter the US. Since the rule applies to all of the states, regions, and cities in the US, leave the spaces blank. In the tax rate field, enter 6.0000.

Type in Sales Tax as the name. We now set the priority to 1 and then select that the tax must apply to the shipping fee as well. Click on save and we are done.
If you create a test order, you will find that the tax calculated is 6%.

How to view tax reports?
The next thing we will see is how to view tax reports. WooCommerce has built-in settings that give its owners the ease to view tax reports as and when they want. To do the same, move to WooCommerce > Reports > Taxes > Taxes by date.
This allows you to enter the time frame for which you wish to view the report. From the month to the number of orders placed, total sales, shipping, the tax, and net profit, the report will give you information about all.

In case you wish to view the tax report in terms of the tax codes, click on Taxes by Code to view the same.

Conclusive Words
Setting up tax rules and calculating sales tax is easy for WooCommerce users. You just need the above-specified procedure and it will be done. In case you want professionals to handle this task for you, WPCustomify has a whole team that is expert in setting up WooCommerce tax, contact us.