Call Us Toll Free - US & Canada : +1-(888) 602-0119

AWeber integration Woocommerce: Steps to follow

AWeber is one of the best tools that businesses are employing for email marketing nowadays. You can create efficient mailing lists. You can easily accumulate the details into them. Therefore, you can effectively plan and design your newsletter.

With its extravagant features like ‘Autoresponders‘, you can send automated email marketing emails.

Why consider AWeber?

They are one of the prominent market leaders in this array. It was introduced in 1998 and has helped many businesses all across the world. You can manage the following with AWeber:-

  • Build a responsive landing page
  • Send email
  • Check the results
  • Analyze results

You can work for 1000+ accomplice solutions of programming. Hence, you can intensify great benefits while you integrate AWeber with WooCommerce.

It gives support for various languages like Bulgarian, Czech, Afrikaans, etc.

AWeber integration WooCommerce brings in plenty of perks. You can simply manage and build effective stores online. You get reasonable arrays of flexibility with AWeber integration WordPress

Why should you consider AWeber integration WooCommerce?

AWeber integration WooCommerce gives you the space to communicate with your audience flexibly. You do not have to be technically strong in order to manage AWeber integration WordPress.

Hence, you can easily crack the best deals and can rapidly shoot emails to communicate with your audience. It will allow you to communicate with your potential audience that you have listed for AWeber integration WooCommerce.

You have to label the various purchase aspects as well as cart abandonment aspects. With this superfluous integration, you can manage to label the combined products using segmentation and dynamic content.

Make sure that your purchasers sign your business newsletter the moment they make their purchase.

You can personalize the details with AWeber integration WooCommerce. You can manage purchase history tags, cart abandonment, and customize the content.

You can easily convert your visitors who are visiting you for the first time into the recurrent client. You can send emails encouraging & motivating them with rewards and incentives. AWeber integration WooCommerce allows you to send recuperation hyperlinks. This will instigate and allow them to make their purchase.

Steps for Aweber integration Woocommerce

Firstly, install and activate AWeber. Hit the option “WooCommerce”. Tap “Settings“.

Settings

1. Hit “AWeber“.

Aweber

2. Tap “Authorize” to integrate AWeber with WooCommerce.

Aweber account

3. Your details must be complete for the AWeber account login. Next, you need to give a password for the integration. Press “Allow Access“.

Integration

4. Browse to Checkout. Click “Add rule” to integrate AWeber with WooCommerce.

Checkout

5. You have to highlight the product that you plan to set the rules for.

Products

Choose the list and add your clients

Add to list

Give any tags that you wish to implement.

Add Tags

You are done.

In a conclusion

AWeber integration WooCommerce is the best way to connect with your audience.

WPCustomify is an established company that is adept in WooCommerce support and help. We are experts in developing and giving support for a secure and responsive website. We offer full-scale solutions and goal-oriented customization as per your business requirements.


How to integrate Apple Pay on a WooCommerce and WordPress website?

Nowadays, eCommerce websites have to take a lot of effort to attract customers and make sales. WooCommerce is an adept and user-friendly plugin. It can help you to build a WordPress business website into an eCommerce website.

Integrating WooCommerce and WordPress websites with other services and apps will improve the flexibility of your store. For instance, Near-Field Communication payments are getting more popular day by day. You can integrate Apple Pay on a WooCommerce and WooCommerce website. Or else, you can do WooCommerce Clover integration, WooCommerce Amazon & eBay integration, etc.

Apple Pay is a prominent payment gateway. Of late, this digital wallet has played a significant part in sales conversion. It is forecasted that Apple Pay users will grow to 56.27 million by 2025. Hence, it would be great if you set up Apple Pay on a WooCommerce and WordPress site if you are running a business online.

Apple Pay and WooCommerce compatibility

You cannot integrate any payment gateway to the WooCommerce website unless it is supported by WordPress. You need to take the support of a third-party service. Apple Pay will allow your clients to do their translation using credit and debit card details.

Apple Pay has great prominence because it is constructed on the ecosystem of iOS. Hence, the majority of users trust this mode of payment. Most people are well aware of the security that this ecosystem offers.

How to integrate Apple Pay on a WooCommerce and WordPress website?

You will have to manage three elements to integrate Apple Pay on WooCommerce and WordPress websites. They are:-

  • An account of Stripe
  • Stripe for the plugin-” WooCommerce”
  • WooCommerce plugin

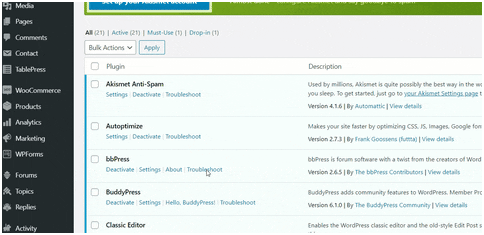
WooCommerce: Installation and Configuration

You need to set up a store in WoCommerce. Hence, do the installation and configuration of it.

You need to have sleek designed product pages. It must also have things like shipping rates and tax calculations. Next, you need to implement a payment gateway that receives Apple Pay.

Stripe: Activate and Install it for the WooCommerce plugin

You can get support for Apple Pay from the Stripe payment gateway to integrate Apple Pay on a WooCommerce and WordPress website.

The process of setup is intuitive with reasonable fees. It is the most reputable processor.

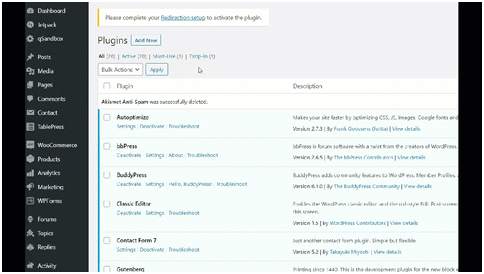
Initially, you have to do the installation and activation of the Stripe WooCommerce plugin.

Use another tab to sign into the account of Stripe. Complete all the details like company name, details of banks, etc.

When done, visit the dashboard of WordPress.

Linking WordPress website and Stripe

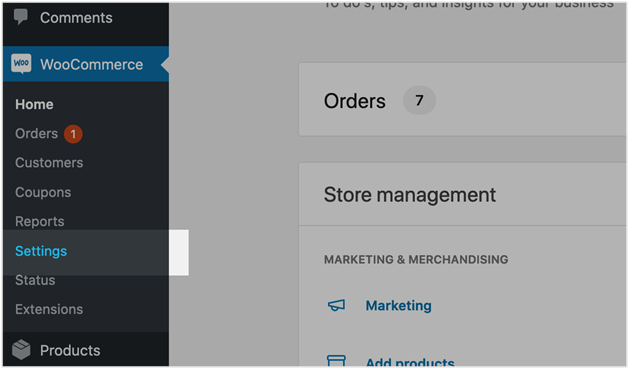
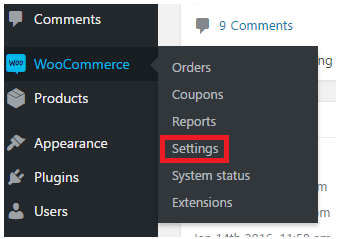
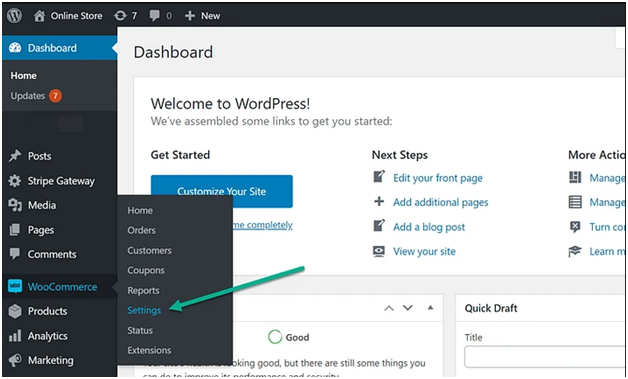
You need to visit “WooCommerce” to integrate Apple Pay on a WooCommerce and WordPress website. Then click “Settings”.

Dashboard Settings

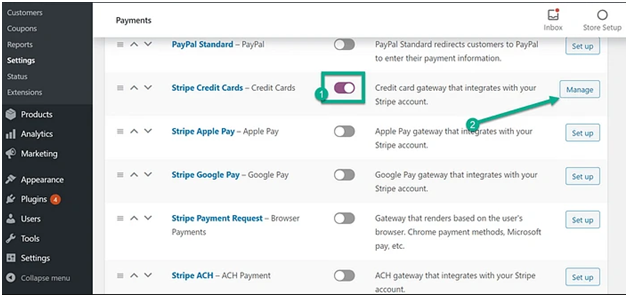
Tap the tab “Payments” and it will reveal all the available methods. It includes Cheque Payments, Stripe, etc.

Payment

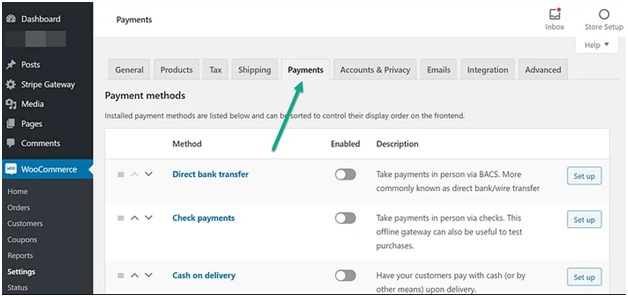
Navigate to the payment option of “Stripe Credit Cards”. In the titles, you will see more fields with Stripe. Skip these!! Make sure to turn on the basic functionality of Stripe Credit Card before you proceed.

Turn the switch to “ON” for Stripe Credit Cards to integrate Apple Pay on a WooCommerce and WordPress website. Next, tap the button “Manage” or “Set Up”.

Stripe and credit card settings

Use API Keys to link Stripe

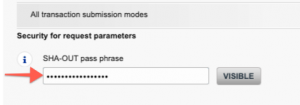
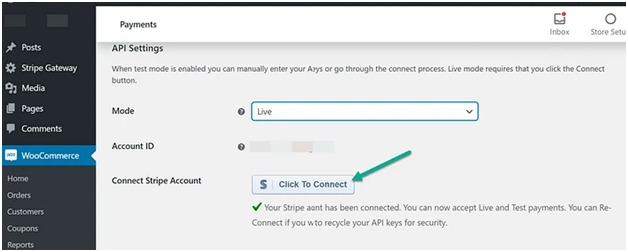
Visit the section “API Settings” to integrate Apple Pay on a WooCommerce and WordPress website. Now if you are set for payment collection, drag and switch to “Live” near the field of Mode. If you are not set, leave it as “Test Mode”.

Hit the button “Click to Connect” for the field of Connect Stripe Account. You will be guided to a web page, you have to log in to the Stripe account here. Please note it will connect WordPress with Stripe here.

Click to connect

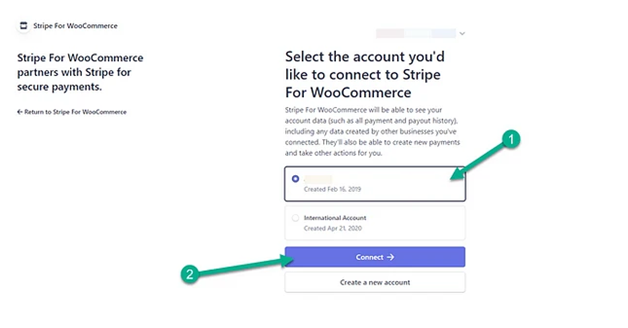
You will see the page for connection of a third party through WordPress. It will pull up the Stripe account till the time you are logged in. Now, if you get prompt messages for login in between, make sure to do so.

When logged in, pick the Stripe account you wish to integrate into the WooCommerce site. Tap “Connect” to integrate Apple Pay on a WooCommerce and WordPress website.

Select Account

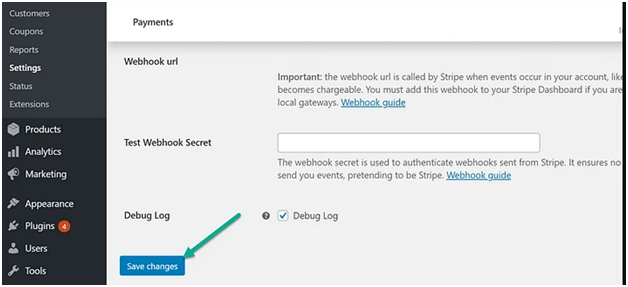
You will see a checkmark in green color. You will also see the message “Stripe Account Has Been Connected”. It will generate the Secret Key and Publishable Key automatically. It will be added to the fields in the dashboard of WordPress.

Test key

Press “Save Changes” once you navigate down to the page of WooCommerce Payments. This step will make sure to secure the Stripe Keys within WordPress. It will prepare them for processing the payment.

Save Changes

Activating the option WooCommerce Apple Play

Since the integration of Stripe is already done with WordPress, it will enable to process the of credit cards. This will occur when the client does the checkout in the store.

This is an essential step. Hit “Apple Pay” to integrate Apple Pay on a WooCommerce and WordPress website. But, you need to work on a few more steps.

Checkout

Browse back to the dashboard of WordPress. Click “WooCommerce” to integrate Apple Pay on a WooCommerce and WordPress website. Tap “Settings” and then hit “Payments”.

Underneath the section of Payments, tap “Apple Pay”.

Apple Pay

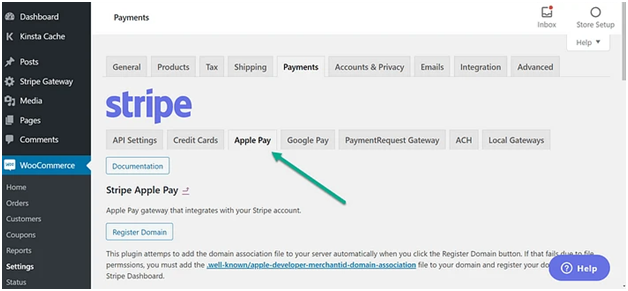
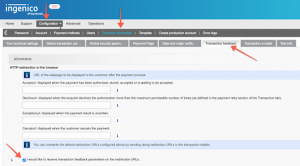
Apple Pay needs Stripe to authenticate that you are the owner of this domain. Hence, you will be asked for the verification document. You need to upload this in the section of hosted website files.

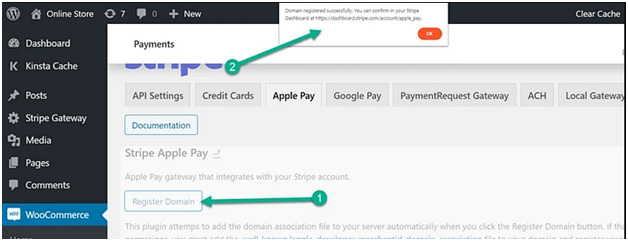
This will be handled automatically. Just tap the button “Register domain” in the section of Apple Pay. When the registration process is over, you will see a message- “Domain Registered Successfully”.

Register domain

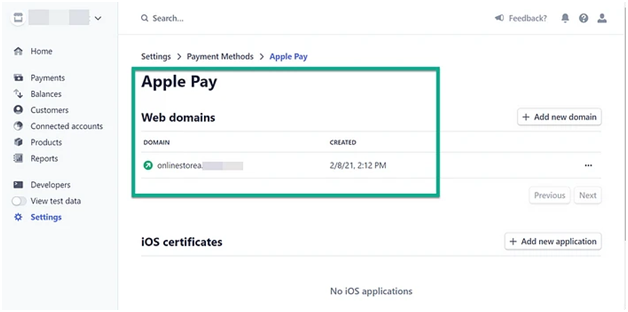
Make sure to run the test before you go live. To do so, head to the dashboard of Stripe. Press “Settings”.

Hit “Payment Methods” and “Apple Pay” to integrate Apple Pay on a WooCommerce and WordPress website.

Under the list of “Web Domains”, you will see your domain name.

Apple Pay Payment

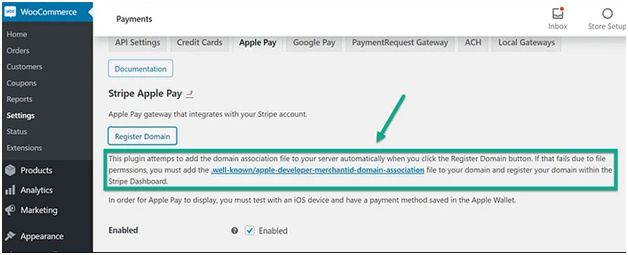
If you cannot find a connected web domain on the dashboard of Stripe or see a failure message, follow the pointers below:-

  1. In WooCommerce Apple Pay Settings, you need to follow the link.
  2. Here, you need to upload the right document for verification manually.

Apple Pay Plugin

Once the verification of the domain name is complete, you will see the checkout module displaying the button “Buy with Apple Pay”.

Add to card with apple pay

Source

It is done!!

Some troubleshoot

If you are receiving errors on the checkout page. It is better to get support for WooCommerce and WordPress from an extinguished team.

Following are some troubleshoots that may be causing the problem:-

1. Your website is not “Live”

Distinct API keys are created for live and test websites. In its Test Mode, Stripe processes the fake transactions. Check if it is in Stripe Test Mode or not

2. Go for the SSL certificate

Acquire an SSL certificate for your WooCommerce site to use HTTPS. Apple Pay especially Stripe blocks the functionality of payment if you do not have an SSL certificate.

So, your website must have “HTTPS://” before your domain name.

Establish your business with WP Customify

WP Customify is a service provider that provides WooCommerce and WordPress support worldwide. We leverage our service for forward-thinking enterprises and start-ups. Our team assists our business partners to accelerate their business competence by merging smart technologies and agile approaches.

So, if you are having a tough time with WordPress and WooCommerce errors, integration, etc., hire us!!


Why Can’t I View Product Pages of WooCommerce?

Have plans to set up a Commerce business? If yes, it means you have to have proper strategies to tackle numerous unexpected requirements while running the business. Nowadays, most business owners raise concerns that they cannot View Product Pages of Woocommerce. As a result, they lose their potential clients.

So, why can’t you View Product Pages of Woocommerce?

There are numerous reasons that lead to the disappearance of the products on the front end of WooCommerce. It can be because of compatibility issues, setup errors for permalinks, plugins, and many more.

Some problems are difficult to resolve. A good WordPress app design and development team can fix if you cannot View Product Pages of Woocommerce.

The other reason can be, maybe your new items are not uploading on your WooCommerce website. There are three main reasons for this:-

  1. Customized page: If you have developed your customized store. There is a 100% chance that the shop page may not have been modified. So, your page might not be updated.
  2. Full Caches: The old version of your site may get cached. Hence, make sure to delete all the caches. Ensure to do it from the servers.
  3. Theme or plugin crash: This issue generally happens when your WooCommerce gets updated to the newer version. It arises because there is a lag from the theme developers or plugins. Hence, it is always best that your plugin authors and theme developers must update the plugins before upgrading to WooCommerce.

How to fix things if you cannot View Product Pages of Woocommerce?

It is certain that you may end up with problems if you cannot View Product Pages of Woocommerce. Here we will discuss the annoying blocks that you may face.

1. Configuration of product pages

The main point is that you must verify to figure out whether you have used the right store page.

To do this, go to WooCommerce and choose Settings.

Click the Products page. Ensure that the dropdown of the Shop page field is chosen correctly as “Shop”.

Shop page

We will suggest you use the store page or other pages from this section. Similarly, you must do My Account, Checkout, Cart. But ensure to check the tab“Advanced”.

Cart page

2. Compatibility of Plugin

The second reason is your plugin. It may generate the conflict that may cause WooCommerce products not to appear on the shop page. This may generally appear after upgrades.

For this, Apart from WooCommerce, you need to disable all the plugins.

cannot View Product Pages of Woocommerce

You must do the verification to check whether the goods are displayed on the store page. Next, activate the plugins one by one. Also, do verify if your store is empty to figure out the issue. You can hire a good WordPress development team to resolve the problem.

In place of removing the plugins, you must disable them. At the initiation of each installation, you might have changed the settings to fit the characteristics of your store. If by any chance you deleted the plugin, you have to start the complete process again.

Now if you delete the plugin, this means that you have to repeat the entire process again.

If you have plans to disable numerous plugins then,

Visit Plugins and click Installed plugins. Here you can manage the systems to set up the store.

cannot View Product Pages of Woocommerce

Make sure that you check for all the plugins.

Scroll the dropbox and tap “Deactivate”.

deactivate Plugin

3. Updation of Store Permalinks

After the installation of WooCommerce or the addition of items to the store, the shop page may be blank. Permalinks may be the culprits behind it.

To check this click Settings and tap Permalinks. This you will get on the WooCommerce dashboard. Next click “Save Changes”.

permalink settings

4. Visibility of the catalog

This might be the next reason for a blank page. The issues when your catalog visibility setting is set as hidden.

For this, visit WooCommerce and on the dashboard, click Items. Choose the product that does not display on the Shop page. You will see the Catalog Visibility over to the right column.

Choose whether you need to appear on the page results or on the shop page. You can even choose individual choices such as search results only.

Tap OK for the update of the product.

cannot View Product Pages of Woocommerce

Conclusion

To conclude, we hope that this article on Why Cannot I View Product Pages of WooCommerce has helped you to fix your trouble.

If you are still facing trouble, bring back the best shopping experience with WP Customify. We are an innovative WordPress design and web development team. We have spent an extensive year developing the best solution that improves the store’s experience.

Easiest Ways to Fix Email Notifications in WooCommerce

This error can take birth to a minor issue like not proper WooCommerce email settings. While you’re doing the email settings in WooCommerce, there are two things to keep in mind. The first one is the Email sender option and the second one is Individual notification emails. If these settings are not done properly, email notification in WooCommerce can fail.

Don’t worry. We are going to fix email notification in WooCommerce the error just now.

To find out the errors in the email sender settings, just log in to the WordPress Dashboard, go to WooCommerce, and pick the Setting option. Now, click on the Emails tab and scroll down to find out “Email Sender Options”.

Fix Email Notifications in WooCommerce


Once you spot this option, ensure that the “From” name and “From” address are properly set up.

Here, From Name refers to the name of the people to whom you allow to see when the emails are received. During the set-up of From name, make sure that special characters like “@/.&-” are not mentioned in it. Use a simple and straight name like Jack. Using jack@xyz will lead to email notification failure.

The same sort of attention is needed in From Address. Make sure it’s error-free and has no characters. If there are errors, correct them and click on Save Changes.

Once you’re sure that there are no errors in the Email sender option, pay attention to the Individual notification emails and check whether or not it’s set up correctly.

You can find out all the notifications emails in WooCommerce > Settings > Email. Look closely and find out with which email you’re facing the email notification failure issue.

Make sure the email is enabled and then check the accuracy of the recipient’s email address. Click on Save Changes and check whether or not the issue is fixed.

Solution 2 – Check whether not the emails are entering to Spam folder

Your WooCommerce email notification can get failed if the emails are going to the Spam folder of the recipient. This could be because of the blacklisting of the web IP address.

Resolving this issue is easy as you need to contact your web host, explain the problem, and wait for their action. If a web host can solve this issue then it’s great. If not then it’s better to switch to another host.

Once the web host is changed, the next step is to install an SMTP plugin. WP Engine is a great choice to make as it features strong spam filters and high-end security standards. Their servers are safe enough to keep email abuse incidents at bay. You can do market research on this and can pick any other web hosting service provider as per your choice.

Solution 3 – Use a recipient address that has a different domain

Sometimes, failure in receiving email notifications in WooCommerce could actually be a one-sided affair. Your customers will be receiving the notification but you’re not getting the updates/notifications for the customers’ activities.

This happens all the time and upon digging, it figured out that this issue takes place when the sender and the recipients’ email addresses are using the same domain.

For instance, if the sender’s email is john@xyz.com and the recipient’s address is tina@xyz.com then this issue can occur. To fix the email notification issue, just change the domain of the sender. To make this happen:

A. Go to the WordPress Dashboard > WooCommerce > Settings.
B. Click in the Email and select the email notification that you need to fix.


Fix Email Notifications in WooCommerce


C. Select the recipient email address and add a different domain.
D. Go down and select the Save Changes option.

The job is done. Now, check whether or not the issue is fixed. If yes then it’s time to rejoice. If not, read the other possible solution.

Solution 4 – Take the help of the SMTP Plugin

If nothing worked and you’re still struggling hard to fix the email notification issue then the issue could be because of the email server of the web host.

To fix this issue, you must try using the SMTP plugin. We are suggesting this way out because WooCommerce shares emails using the wp_mail() WordPress function.

WordPress then calls on PHP for sending the emails and PHP further calls on the web host servers that you’re using.

Fix Email Notifications in WooCommerce

With the help of a reliable SMTP plugin, the email sending notification will not be diverted to the web host email server. Rather, it will go to the SMTP plugin where it will be queued for sending.

When web host email servers are not involved in the email sending process, the error will no longer take place.

The Final Say

Email notification is one of the most useful of the WooCommerce plugin as it keeps businesses posted about every single activity of the customers. It’s a great way to keep the customer aware of the services and facilities that have a positive impact on customer retention.

By any chance, if you’re not receiving email notifications, don’t get worried. In this post, we shared the most viable ways to fix email notifications in WooCommerce errors. They all have been tried and tested by many and won’t disappoint you.

If you’re still facing any troubles, contact us, and we will be happy to help.

How to Integration Bambora Payment Gateway in WooCommerce?

Bambora is a next-level eCommerce payment solution that has gained a lot of fame recently. Prior to its In-store and Enterprise solutions, this payment gateway has tons of robust features when it comes to accepting eCommerce payments. The integration process is simple, and the pricing is transparent. The clean design also contributes to higher conversions.

Even though you can use the payment gateway in several web-platforms, we will only discuss the WordPress platform today. More precisely, WooCommerce. Now, there are several segments we need to discuss here – what is the name of the plugin that will integrate Bambora payment solution to WordPress sites? How to set up this platform with WooCommerce? We will discuss everything in this article today, or you can hire Bambora configuration support experts for its quick deployment.

WooCommerce and the Bambora Plugin

If you run a business and have a website built in WordPress, you can add the eCommerce functionalities in a matter of minutes. You will need a plugin named WooCommerce for that, which simply adds all the features to let you sell your products or service online. It is a WordPress plugin that you can use for free. However, it doesn’t come with the modern-day features to convert more sales.

So, that gives other 3rd-party companies to build add-ons and extensions, which can integrate with the core WooCommerce platform. Now, as we have mentioned about the Bambora payment gateway; they too created a dedicated plugin which you can integrate with the WooCommerce plugin. Its name is Bambora Online Checkout. So, with the help of this plugin, you can accept payments from customers using the Bambora payment gateway integrated into the WordPress site.

How to acquire the access keys?

One of the prerequisites to make Bambora Online Checkout work with WooCommerce module is to find some access keys. These keys are pivotal to make it functional so that you can receive payments. So, here are the steps to get those keys:

  • The first is to open an account with Bambora. Of course, if you already own an account, you simply need to log in instead.
  • Once you are in the Bambora Dashboard, at the top right corner, click on the account dropdown and click on ‘Settings.’
  • Now, on your screen, you should see an option on the left ‘API.’ Click on that.
  • After that, you should see a button named “Generate New.” Click on that.
  • Then, type a desired API key name, and click on “Copy info.”
  • We suggest you save this information to a doc file to use it later. You can paste the API information that you have copied earlier.

Install and Configure Bambora

Now once you have the access keys, keep it safe with you for future use. First, you need to install the plugin. There is an important thing that you need to check before you go on to the installation procedure. Make sure the PHP version is upgraded to the latest one. Now, let us carry on with the steps:

  • It starts with finding the right plugin for installation. So, go to the “Add New” section of Plugins. On the search bar, type in ‘Bambora.”
  • In a few moments, you should see a plugin named “Bambora Online Checkout” has popped-up.
  • On its right-hand side, you will see “Install Now.” Click on that, and then click on ‘Activate.’
  • Once you activate the plugin, go to the WooCommerce Settings section. You should get an option ‘Checkout’ there. Click on that, and you should find a particular “Bambora Online Checkout” option over there. Click on that.
  • Now, the next step is to copy and paste all the access keys that you have acquired from the main Bambora dashboard before.

  • You need to also check the box named, “Activate Module.” After that, Save the changes.
  • We recommend testing a payment before you start accepting payments.

You can also download the plugin .zip file and install the plugin separately. Rest of the procedure remains the same as before. One other thing that you should remember is to upgrade the version of WooCommerce before you install the plugin.

How to add a Subscription Payment module using Bambora Online Checkout?

Sometimes the sellers charge a monthly subscription typically for a service. WooCommerce has an ideal extension by which you can add this feature in a WordPress site. On the other hand, Bambora Online Checkout is an adept platform too where you can seamlessly integrate the subscription feature.

For that, the steps are pretty straight forward. You must install Bambora Online Checkout first, just as we mentioned before. After that, you need to get the WooCommerce Subscription Extension. Please note that this WooCommerce extension requires an annual subscription amount of $199 every year. Once you purchase the license, install the extension.

Now once WooCommerce Subscription and Bambora Online Check is ready as well, go to the Subscription module, and create plans. You will get all the gateway’s features. So, you can tweak it to what you need. Now, you are ready to accept subscription-based payments using the Bambora Online Checkout plugin.

Conclusion

Bambora is one of the most trending payment gateways right now, which has global reach now. So, it is always a worthy choice to use it in your WordPress site. The options the payment gateway is offering backed by its encrypted security level make it a trustworthy option while you accept payments online. So, you can now receive payments from most countries in the world without a hint of worry.

How to Setup Ogone Payment Gateway in WooCommerce?

Ogone Payment Gateway or WooCommerce Ingenico is a popular plugin allowing online sellers to accept both local and international payments from their online customers. The best part is that it facilitates the customers with multiple payment options. They can choose a payment mode as per their convenience. The platform helps in improving the graph of conversions while ensuring complete satisfaction of the customers.

What is the WooCommerce Ingenico or Ogone Platform?

Ogone Platform is rebranded as WooCommerce Ingenico. The major reason behind rebranding of the platform is to highlight Ingenico (Ogone platform plugin works in integration with it). However, it is to be noted that only its name has been changed and not the features.

Ingenico comes with a wide range of versatile reporting options making it easier for merchants to manage and monitor their payments accounts without any hassles. Plus, the platform also uses a flexible approach. Merchants can customize the channels, payment modes, and functionality according to their business needs.

Why choose WooCommerce Ingenico?

  • It is accepted in more than 40 international and local payment options
  • It meets all the security standards as the payments are routed via its own servers
  • Ingenico can be easily customized and users can add as many payment modes as required
  • The payment page is customizable
  • Ingenico accepts all types of Debit and Credit Cards such as Diner’s Club, MasterCard, Visa, Maestro, American Express, etc.

What countries support Ingenico?

The platform is supported in many nations including Belgium, US, Netherlands, France, Germany, Austria, United Kingdom, Switzerland, and Luxembourg.

What plugin is used to set up WooCommerce Ingenico?

PayTrace Payment Gateway plugin is used for setting up WooCommerce Ingenico. It can be downloaded using this link – https://woocommerce.com/products/ogone/.

Requirements

  • WooCommerce website version 3.0.0
  • Merchants need to purchase the extension.
  • Sign in to Ingenico platform and get your Secure Hash Algorithm (SHA) credentials.

Steps to Setting up and Configuring WooCommerce Ingenico plugin

Installation

Step 1- Sign in to your WordPress account.


Step 2 – Click on WordPress admin I plugins I add new I upload plugin I choose a file. Select the downloaded zip file. Next, select install now I activate to enable the extension.

Setting up the plugin

  • Click on WooCommerce I Settings I Payments > WooCommerce Ingenico
  • Select “Enable plugin” and then press “Manage” button

Configuring the plugin

Step 1 – Sign in to Ingenico account

Step 2 – Click on Configuration I Technical Information I Global Security Parameters. Now, set SHA-256 as the platform’s Hash algorithm. Now, scroll down to the page’s bottom and select “Save”.


Step 3 – Select Configuration I Technical Information I Data and Origin Verification. Now add “URL of the merchant page containing the payment form that will call the page: order standard.asap” in the given sandbox. Next, fill in “SHA-IN passphrase”. Lastly, click on “Save”.

Step 4 – Click on Configuration I Technical Information I Transaction Feedback. Tick the checkbox related to receiving redirection related transaction feedback parameters later on (check image).


Ogone Payment Gateway

Step 5 – Go to “Direct HTTP server-to-server request” and select “No request” as the “Timing of the request”.

Ogone Payment Gateway

Step 6 – Next, on the same page you’ll find the “Dynamic e-Commerce parameters” section. Check the “Selected” list and make sure it has NCERROR, COMPLUS, STATUS, PAYID, and ORDERID.

Ogone Payment Gateway

Note – The customers who have already purchased WooCommerce Ingenico plugin but failed to add COMPLUS in the “Setting” may find a notification (on the admin page) for setting configuration within WooCommerce Ingenico. Once you configure the setting click on “Complete” (which is there on the notification). These steps are crucial to ensure uninterrupted processing of credit cards.

Step 7 – On scrolling down the page (towards Transaction Feedback) you’ll find the “Security for request parameters” section with SHA-OUT passphrase mentioned under it. Add a phrase in the box of your choice. Finally, click on “Save”.

Ogone Payment Gateway

Customize Ingenico (Ogone Platform) Extension

After completing customization of Ingenico settings (back office) Sign in to your Ingenico dashboard for configuring the plugin. You may customize all the elements listed on the page including the ones highlighted below –


Ogone Payment Gateway

  • Check or uncheck “Ingenico (Ogone Platform)” box – Enabling the payment gateway will allow the customers to use it during the checkout process.
  • “Testing” – Select “Yes” from the dropdown list if you want to add the test feature in your account. You may add a “No” here as well if you have already planned to make your site public and accept the payments from customers.
  • “Title” – Fill in the “Title” in the given box. Keep in mind this title will be displayed before your customers on the checkout page.
  • “Description” – here you can add detailed information for your purchasers.
  • “Ingenico PSPID” – Add the PSPID sourced from your Ingenico account. The PSPID should be different from testing mode and live mode.
  • “SHA-IN” – Fill in the SHA-IN passcode created during account configuration in the step mentioned above in Step 3 above.
  • “SHA-OUT” – Add SHA-OUT passcode created during account configuration in the step mentioned above in Step 7 above.
  • “Template Page” – Add a URL similar to the one on your site’s server.
  • “Debug Mode” – This option should be enabled only if you are facing any problem with WooCommerce Ingenico plugin.

Conclusion

Integrating your WooCommerce online shop with Ingenico (Ogone Platform) will make things easier for you. From accepting payments through credit card to ensuring complete security of your customers’ sensitive data the advanced servers of Ingenious will meet all your unique business requirements (related to payments particularly) efficiently. Hire WooCommerce experts if you are sceptical about doing it on your own.