Call Us Toll Free - US & Canada : +1-(888) 602-0119

How to Setup Payment Express (Windcave for WooCommerce) as Your Payment Gateway?

A perfect payment gateway works like a charm with any transaction. Also, if you have a variety of payment options available, you have the guarantee of users not leaving due to the lack of their preferred payment option.

A payment gateway is a medium that allows users to successfully transact a certain amount of money by processing the cards under the assurance of the payment gateway’s public and private keys. The payment express payment gateway links to almost all brand debit and credits including JCB, Diners, VISA, and MasterCard.

Payment Express (now called Windcave for WooCommerce) requires an SSL certificate of course and a hosting that binds the SSL. Apart from that, a master manual to set it up perfectly. This article will cover a vast overview of how to set up Payment Express as your Payment gateway.

What plugin is used for Payment Express (Windcave for WooCommerce)?

One can use Windcave for WooCommerce Plugin (It was formerly called WindCave) to set up Payment Express. Downloading and installing this plugin just requires a few steps.

Step 1: The user is required to login into their WooCommerce account. You can also login via WordPress credentials.
Step 2: Download the Zip file of WooCommerce from the download link provided.
Step 3: Having logged into the WordPress Dashboard, enter the plugin section.
Step 4: Click on add new plugin and navigate to the download folder in the local storage.
Step 5: Make the upload and activate the Windcave for WooCommerce plugin.

How to Register with Payment Express or Windcave?

After setting up payment express, it will require you to sign up on the Payment Express official website to use it.

Note: Payment Express is rebranded in the name of Windcave.

Step 1: Once you enter the payment express or Windcave signup page. Fill the details asked for and click on get started

Step 2: Verify the email account and Wait for the Sales to contact you as an answer of account activation.

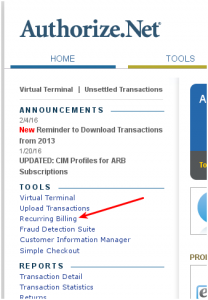
Step 3: Request for a chargeless Px-Post credentials from the support.

Step 4: Once you have the credentials in your hand you are ready to go for the configuration in the WordPress dashboard. Having entered the dashboard, click on the WooCommerce setting and click on checkout.

Setup Payment Express

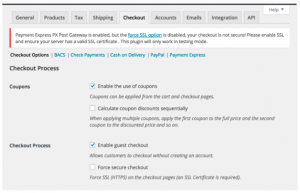
Step 5: Check the force secure checkout option under the checkout process. Now, Checkout can be done in Live mode.

Step 6: Save the changes

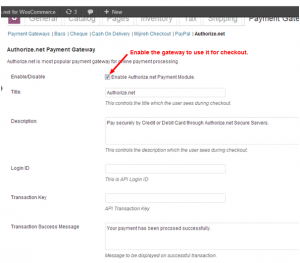
Step 7: Enter the WooCommerce Menu > Settings > Checkout > Payment Express.

Setup Payment Express

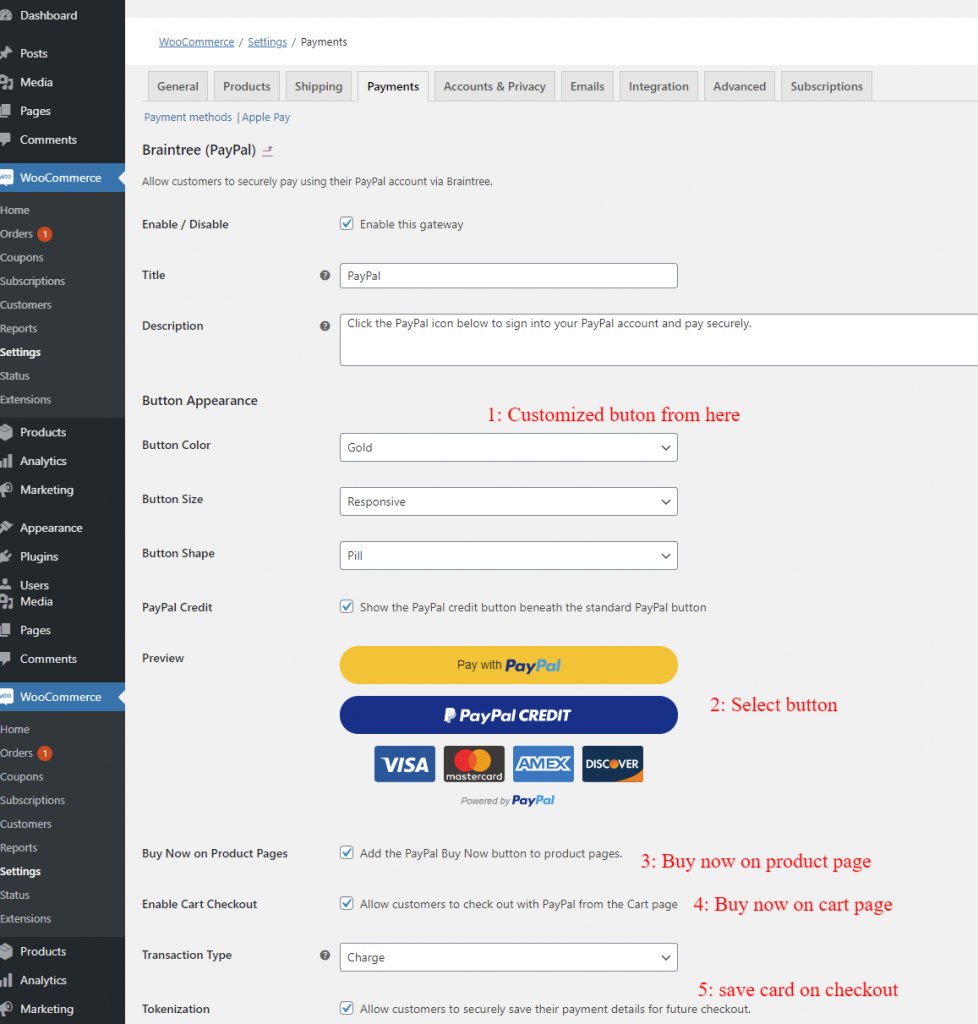
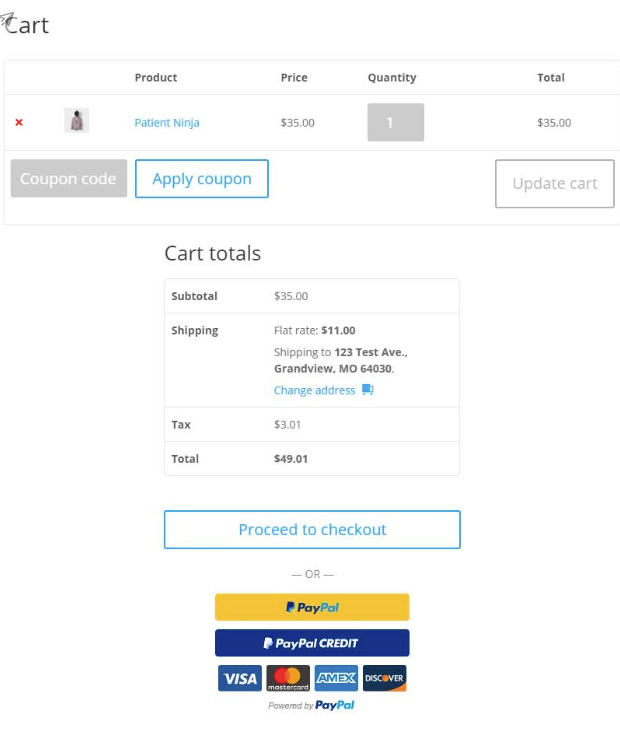
Step 8: Tick Enable the Payment Express and Px-Post Testing to let the Payment Express run in live mode. Enter other details that need to be shown to your store customers at the time of checkout.

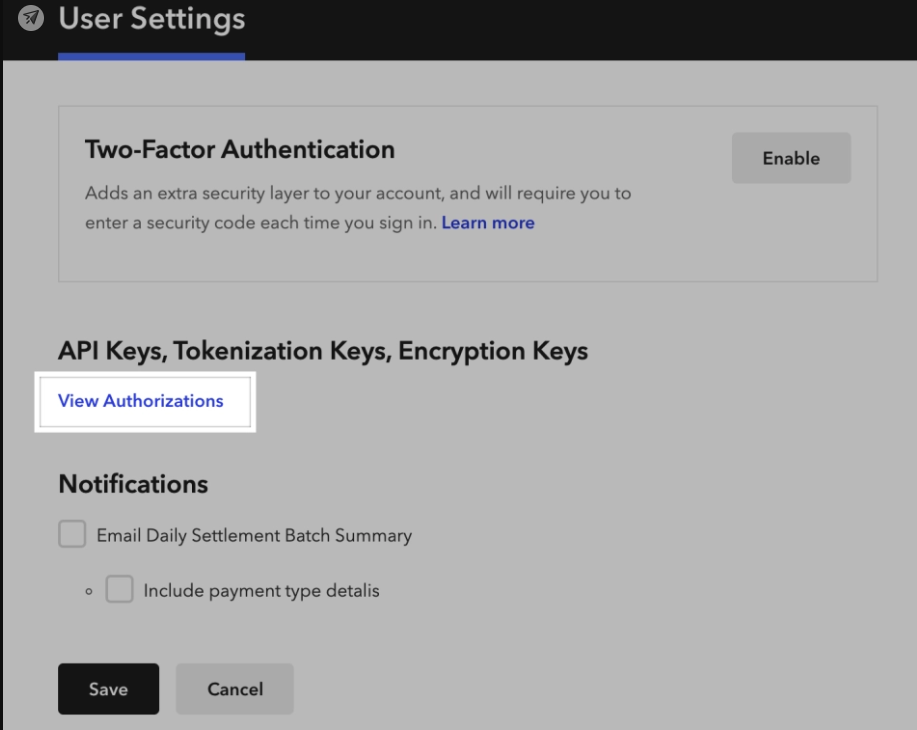
Step 9: Now, there are Px-Post Username and Px-Post Password fields that need to be filled with the same credential that you requested from the support.

Step 10: Save all the changes.

As the WooCommerce store owners need to add more details for their customers’ easy than just setting up and configuring payment gateway, here are a few more configurations that you must take care of:

  1. For a credit card payment, you must get an Internet Merchant Account Facility from your bank and apply for the Payment Express service on the Payment Express official Website.
  2. You can also configure the currency type and transaction mode. There are more than dozens of currency type options available for transactions in different countries and mainly 5 Transaction types to choose one from Purchase, Auth, Complete, Refund, and Validate.
  3. To show off the security parameters, you can use AVS for all transactions made with credit and debit cards at the payment gateway.
  4. Another security parameter is the Card Verification 2 or CV2. It allows you to validate the credit and debit card transactions made on Payment Express.
  5. You can also make change to the interface, changes like Submit button text, Reset button Text, Cancel button Text, Amount not specified error, Card number not specified error, Expiry date invalid error, and a lot more texts that are displayed either as correction to user input or a sign to invalid entry.

These settings will help you improve the user experience for the checkout process in your WooCommerce shop for the buyers.

Payment Express is a quick addition to WooCommerce and a really quick solution to transactions as well. Provided a SSL certificate held with the hosting, you need nothing more to grab the credentials through quick sign in on its official website. Believe me, Payment Express is a melting butter over the fluidy WooCommerce. We hope you got your problems sorted with the help of this article. In any case you didn’t, you can always visit WPCustomify to get quality support services.

How to Setup PayPal Powered by Braintree in WooCommerce?

PayPal powered by Braintree is an easier option for accepting payments. This payment gateway plugin is no different to credit card terminals where the customers are required to swipe their card to pay for their in-store shopping. It ensures that the payment info of the customer is safely and securely stored.

Integrating your website with a merchant account on PayPal powered by Braintree offers a number of benefits. The shopping cart and e-commerce partners allow users to create a provisional or trial account even with less information. After creating a merchant account users can access the payment gateway through the Control Panel of PayPal powered by Braintree. Once your application process is completed you may start receiving all the payments to the registered bank account.

It is easy to accept PayPal and credit cards alongside each other. When submitting your account application it is recommended to link your account with your current PayPal account. Alternatively, you may build a new account. In either of the ways users can easily manage their PayPal account settings/disputes.

WooCommerce PayPal Checkout Payment Gateway plugin is used for the purpose. It can be downloaded using this link.

A) Installing PayPal Checkout Plugin

  • Sign in to your WordPress account
  • Find ‘Plugin’ and then click on ‘Add new’

B) Setting Up And Configuring

  • Go to Woo Commerce > Settings > Payments > PayPal Checkout
  1. Now, enable Braintree(PayPal) plugin
  2. Click ‘Manage’
Enable Braintree PayPal

Setting of Gateway Configuration

To set Gateway Configuration check the steps listed below –

  1. Check Braintree (PayPal) Gateway by ticking on ‘Enable this Gateway’ box
  2. From Environment’s sandbox choose ‘Production’ from the dropdown menu
  3. Fill Merchant ID, Public Key, and Private Key.
  4. Select ‘Save Change’
Braintree PayPal Gateway
  1. Customize Button Shape, Button Shape, and Button Size
  2. Choose Pay with PayPal or PayPal CREDIT button
  3. Tick on Buy Now On Product Pages
  4. Check Enable Cart Checkout box
  5. Check Tokenization to enable save card on checkout option
  6. Select ‘Save Changes’
Customizing Payment Button

Check the Final Braintree PayPal Pages

Product Page of Your Website

Final Braintree PayPal Pages

Checkout Page and Cart Page of Your Website

Cart Page of Your Website

h2 class=”elementor-heading-title elementor-size-default”>How to Find API and Merchant ID on PayPal Powered by Braintree?

Follow the steps to connect the plugin to your Braintree account –

  • Sign in to your account
  • Find the profile icon (towards the upper right corner)
  • Select ‘My User’
My User
  • Click on ‘View Authorizations’
View Authorizations
  • Select ‘View’ for viewing the API keys. Alternatively, you have the option of generating a new set of API Keys.
viewing the API keys
  • If you click on ‘View’ you’ll get access to Public Key, Private Key, and Merchant ID.
Public Key

Braintree PayPal Gateway Settings

Enable PayPal in your account to access Braintree PayPal gateway. Go to Settings > Processing to enable customers to pay with PayPal option.

Braintree PayPal Gateway Settings

How to use a Control Panel for voiding a payment on PayPal powered by a Braintree account?

Follow the steps listed below voiding a payment –

  • Sign in to your Braintree account and go to Control Panel
  • Select ‘Transactions’ ( towards the upper left corner)
  • Check or uncheck the options to customize date range, amount, etc.
  • Next, select ‘Search’
  • Look for the latest transactions
  • Select payment Transaction ID ( that you want to void)
  • Click Select ‘Void’ ( located towards the upper left corner of the screen)

How to activate fraud filters on your Braintree account Control Panel?

The steps listed below will help you in enabling fraud filters –

  • Sign in to your PayPal powered by Braintree account
  • Select the gear icon (upper right corner).
  • Click on ‘Processing’
  • Select the Options located next to CVV and AVS for customizing credit card fraud filters.

Conclusion

PayPal powered by a Braintree account not only makes it easier for merchants to accept payments but also offers multiple other benefits such as voiding payment.

With its use merchants have the ability of voiding a debit or credit card payments while the settlement is in pending. Moreover, when a user receives full approval for their Braintree account they can access fraud filters designed for combating fraudulent activities and ensuring fraud management. The filters allow users to take complete control of their online business and meet customer demands efficiently.

If you want professional assistance in PayPal powered by Braintree configuration for WooCommerce or need WooCommerce support services, contact WPCustomify.

How to Integrate SecurePay Payment Gateway in WooCommerce Stores?

SecurePay is one of the most reliable payment gateways introduced by the Australian Company OLB Group, Inc. It is an ideal way of connecting an online platform to a secure server that can address various e-commerce needs. The extension is a perfect solution for organizations and businesses of all kinds and sizes. Merchants are facilitated with complete payment solutions that can ease the online sale-purchase process for the businesses. The system enables them to start their business within a week’s time.

Being a leader in Australia’s online payment market, SecurePay’s experience spans over 15 years. The platform has experience of helping more than 40,000 organizations with their unique e-commerce requirements.

What Plugin is used for SecurePay Direct Post Setup?

SecurePay Payment Setup uses WooCommerce SecurePay Payment Gateway plugin. With installation and setup of this plugin the merchants can accept customer credit cards. It takes less than 5 minutes to set up the plugin. The system checkout process is eased to a great extent with SecurePay. Before we talk about the process, let’s first tell you why this gateway is a decent choice for your eCommerce store.

Benefits of SecurePay Online Payments

Simple application process – SecurePay Payment Gateway allows businesses to facilitate their customers with good selections of payment options including PayPal, Visa, American Express, MasterCard, Diners and Club International. Customers can make the purchase without any hassle. It further helps businesses to gain an increased number of sales. The best part is that merchants need not to visit their banks to submit the application. The complete process can be initiated online.

Easy integration – The payment gateway also offers the benefit of quick integration. You can easily integrate the system with multiple e-shopping carts. Plus, users can access all major banks (particularly Australian) easing the process of receiving payments for merchants.

Security of online transactions – With online payment gateway in use you are guaranteed to have safe and secure transactions. It also protects customer information from unauthorized access and fraud. SecurePay is easily manageable. Customers can access the account related data any time. Additionally, it offers the benefit of reporting. The details therein allow individuals to manage transactions and build strategies effective for business marketing.

User-friendly for both customers and businesses – SecurePay opens multiple payment options for online purchase. Customers can pay via bank transfer, credit card, COD, or in person. One of the greatest advantages of the online gateways is that you can reap the benefit of all the methods collectively.

Additionally, SecurePay easily works in combination with multiple payment platforms. By integrating the platforms with this payment gateway a businesses’ customer count is sure to increase in their customer count (irrespective of the payment option they choose according to their bank account suitability. Paying for their online purchase will be easier. Also, the process of payment through SecurePay is user-friendly, quick, and safe.

Additional benefits – SecurePay is supported on Mac and Windows. It can be deployed on Cloud Hosted platforms and offers impeccable English language support. The online gateway comes with Quote-based and One-time payment pricing models making it easier for merchants to manage the cost. It’s an ideal option for Freelancers, Small/Medium Business and large corporates. You can rely on this payment gateway for detailed online reporting, online payments, PayPal support and more.

SecurePay Payment Gateway Installation Process

  • Download the SecurePay Payment Gateway plugin.
  • Open “woocommerce-securepay.zip” file and then upload it to the directory. Find WordPress > Content > Plugins.
  • Go to the “Plugins” menu for activation in WordPress.

SecurePay Payment Gateway Plugin Setup Process

  • Find Store > WooCommerce > Settings > Checkout.
  • Select SecurePay payment gateway by selecting payment gateway.
  • Customize the Test Mode, Title, Merchant Pass, Merchant ID, and Currency.
  • Now select ‘Save Changes’ for saving the SecurePay information.
  • Now use frontend SecurePay.

Integrating WooCommerce SecurePay Payment Gateway in Website

Requirement

  • SecurePay Payment Gateway Plugin for WooCommerce.
  • SecurePay account (in a Australia based bank).
  • SSL certificate.

Follow the below listed steps for integrating SecurePay Payment Gateway –

  1. Sign in to your WooCommerce WordPress Website
  2. Go to WooCommerce Menu > Payment > SecurePay payment gateway
  3. Check ‘Enable SecurePay Payment Gateway’ box
  4. Add SecurePay Merchant ID and SecurePay Password
  5. Select ‘Save Changes’

Finding Secure Pay Merchant ID

Merchant ID can be found in SecurePay account by logging in to your account using this link.

Once you sign in to your SecurePay accounts find your account’s Merchant password and ID.

What to do if you find Live Mode ‘Invalid Merchant ID’ Error

Here are the reasons if you find ‘Invalid Merchant ID’ error –

  • Check whether your ‘Transaction Merchant ID’ has 7 characters (For example – XYZ0022). Accounts having Merchant ID of 3 characters wouldn’t be accepted (for example – XYZ). In this case you’ll need to connect with SecurePay customer care for a valid LIVE Merchant ID.
  • After you enter the ‘Transaction Merchant ID’ make sure you forget to untick ‘Test environment’ box.
  • It is important to install a full-proof SSL certificate on WooCommerce site. Plus, ensure the server has TLS1.2 support.
  • If you are facing errors make sure the plugin is downloaded or installed from the official WordPress plugin manager. Do not consider any other site for plugin download.
  • Disable plugins which aren’t necessary. Switch your account to WordPress theme (default).

Conclusion

Being one of the most reliable payment gateway plugins SecurePay can meet your unique business needs efficiently. However, some third party themes or plugins added to the site may cause some issue. Therefore, it is wise to conduct test transaction. In case the plugin fails in the testing system disable some plugins or try changing your website’s theme. For assistance or support services related to SecurePay Direct Post, you may consider WPCustomify team.

How to Integrate SagePay (Opayo) Direct Payment Gateway with eCommerce Platform?

SagePay Direct Plugin comes with a dual payment gateway system which is clubbed into one. The plugin allows the users to take advantage of two payments by integrating it with WooCommerce. Well, we know that this plugin must be in your to-checkout or to-add-to-store list for long, and the name is hard to forget. But now, Sage Pay is rebranded as Opayo. So, you will have to remember the same name while searching for it.

In this article, we will tell you why this payment gateway is of extreme importance for your WooCommerce and how you can use, integrate, setup, configure and do related operations for your online store.

Note: Sage Pay is now Opayo.

Features of Sage Pay (Opayo)

Top-notch Security

Sage Pay is an advanced payment gateway making it one of the most reliable, safe, and secure options in the market. It offers approx. 98% uptime and best in the class fraud tools for free.

Opayo, or Sage Pay, which is one of the independent gateways of Elavon is trusted by consumers and businesses alike. Over the years the brand has built a reputation for delivering matchless customer support.

Offers Unparalleled Growth opportunities

With this plugin in use merchants can get the amount into their bank account in less than 48 hours. This means they won’t have to wait for a week’s time for receiving their money. Increased cash flow means increased growth opportunities.

Customizable According To the Particular Needs of Individuals

Opayo form and Opayo direct can be accessed using the current merchant account. However, you may look for alternatives suiting your unique needs.

Requirements

  1. Sage Pay account
  2. SSL Certificate

Two payment gateways –

1. SagePay Form

  • Customers are given access to SagePay for completing the payment
  • No need for a SSL Certificate

2. SagePay Direct

  • The entire checkout process takes place on the site
  • SSL Certificate mandatory
  • WooCommerce Pre-Orders supported
  • WooCommerce Subscriptions recurring payments supported
  • Refunds supported in WooCommerce
  • Tokens supported when used with WooCommerce
  • Capturing WooCommerce transactions (authorized )

Which plugin is used for setting up Sage Pay Payment Gateway?

SagePay Direct Gateway for WooCommerce is popularly used for this purpose. It can be downloaded using this link.

Setting up Sage Pay Payment Gateway

The steps listed below will help you set-up the plugin –

A) Installing SagePay Plugin

    • Login into your WooCommerce account.

  • Find Plugin and then click ‘Add new’

Activate the plugin once installed.

B) Setting up and Configuring

Click on Woo Commerce > Settings > Payments > Sage Pay

  • Enable the plugin and click on manage

Sage Pay Configuration

Follow below listed steps

  • Check ‘ Enable Sage’ box Add vendor’s name in the given sandbox
  • Check ‘test mode’ ( unchecking the box means the settings will be on live mode
  • Fill in the Integration Key and Integration Password
  • Enable ‘Capture Charge Immediately’
  • ‘Enable MOTO’ integration
  • Check ‘Enable CV2 Checks’ box

Take a look at your final checkout Page

Verifying CVV number

Check ‘Enable CV2 Checks’ to verify CVV number.

Steps to Finding Sage Pay API Keys

  • Sign in to your Sage Pay account using this link.
  • Go to settings

Integrate SagePay

  • Click on ‘Create API credentials’

Integrate SagePay

You’ll find the API keys details.

Setting up PayPal for Sage Pay Direct

Here are the steps –

  • Create your PayPal test account
  • Enable Sage Pay
  • Link Live account with your PayPal account

Once PayPal is enabled in your Sage Pay account, add PayPal in the ‘Accepted Cards’ settings.

Integrate SagePay

Now customers get access to PayPal in the dropdown card type list.

Integrate SagePay

NOTE – In cases when the cart includes a subscription product the list won’t show PayPal.

Testing Transactions

To confirm the customized settings are working properly it is important to test the transactions. After you are done completing the tests connect with SagePay customer care to make your account available for the public. You will be notified once the account status is changed to Live. Also, Sage Pay comes with test cards that can be used for testing transactions.

Screening Sage Pay Direct Fraud Transactions

Sage Pay facilitates the merchants with fraud screening which can be done at any step of the process. In case of any discrepancies in the transaction order status is changed to alert the merchants during checkout. In this case you’ll be required to sign in to MySagePay for confirming/canceling the order. After reviewing the fraud notification reasons you may update the transaction at WooCommerce as needed.

Sage Pay Direct Refund

Generally, customers that place refund requests aren’t satisfied with the brand’s services. They either have some issue with the product or dissatisfied with the customer support. All they want is a complete refund of their money without any hassles at the earliest. This is your last chance to maintain goodwill of your brand before the customer. Direct Refund option in Sage Pay allows individuals to make quick refunds at the earliest.

Sage Pay Extension supports GBP, USD, Euro, and various other currencies. It also supports different card types such as Mastercard, Visa, and American Express. This UK based payment gateway is indeed one of the best options to ensure easy business transactions. It makes the checkout process more efficient and easy for both customers and merchants. Furthermore, with two gateway options in hand you can ensure complete customer satisfaction.

Willing to integrate SagePay Direct (Opayo) but not sure about succeeding while doing it on your own? No worries. Hire experts from WPCustomify.

PayPal Checkout Explained for WooCommerce Store Owners

PayPal Checkout for WooCommerce allows online store owners to accept instant online payments through PayPal. The checkout is featured with personalized advanced Payment Buttons. This latest and PayPal extension is indeed one of its best payment methods.

When you use PayPal checkout for your store, the feel and look of the checkout page can be customized according to your unique requirements. Plus, you’ll get the complete protection from fraud and theft. The WooCommerce extension also benefits the users with real-time updates automatically. So, it is always a better idea to adopt it. Most of your customers must have PayPal too, right?

In this article, we will introduce you to PayPal properly and tell you how to enable PayPal checkout for your store. Meanwhile, you can also take expert advice and services from WPCustomify regarding this integration and other WooCommerce issues/tasks.

Features of PayPal

Advanced servers for high-end security

PayPal uses secure servers for processing the payments. It means you need not to be concerned about safety and security of sensitive info of your customers shared on checkout. PayPal Checkout allows individuals to  focus more on making their business successful.

Easy to set-up

PayPal onboarding offers the added advantage of free extension facilitating the users with easy ways of setting up and using the PayPal account for the business. Just select “Setup your PayPal account” and you will not have to deal with the hassle of copy/pasting the PayPal credentials.

Seamless and Secure Checkout

PayPal comes with In-Context Express Checkout  feature benefitting the buyers with speedy, seamless, and secure checkout while staying on the website. The business website provides streamline experience to the customers.

WooCommerce One Touch check out

WooCommerce PayPal Checkout comes with One Touch feature designed for seamless experience of the customers. They need not to enter card details or password for at least six months. It enhances their overall checkout experience on the site.

Direct capturing of charges in WooCommerce

The extension facilities users to maintain record of the previous transactions from the website’s Edit Order page. You’ll be saved from the extra efforts that otherwise go singing in to the PayPal account.

Personalized checkout page

With this extension in use you may ensure that the payment experience matches your brand’s unique style. The extension offers the flexibility of changing the size, layout, and color for a customized experience during the checkout process.

How to set up a PayPal checkout?

Requirements

  1. A PayPal account (in the name of your business). If you don’t have an account you may register one at PayPal.com.
  2. PayPal Reference Transactions for Subscriptions. You may opt for Reference Transactions for using/selling Subscriptions at WooCommerce.

Which Plugin used for setting up PayPal Checkout?

First of all you need to download PayPal Checkout Payment Gateway for WooCommerce using this link.

Setting up and configuring WooCommerce PayPal Checkout

Here are the steps –

PayPal Checkout Plugin Installation

    • Sign in to WooCommerce account
      • Find ‘Plugin’ and then click on ‘Add new’
        1. Activate the plugin once it’s installed in your system.
        2. Now you need to Setup and configure
        3. Find WooCommerce, then click on Settings, then Payments and then on PayPal Checkout
        4. After Enabling the plugin and select ‘Manage’

PayPal Checkout Integration with WooCommerce

      1. Tick the ‘Enable PayPal Checkout’ box
      2. Select ‘Live’ from Environment sandbox’s dropdown menu
      3. Enter Live API Username, Live API Password, and Live API Signature
        • Select ‘Save Changes’


      • PayPal Checkout is successfully integrated with WooCommerce
      • Check your final Checkout page once a product is added to the cart.

How to find the API of PayPal?

        • Sign in to your PayPal account using this link.
        • Click on Setting > Account access > API Access (select Update)

        • Select ‘Mange API credential’

      • Select show Signature, API Username, and API Password to access the API keys.

How to Customize Button on Checkout, Cart or Product Page?

Customization of Checkout Button

        • Click WooCommerce > Settings > Payments > PayPal Checkout
        • Select the ‘Button Settings’ to personalize Button Color, Button Shape, Button Label, Button Layout, and Button Size.

      • Click ‘Save Changes’

Customizing Direct Checkout

        • Tick ‘Enable Paypal Checkout On The Cart Page’ box
        • Tick ‘ Configure Settings Specific to Mini-Cart’ box
        • Customize the Button label, size, and layout

      • Select ‘Save Changes’

Check Cart Page of your site

Personalization of Direct Checkout Page

        • Tick on the ‘Checkout On Single Product’
        • Select ‘Configure Settings Specific To Single Product View’
        • Customize Button Label, Button Layout, and Button Size

      • Select ‘Save Change’
      • Check the single product page look of your website

How to Use Direct Checkout?

Direct Checkout on the Site’s Cart Page

Direct Checkout on the Site’s Single Product Page

How to set up a PayPal reference transaction for recurring payment?

Users are required to email their queries to PayPal support for enabling reference transaction

For sending Email Application

      • Sign in to PayPal account
      • Find Email Contact Form
      • Select Business solutions as your topic
      • Select PayPal payment solutions as your sub-topic
      • Select PayPal Express
      • Checkout as your sub-topic

Write your message in the given space. Don’t forget to add your PayPal account name and email address. Send the message.

Wait for the response.

Customize reference transaction setting

        • Select WooCommerce > Settings > Payments > PayPal
        • Customize the credentials
        • Click on the ‘Enable PayPal Reference Transaction’ link as in the image below.

      • Enable Reference transaction

Once you are done with all the above-listed steps recurring payment will be enabled for your PayPal account.

PayPal Checkout Support Subscription

Recurring payments are supported when WooCommerce Subscriptions are integrated with PayPal Checkout supports. Users can use Express Checkout when applying for Reference Transactions to enable this PayPal plugin with Checkout Subscription support.

PayPal Credit Checkout

This option is available primarily for U.S. users. It is one of the Checkout stack parts of PayPal. It allows the users to offer payment flexibility to their customers when shopping on the site. Merchants get full payment of the merchandise instantly but customers are allowed to pay for it over time.

Troubleshooting

Go to Advanced plugin settings to ‘Enable logging’ for Debug Log

You can find Logs by clicking on WooCommerce and then on System Status and lastly on Logs.

Conclusion

Paypal Checkout extension allows merchants to accept Credit Card, Debit Card, and PayPal. Plus, it supports payment subscription as well. The best part is that it can be set up without any hassle. Customers are benefited with Checkout directly from cart page and product page without getting redirected to third party website.

How to Setup WorldPay as a Payment Gateway to Online Store?

Worldpay gateway plugin allows the users to multiple payment options including PayPal, Visa, Mastercard, and more. If you own a WooCommerce store and are willing to set up this payment gateway, you have made the right choice.

When the customers fill in their card details on checkout they are redirected to the payments page automatically where they can enter the necessary details. Worldpay gateway processes the payment and authorization is sent back to the site.

Now, let us tell you how to set up WorldPay as your online store’s payment gateway. If at any point, you feel like the process is tough and you might mess it up, just come back to this section and hire professionals for this purpose.

Requirements

  • A WooCommerce version 3.0.0 website
  • A Worldpay account. Users who haven’t already signed up can create their account here.
  • An SSL certificate

Which plugin is used for the WorldPay Payment Gateway?

‘Online Worldpay for WooCommerce’ is the best plugin for World Pay Payment Gateway. You may download it using this link. In this tutorial, we are going to use the same.

World Pay Plugin Installation

Follow the steps below to install the plugin –

  • Sign in to your WP account.
  • Next, select ‘Plugin’ and then ‘Add new’.
  • Install the plugin and then ‘activate’

World pay Set up and Configuration – How to setup and configure World pay?

  • Click on WooCommerce, and then select Settings, Payments, and then World pay
  • Enable ‘Online Worldpay CC Gateway’ and ‘Online Worldpay PayPal’ plugins and select ‘Manage’.

API Settings and How to Find API of World Pay?

  • Select ‘API Settings’
  • Now got to Environment and choose ‘live’ from the given Drop Down menu
  • Next, complete the API Settings
  • Last, ‘Save Changes’.

Credit Card Gateway

  • Once you are done with the API settings click on ‘Credit Card Gateway’ tab
  • Check the ‘Enable Credit Card Gateway’ box
  • Select ‘iFrame Form’ in Form Type sandbox
  • Fill in ‘Worldpay’ in the Title sandbox. Check other settings of the form similarly.
  • Now ‘Save Changes’.

PayPal Gateway

  • Click on ‘PayPal Gateway’ tab
  • Check ‘Enable PayPal’ box
  • Complete the ‘General Settings’
  • Select ‘Save Changes’

Webhook Settings – How to Setup Webhook in Worldpay?

Follow the steps below to Setup Webhook in Worldpay –

  • Select ‘Webhook Settings’
  • Go to Webhook Url sandbox and select the given link.

  • Now sign in to World pay
  • Next, go to Dashboard, then Setting, and then Webhook
  • Paste the website url
  • Select ‘Save’

Setup WorldPay Payment Gateway

Find the checkout page of your WooCommerce website and check PayPal and Credit Card Worldpay.

Setup WorldPay Payment Gateway

Finding WorldPay API

  • Sign in to your Worldpay account using this link.
  • Click on Dashboard > Setting > live > API Keys
  • Copy both Service key and Client key

Setup WorldPay Payment Gateway

Worldpay Online Setting Details

Enable/Disable – Allows enabling or disabling the payment gateway. Checking the box means you have enabled the feature and the customers are allowed to pay using Worldpay Online.

Checkout Form – This in-built checkout form in WooCommerce ensures an integrated and seamless experience to your customer on checkout. Merchants with no an SSL certificate can untick the Checkout Form option.

Testing – Merchants need to check the Testing option in the initial stage of setting up their website. You may uncheck the option once live orders can be processed for money.

Payment Action – This option allows immediate capturing of the payment or authorizing the card instantly/ capturing the payments later. All your orders with Authorized marking can be easily captured from site.

Title – The title you fill in the sandbox is displayed on the checkout page.

3DS Enabled – It facilitates an extra step on checkout which is for additional safety and security of customer data. Enabling 3DS shows whether the buyer’s bank leverages the 3D secure Solution.

Card-on-file Payment / Tokens – Facilitate your customers with easy and secure storing of their payment method and card details. This ensures quick checkouts in the future. The entire card details are stored at Worldpay and not in the database. Though the site’s database has a token for saving the cards that can be automatically charged on checkout. Note that Tokens are best suited for Authorized orders, Subscription orders, and Pre-Orders.

Live Service Key – Use live service key for processing live orders. You can find it in your Worldpay account.

Live Client Key – This key is also needed for processing live orders. Like the Live Service key it can be also found in the Worldpay account.

Settlement Currency – Merchants can select their preferred currency using this option Worldpay will pay you in the selected currency only.

Test Service Key and Test Client Key – Merchants who have both these keys can reap the benefits of test orders. It can be found in your Worldpay account.

Transaction manager – Using this option you can process the payments from your online shop’s back-end.

Dedicated Support Worldpay Team

Worldpay has a team of dedicated support teams accessible 24/7. You may reach out to them whenever you need any help related to your Worldpay account.

Migration/Deactivating World Pay Form

Users with a Worldpay account can add the keys to their account’s settings to deactivate the Form. Note that migrating Subscription payment amounts from your Worldpay Form to Online Worldpay account is a complex process. Your customers’ cache will be cleared – even the cards saved with your store’s account will get removed. So, in case you reactivate it again, they will have to fill in all details again. However, you have one facility here – all the outstanding payments will still be collected through Future Pay service by WorldPay.

Conclusion

WorldPay WooCommerce Payment Gateway Extension is indeed a great thing as it allows merchants to collect payments on their store automatically, eliminating the need for redirecting buyers to a third party website.

Moreover, WorldPay enables merchants to take payments anytime, anywhere, through mobile/desktop. The entire process takes place on the site. Hence, you can receive info about your order status in real-time. Plus, the platform comes with an Unlimited License Agreement for an online store. Worldpay provides payment solutions meeting merchant demands.

How to Integrate Square Payment Gateway in WordPress Website?

The Square Payment Gateway for WooCommerce is an amazing tool that can be easily integrated into customer data, sales, inventory and other channels. It enables instant acceptance of payments through a single centralized solution. This means WooCommerce store end-users can start using Square right away without waiting for hours. Also, there aren’t any hidden charges. You are charged only when you earn sales revenue.

Thinking about setting up and integrating Square Payment Gateway on the WordPress website? This article will tell why and how you can do that. And if you have already made up your mind and are looking for experts to help you in doing the same, hire professionals at WPCustomify for excellent and fast services.

Features of Square Payment Gateway for WooCommerce

a) Saves Card and Customers Details

Regular customers can easily save and secure their card details. Plus, it also allows them to label their mode of payment making it easier for them to identify the method when needed in future.

b) Authorize Capture

Square allows the merchants to authorize customer order when a transaction is made by the customers and the payment is captured when order is shipped.

c) WooCommerce Pre-Orders and Subscriptions Support

WooCommerce Pre-Orders is an ideal option to add pre-orders buttons in your online store for various products and services. With this extension you can accept upfront payment for the pre-orders and set any time and date according to the availability.

d) Business Security at Zero Cost

Payment disputes are obvious where sale and purchase take place. There is always a risk of issues with the purchase from the customer’s end. Square’s team of professionals resolve the matter by verifying the authenticity of concern raised by customers. The end decision is made by them accordingly.

f) Dispute Dashboard for Easy Work Management

Square’s Disputes Dashboard allows users to submit e-copies of the important documents to the extension. It eases the job of merchants by handling the stressful, time-consuming, and hefty work of sorting bank related issues of the customers.

g) Account Protection and Fraud Prevention

The dedicated fraud protection team of Square ensures complete account security. Not only do they keep 24/7 watch on the account activities but ensure a holistic approach towards the extension’s ecosystem. Plus, they keep analyzing different signals in order to keep themselves abreast of the latest fraud trends.

h) Advanced Data Security

Square’s advanced features enable it to protect all the business related data. It records every business activity and transaction. You need to worry about the safety of your business and confidential info with Square in use.

i) Up-to-date and accurate inventory

Square integration eliminates the need to maintain a manual record of sales and inventory. The extension automates the entire process and helps in keeping the track of the WooCommerce inventory. With tools in use merchants can easily sync any offline or online changes in the stock.

What Plugin is used to Set Up Square?

Requirements

  • An SSL Certificate
  • WooCommerce version 3.0+
  • PHP version 5.6+
  • WordPress version 4.6+
  • A Square account

Setting up and Configuration Process

  1. The process starts with buying and downloading the plugin needed for integrating Square extension with the site.
  2. “Square For WooCommerce” is the best plugin for the purpose. You may purchase and download it from this link.
  3. After the plugin is downloaded proceed with installing and activating it to your business website.
  4. Next, click on WooCommerce > Settings > Square tab for completing the configuration.
  5. Now Sign in and set up your Square account. Next, select the “Connect with Square” option.
  6. Manage app permissions to connect Square with your website automatically.
  7. Now you’ll be redirected to your website.

How to Manage Inventory and Synchronize Woo with Square?

  1. Find the Product in your Square account.
  2. After selecting the product click on ‘Sync with Square’ option. Note that this option is limited to the products having a SKU and an attribute.
  3. Lastly, click on Update.

Synchronizing Inventory and Products Manually

Wondering how to Synchronize Woo with Square? Follow these steps:

  1. Select WooCommerce, then Settings, and then Square.
  2. Next, click on ‘Update’.
  3. Now select ‘Sync Now’

The above steps help in managing and synchronizing the inventory/products with things listed below –

  • Product Price
  • Product Name
  • Inventory Count
  • Product Category
  • Product Image
  • Product Description

Capturing the Charges

The payments can be captured manually if the ‘Transaction Type’ of the gateway is ‘Authorization’. It can be done from the Orders page on WooCommerce.

Users can capture the authorized transaction for a maximum of 6 days. Post this period you’ll have to ask your customers for transaction re-authorization for capturing payment. You’ll have to follow this procedure for every Square transaction. Note that the amount which is captured has to be similar to the authorized amount. Square doesn’t permit for partial captures.

Automatic Refunds

The refunds can be issued automatically on the website. You won’t have to check in to Square account for refunds.

How to Setup Recurring Payments Setup?

To Set Up Recurring Payments you need to allow the customers to save the payment method and card details in their profile for future reference. It helps merchants for pre-orders and product subscriptions.

Conclusion

Square WooCommerce Payment Gateway makes the eCommerce site both flexible and powerful. All the changes made to the inventory in WooCommerce are synced to the gateway automatically. It is a robust, easy to use, and affordable solution to manage online sales – a perfect package for small business owners, artists, and others. Do you still need more reasons to start using this gateway? We guess not.

How to Integrate Stripe Payment Gateway in Your Website?

The Stripe Payment Gateway allows the merchants to accept easy payments onsite. It can be used for both mobile and web transactions.

This plugin lets the customers stay on the online platform and eliminates the needs of redirecting them to a third-party host page during the process of checkout in WooCommerce.

In other words, you’ll be benefitted improved conversion rates. With Stripe, you can add Payment Request buttons to your site (including Google Pay and Apple Pay). And this article guides you to deploy this gateway properly for your buyers. Alternatively, you can take help of the best WooCommerce support service providers.

How to Setup Stripe?

Requirements

    • An SSL certificate is needed as a proof of the merchant’s credit card detail. Note that this plugin has the power of Stripe JS for tokenizing credit card details for data security.
    • Stripe abides by the Strong Customer Authentication standards crucial for safe and secure transactions that come under European Economic Area.

What Plugin is used to Setup Stripe?

Stripe plugin for WooCommerce is available for downloading here.

Installation and Setting up Stripe Plugin

Follow the steps listed below after downloading the plugin from the link given above.

      • Sign in into WordPress site as an Admin
      • Now click on ‘Plugin’, then ‘Add new’. Once the plugin is installed, click on ‘Activate’.
      • Here you need to setup and configure the plugin as directed below –
        1. Go to WooCommerce then click on ‘Settings’, then ‘Payments’ and then on ‘World pay’
        2. Now select ‘Enable’ > ‘Manage’
        • Type in the API keys for Stripe relevant to live mode or test mode

        • Check the ‘Force Secure Checkout’ box to enable the feature and then select ‘Save’

        • Fill in all the details on the checkout Page and click on ‘Place Order’.

Finding API on Stripe

Simply follow the following steps –

        • Sign in into your Stripe account using this link and then select ‘Setting’ followed by ‘Connect Settings.’

        • Get your Stripe API keys by clicking on ‘Developers’ > ‘API Keys’

        • Enable ‘Viewing Test Data’ or ‘Viewing Test API keys’ as per your requirement.

        • Now go to the Publishable Key and you’ll find a value in the Token column – pk_live_somelongrandomvaluelikeVqFze9etc. Copy it.

        • After saving the Publisher key click on ‘Reveal live key token’ which is in the secret key row.

      • Copy the secret key. It will be used in the website’s stripe setting.

Payment Request Buttons and Subscriptions Extension

Payment Request buttons support Variable and Simple products in cases when the WooCommerce Subscriptions extension is used. WooCommerce Subscriptions and WooCommerce Stripe extension use allow merchants to have a good number of subscriptions in their online store.

How to Find a Webhook in Stripe?

Step 1 – Extract the signatures and timestamp from Stripe header

Start with splitting the header by using the character “,” (comma) as your separator. This step is crucial to get the elements list. Next, split all the elements with “=” (equal to) sign. You’ll get a value and prefix pair.

Step 2 – Creating the signed_payload string

It can be easily prepared by linking character, timestamp and JSON payload all together.

Step 3 – Finding the signature

HMAC computing with the hash function SHA256 is required for the purpose. Signing secret of the endpoint can be used as your key, while the signed_payload string will serve the purpose of the message.

Step 4 – Comparing the signatures

You need to compare and mark the difference between the header and expected signatures. Consider how different is the current timestamp from the received timestamp and then map the difference with your tolerance.

How to Set Up Recurring Payment in Stripe?

Requirements

Setting up a recurring payment becomes easier if you have all the things available with you. Here is all you need to arrange to begin the process –

      • Stripe account with Subscription plans
      • Qwilr integration with Stripe account
      • Qwilr Page should have the payments enabled

Setting up Recurring Payments

After collecting payment through your Qwilr Page the merchant’s Stripe account gets a new customer record. Here are the steps to set up recurring payments –

      • Once you reach your Stripe account, find the record page of the customer where the recurring subscription is to be added.
      • Now go to your Active Subscriptions and select ‘Add Subscription’ button which will be on top of the page.

Now you’ll be redirected to ‘Create a Subscription’ page. After you are done adding a product, click on ‘Start subscription’ and you are done.

Concluding Word

Stripe is one of the exceptional ways of accepting online payments. It allows the merchants to accept Diners Club, Visa, American Express, JCB, MasterCard, and Discover cards. You can even accept Bitcoin on your online store with this plugin in use. The best part is that you won’t have to bear any setup or monthly charges. Also, you won’t have to face the hassle of hidden costs. Users are charged only when they get earnings which are transferred to the registered bank account within a week’s time.

How to Integrate Authorize.net Payment Gateway in WooCommerce?

When we talk about online payments, the first thing that comes to mind is a payment gateway. Irrespective of the type of business you run, a payment gateway is a must. They act as a connecting bridge that also protects the identity of the customer and the privacy of their data. All of the heavy-lifting is done through the gateway, processing, and validating credentials, making it easier for all. Authorize.net for WooCommerce can simplify the process for you here.

Plugin for Configuring Authorize.net Payment Gateway for WooCommerce Store

Integrating a payment gateway in your WooCommerce store is no longer a heavy process. There are multiple plugins available that help you seamlessly upgrade your payment portal of all the choices, Authorize.net is one gateway that stands out in terms of efficiency and performance. It helps you accept contactless payments on the go. From credit to debit, e-checks, and APIs, the plugin encompasses all.

With Authorize.net, your store can accept payments from customers irrespective of time and place. The plugin has multiple features, each of which vouches for the efficiency and the performance of the same. Some of the vital features offered by the plugin include:

Features of plugins:

  • Quick and simple installation process. Easy to configure.
  • No PCI required
  • Doesn’t require SSL.
  • Offers the ability to add a message that states whether or not the payment has been successful.
  • Uses the MD5 hashing technique to rule out the possibility of fake transactions.

Find below a detailed guide on installing and configuring the plugin to start using it for your online WooCommerce store.

  • Move to the WooCommerce website dashboard > Plugins > Add new. In the search bar, type Authorize.net Payment Gateway for WooCommerce.
  • Download and install the plugin. Once done, click on activate.

Activate the plugin (WordPress -> Plugins).

    • To configure the plugin, visit the WooCommerce settings page. Scroll to WordPress, move to WooCommerce, and then click on Settings. Here, move to the Payments tab and click on it.
    • Under the Payments tab, you will find a variety of payment methods. Search for ‘Authorize.Net’. You will see a link in the list adjacent to the plugin name, click on it.
  • The page will list multiple fields that you need to fill out to configure the plugin. Begin with clicking on the checkbox to enable the gateway for your WooCommerce store.
  • Next, add a Title. Whatever you enter here would be visible to the user when they checkout to complete the payment process.
  • The description field gives you the option to display a message for the user. Something like pay securely via Authorize.net.
  • Enter your API login ID in the field of Login ID.
  • The next one you need to add is the transaction key.
  • Two tabs to enter the message for payment successful and payment failure. Enter a customized message for your customers in both of these fields.
  • In case you are a developer and would like to test the gateway, click on Test mode. Else, select live mode to make the gateway live.
  • Finally, click on Save Changes to complete the configuration process and have the plugin integrated into your WooCommerce store. To test the environment, simply add a product to the WooCommerce store and process it through to see whether or not the gateway is working fine.

How to find API of Authorize.net?

If you would have noticed carefully, the steps mentioned as 5a and 5b require you to enter the API login ID as well as the transaction key. This section will help you understand how to get hold of the two credentials.

How to Fetch API Login ID & Transaction Key for Authorize.net WooCommerce Setup:

    • Move to the merchant interface of Authorize.net. Log into the Merchant Interface.
    • Now move to the main toolbar and here click on Account.
  • On the left side of the menu, click on Settings.
  • As you click on Settings, you will see a list opening. Here, click on API Login ID and Transaction Key.
  • The next page will display the API Login ID that would be used when configuring the store.
  • Click on New Transaction Key/Create New Transaction Key.

Now click on submit to continue. This will ask you to enter the PIN for verification. Once done, you will have the New Transaction Key displayed on the page.

Now that you have the login id as well as the transaction key, you can enter them in the configuration page of the plugin on your website dashboard.

Make sure you have enabled the gateway.

Integrate Authorize.net Payment Gateway

Click on save changes to get started with the plugin.

How to Cancel Subscription from Authorize.net Dashboard?

For cancelling the Authorize.net plugin subscription, you need to follow the steps mentioned below:

    1. Begin with logging in to the Merchant Interface of the plugin.
    2. Now, move to the left side of the menu and click on Recurring Billing.
    3. Here, click on Search ARB Subscriptions.
    4. Type in the applicable transaction data and click on search.
    5. On the left side of the far column, click the Subscription ID.
    6. Next move to the Transaction Details page, and then click on the link for Edit Subscription. The page of ARB Subscription Detail that opens will have all of the fields that are editable.
    7. Now click on Cancel Subscription on the Edit Subscription page. You will find these in the top right corner of the page. If done successfully, a dialogue box will pop-up with the confirmation message.
    8. Click on Yes to finally confirm the cancellation. If you aren’t sure, you can cancel the process by clicking on Cancel.
    9. Follow the steps one after the other to successfully cancel the subscription of Authorize.net.

How to Setup a Silent Post Configuration for a recurring payment?

The given below steps will help you set up a silent post configuration to Authorize.net

  • Move to Account and then click on Settings.
Integrate Authorize.net Payment Gateway
    • Here, click on Silent Post URL. You will find them under the section: Transaction Format Settings > Transaction Response Settings.
Integrate Authorize.net Payment Gateway
  • The page opens up and will ask you to enter the URL of your WooCommerce site.

Alternatively, You can enter the URL in your online store’s main web address, with ?edd-listener=authorize at the end, so it looks like this: http://example.com/?edd-listener=authorize

With this, you can easily set up a silent post configuration.

Integrate Authorize.net Payment Gateway

How to check recurring billing in Aurhorize.net?

In order to check recurring billing payments made via the Authorize.net gateway, simply login to their main panel and you will find the option of Recurring Billing in the side menu. Click on it.

Integrate Authorize.net Payment Gateway

How to check a subscription Report in Authorize.net?

To check the subscription reports through the Authorize.net gateway, simply log in to their main panel, and under the reports section, click on Subscription status to find a detailed report on the same.

The Final Word

For the people entering in the e-commerce sector to leverage its potential, deploying payment gateways hold a crucial place. Why? Because people i.e. buyers seek for a trustworthy online shop alongside comfort & convenience. As Autherise.net can help you enable an uninterrupted and secured payment process, you must use it. This article will help you in getting started with this plugin without hassles. In case you want professionals’ help in installing the plugin or selecting payment gateway for your online business, talk to experts at WPCustomify.

×

DO YOU NEED HELP?

24x7wpsupport
Join the Course