Call Us Toll Free - US & Canada : +1-(888) 602-0119

Benefits of Bexio WooCommerce integration

Bexio is a Swiss business software that can make the process of administration simpler for SMEs. This software is cloud-based that ensures that the data is secure via Swiss data centers. It is a point that is essential for sensitive accounting topics.

This software tool is best for contact management, orders, invoices, offers, and banking & accounting. Hence, it is best for businesses who want to automate their accounting with Bexio WooCommerce integration.

The functionality of Bexio at a Glance

1. Contact Management

You can get all the contacts in a central location and can access and change them. All the other functionalities are relied upon this data and can only be accessed through Bexio mobile app. You can enter notes for categories facilitating organizations or contacts. The import of contact is also supported through CSV or Excel.

With Bexio WooCommerce integration, you can manage your contact simply.

2. Orders, Invoices, and Offers

Creating Invoices, orders, offers, and credit notes is the most basic functionality of Bexio. You can use text modules to craft it. The resulting PDF docs can be generated in numerous languages. In addition, you can customize the design.

3. Accounting

You can maintain the journal for all bookings in Bexio. This enables receipts storage and clarity. Adding to it, you can map the booking of your invoices to debtors and supplier invoice. Things are legally compliant.

4. Banking

Integrating e-banking with Bexio will allow you to have financial status overview apart from paid/ open invoices. The data is automatically updated and can be transferred to e-banking from Bexio.

Benefits of Bexio WooCommerce integration

  • Develop great journeys for customers
  • Saves time for managing administrative tasks
  • Optimized and lean processes for business
  • Attain time for activities that add value
  • Plenty of potentials to grow through scaling
  • Sustainable and innovative business processes
  • Less error-prone and seamless processes

WPCustomify is a leading service provider that gives extravagant WooCommerce support. We are an established name that provides efficient custom-fit solutions to enhance the function of the WooCommerce store.

Call us @ +1-(888) 602-0119 to know more.

Setting Up Tax Rules in WooCommerce – Everything That You Need to Know

When you are starting your online store for the first time, there is an array of things that you must know and take care of. Starting with the products you add to the pricing set, everything needs to be perfectly aligned to attract visitors and convert them to customers.

Of all of the modifications and configurations, one thing that often goes unnoticed is the tax rules and corresponding rates. It might so happen that you operate on a wide scale encountering customers from varied regions. It is necessary that the tax rules set for the store adhere to the standards and are in terms of what the customer expects.

In case you aren’t sure how to get along with the tax configuration process for your WooCommerce store, this article will give you a heads up. We have covered in detail the different aspects of WooCommerce taxes. Read till the end to understand better.

WooCommerce Taxes: Know to set different options

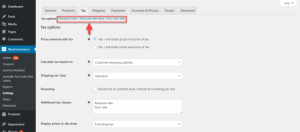
To begin with, you first need to visit the WooCommerce dashboard and hover to the end. Click on settings and then select Tax. This is where you can edit, modify, or customize all of the tax rules for your WooCommerce store.

The page displays different fields, each of which points to a particular purpose.

Case One: Apply tax rate to shipping charges

Consider that you want the taxes to apply on the total amount, i.e. the product price plus the shipping fee. To do this, you need to click on the name of the tax class.

Towards the end of the row, you will find a column as Shipping. This allows you to modify the shipping fee as taxable or not. Clicking on the checkbox will turn the shipping fee taxable.

Note: You can always limit the tax rules to a certain region, state, or country.

Case Two: Enabling / Disabling TAX

Suppose that you wish to disable taxes or simply free your store from all kinds of taxes. In this case, you need not deselect each and every tax rule. Instead, visit the settings page and deselect the checkbox of Enable Taxes.

This however isn’t practical as every store must comply with the tax rules.

The above is a snapshot of the cart page after disabling the option of tax.

Case Three: Tax configuration

Similar to the above, when you want to enable taxes within your online store, all you need to do is visit the tax page and click on the checkbox.

Once you have enabled taxes for the WooCommerce store, you can now move ahead and configure the same as per your likes.

Prices entered with tax

The first field is Price entered with tax. There are two ways this option works. One is where the price displayed on the product page has the tax amount added to it. The other one is where the tax is specifically calculated on the cart page. Meaning that the one displayed on the product page doesn’t include the tax amount.

  • To enter prices including tax, select the first radio button, and
  • To enter prices excluding tax, select the second radio button

Now when you select the first radio button, there are two options suggesting how the process is displayed on the cart page and the checkout page. Scroll down to the field that says, display prices during cart and checkout. Click on the drop-down and select including tax if you wish to have a display with prices that are inclusive of taxes.

This is how the cart page looks like when you select display price including tax.

Display prices excluding tax

In case you wish to have the first option but the store displays the price without tax, we select the first radio button and from the drop-down, we select excluding tax.

Prices entered without tax

Similar to the above configuration, we can have the prices entered without tax and the display with or without taxes.

Display prices including tax

Select the second radio button and from the drop-down, select including tax. This means that the price on the product page doesn’t include tax and that they are added to the cart page separately.

What’s the effect?

Display prices excluding tax

Last we have the option where the prices are:

  • entered without tax, and
  • displayed excluding tax

Select the second radio button and from the drop-down, select excluding tax. This means that the price on the product page doesn’t include tax and that they are added to the cart page separately.

Calculate Tax Based On

The next field asks you to enter how the tax will be calculated. There are three different options available:

  • Customer billing address
  • Customer shipping address (default)
  • Store base address

Based on the option that you choose, the tax gets calculated.

Shipping Tax Class

This allows you to select which of the tax classes would be applied when calculating the shipping fee. By default, the rate that applies to the product is applied. However, you can always select one of the classes manually.

Rounding

For values that sum down to a floating-point number, rounding helps turn it into an integer value. You can choose from rounding at the subtotal level, or per line.

Additional Tax Classes

WooCommerce has one or two tax classes defined within the store by default. The most commonly used ones are the Standard class, Reduced Rate, and Zero Rate Tax class. However, there might come a time when you need to set custom-fit tax rates that abide by certain rules. This is where you can take help from the Additional Tax Class field.

All you need to do is enter the name of the tax class and then configure it as per the need.

Display Prices in the Shop

Select whether you wish to display prices on the shop page as inclusive or exclusive of taxes. Click on the drop-down to do the same.

Display Prices During Cart and Checkout

Similar to the above, this option allows you to select whether you wish to display prices on the cart/checkout page as inclusive or exclusive of taxes. Click on the drop-down to do the same.

Price Display Suffix

Just like you can specify whether the prices are inclusive or exclusive of taxes, you can also indicate whether the price has a suffix indicating if it includes tax or excludes the same. The two placeholders are:

  • {price_including_tax}
  • {price_excluding_tax}

Display Tax Totals

Lastly, the option determines that in case there are more than one tax rule applied, will they be listed separately or together as one item.

Configuring ZIP/Postcode Tax Options

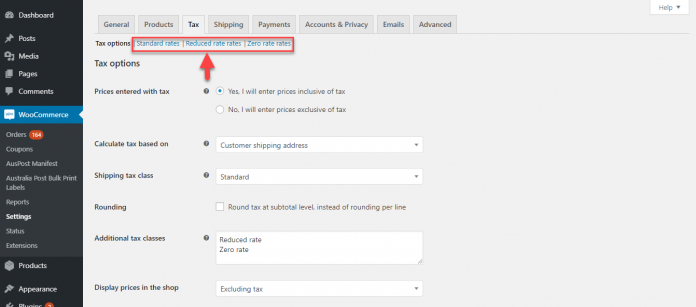
Now that you know what are the different options to set up taxes, let’s see how we can configure a tax class. For instance, let’s assume that you wish to apply a specific rate for a particular region (zip code).

Initially, you would need to click on the settings, and then taxes. Now, click on the link of the tax class that you need to configure the zip code tax options.

Setting up tax rates

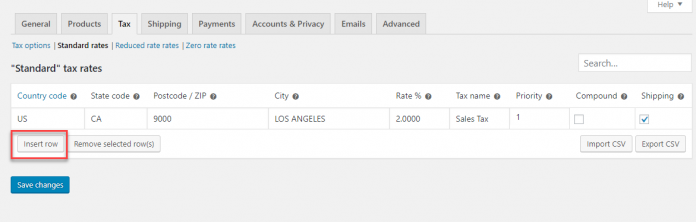
Click on Insert Row to add a new one. Once you do that, you see a new line appearing with all of the columns left blank. Enter the values as and how required.

Each tax rate has these attributes:

  • Country Code – The first column asks you to enter the 2 digit country code. For example, if you want the rate to apply in the USA. Enter the US in the country code.
  • State Code – The second column asks you to enter the 2 digit state code. For example, if you want the rate to apply in California. Enter CA in the country code. In case you wish the rate to apply in all states of the country, leave the box blank.
  • ZIP/Postcode – Similar to the state code, we have the zip code. To specify the particular areas, you can simply enter the postal code and separate them with a semicolon. Also, you can enter a range of codes together. For example, for all zip codes starting with 90, you can enter ’90*’.
  • City – The fourth column asks you to enter the city. For example, if you want the rate to apply in Los Angeles. Enter Los Angeles under the city column. In case you wish the rate to apply to all cities of the country, leave the box blank.
  • Rate % – Here is where you specify the tax rate for the chosen city in the given country. Remember that the field requires you to enter the rate in four decimal places. For example, if you want the tax rate to be 9%, the value to be entered is 9.0000.
  • Tax Name – Enter the name of the tax.
    Priority –It may happen that a particular checkout page has more than one tax rate applicable, accounting for a conflict. To resolve the same, you must set a priority.
  • Compound – Considering the above, if you want the mentioned rate to take over others, simply click on the checkbox here.
  • Shipping – Finally, if you want the tax rate to be applied after the addition of the shipping fee, check this box. If not, leave it as it is.
  • Once done, click on save changes to reflect them in the store.

Deleting tax rates

Now that you know how to add tax rates, let’s see how to remove them.

To delete tax rates from the WooCommerce store:

  • Move to WooCommerce dashboard, click on settings, select tax Tax, and then our Tax Rates.
  • Click on the lines and then select Remove Selected rows.
  • Click on save changes to delete them permanently.

You can also delete all of the tax rates in a single go. Move to WooCommerce, click on status, and select tools. Click on Delete WooCommerce Tax Rates.

Viewing tax reports

The next thing we see is how to view tax reports. Move to WooCommerce > Reports > Taxes > Taxes by Date > Year. This will display the reports for the selected timeframe.

You can also generate reports sorting them with respect to the tax code. Click on Tax by code to view the reports.

Who Should Pay the Customs Duty Fee? WooCommerce Store Owner or the Customers?

A lot has been said about WooCommerce taxes, the different rules, and the methods used to configure them as and when needed. While the tax rates are more or less the same when you operate nationally. However, as you expand your business and take it overseas, you need to take care or custom duty fee. Considering the fact that every country has its own duty rates and laws, it is a must to abide by the same.

Understanding Customs Duty – What is it?

To begin with, let’s run down the definition of custom duty to understand what it exactly means. Custom duty as known is the tax levied on the transfer of goods to and from a country. It is important for all traders and business operators to take note of the laws before sending their items across borders. Most of the time, an additional fee needs to be paid for sending goods and this is referred to as a customs duty fee. The addition of the same makes the product much more expensive.

Consider for example, if a product has a standard rate of $57 and a customs duty fee of $8 is imposed, the product is now worth$65. The sole purpose behind imposing the fee is to raise the price so that people are more invested in a local business.

Note that the custom fee depends on several factors including the dimensions, weight, and size of the item.

What makes Customs Duty an essential aspect for the e-Commerce businesses?

When it comes to operating an online store, store managers often are misguided in terms of the duty fee. Considering that it is an important thing and every e-commerce store owner must be aware of the taxes levied nationally and internationally, this section talks about the same.

WooCommerce stores run both in and out of the country. If a store manager isn’t aware of the right charges, he/she might end up charging their customers more or less. Either way they suffer a loss. Hence you must have a good idea of how the customs work overseas.

Every time a product is shipped from country A to country B, it is stopped midway in the customs office at B. Only after they receive a clearance, will the product reach its ideal destination.

Based on how the product was originally shipped, who is the recipient, the vendor, or via a store owner, the customs fee is levied? In case you wish to set the same, shipping plugins such as a WooCommerce FedEx Shipping Plugin allows you to manually specify who is liable to pay the customs duty fee.

Above, we provided pretty much details about the custom duty fee and how it is handled, let’s see how to pay the same.

When is it required for the Store Owner to Pay?

1: In case of Low Fees

As mentioned above, the customs duty fee depends on multiple factors. So for cases when the duty fee is less, it is the store owners who take the responsibility to make the payment. This gives them an opportunity to stand out from the competitors and win over their customer’s trust.

The WooCommerce FedEx Shipping plugin has the option to set the duty payer as the sender of the product.

2: When you know the Customs Duty Fees Applicable in your serviceable countries

When the store manager has a good idea of where the product is being shipped and what would be the total fee, they prefer to settle the amount and pay from their end. Often, it so happens that the product quantity is less. If the customs fee is levied on the customers, odds are they would abandon the cart. Hence, here again, the store owners do the needful and pay the same from their pockets.

When Should Store Owners make their Customers Pay the Customs Fees?

1: When it is high and discarding is infeasible

Imagine a situation when the product is originally priced at $250 and you need to pay $150 as the customs duty fee. Even though the store owner wouldn’t want to charge their customers high, paying custom duty fees here would only incur a loss and hence, it would be better not to have the order in the first place. So for orders with heavy custom duty fee, the buyer is the payer.

Additional cases could be when goods are shipped to multiple vendors or through third-party agencies such as FedEx Shipping. In such cases, the customs duty fee is settled and the two parties agree on who would pay the duty fee. Mostly, it is the vendor or the third-party company that pays the same.

Customs Duty & Return Shipping – A Quick Overview

One problem that arises when dealing with custom duty fees is for products that are returned. By default, the customer is now the sender and if we stick to the option where the sender is expected to pay the duty fee, the customer is liable for the same.

To deal with this, what we need to do is recreate an order. Here, the shipper address is set to the customer address and the customer’s address becomes the Shipper’s address. Next, we generate a shipping label to initiate the return of the product. Considering that we cannot set or modify the option to pay the duty fee, the customer must pay the same to return the shipment.

What is Landed Cost?

Landed cost is the incurring involved in shipping physical products from one to another country. You generally need to learn about it when you start international delivery services for your customers. Overall, the landed cost consists of the item cost and shipment expenses such as the shipping fee, tax, and insurance amount, plus the customs duty fees.

While this might not seem relevant, it is important to calculate the landed cost to effectively ship products from one country to another. As a matter of fact, landed costs are important for the ones in international trade. It helps identify the total price of the product, the profit margins and the final amount to be paid by the customer. If not done, store operators might run into a loss. Irrespective of whether you are just starting or have been operating your business overseas, it’s high time that you considered landed cost as one of the important factors when calculating profits.

Conclusion

It is now easy for you to set up tax classes within your WooCommerce store. You can create and configure tax rules based on the city, region, and zip code. Make sure you adhere to custom duty fee rules and induce the same effectively, ensuring hassle-free business operations. We hope that this WPCustomify tutorial must have made doing it all even easier for you. However, you can always go ahead with professional support when things look complicated or confusing.

How to Set up Tax rates & Exclude or Hide Tax Calculations based user role in WooCommerce?

Planning to set up tax rates or extend the application of the same to hide or exclude calculations depending upon the user role?

In this tutorial, we are going to use the elex Catalog Mode Wholesale Pricing Role-Based Plugin. You may purchase the plugin by visiting the official site here. Click Here.

The elex Catalog Mode Wholesale Pricing Role-Based Plugin is one of the popularly used tax plugins for WooCommerce. It undertakes the user role as one of the parameters when setting up taxes in the WooCommerce store. Also, the plugin allows you to make changes to four important tax settings in the WooCommerce store:

  • Additional Tax Classes
  • Display Prices in the Shop
  • Display Prices During Cart and Checkout
  • Price Display Suffix

Not sure how to edit or modify them? This article will help you understand how to change the above to improve your store functionality.

Once you have the plugin downloaded within the store, install and activate the same. Move to the WooCommerce admin dashboard and then click on settings. Here, click on taxes. Under the section that says prices entered with tax, select on the radio button that is to enter the prices exclusive of taxes.

  • First, let us configure how the product prices will be entered.

Now that we have selected the option, the next thing to do is set the above to function effectively in the store. To do so, we would need to create a new tax class and configure the same.

    • In the field of Additional Tax Classes, enter a new tax class name. Let’s say we add a new tax class with the name MyTaxClass. Remember that the field allows a single tax class per field.

    • Next, we adjust the manner in which the price is displayed on the shop page. If you wish to display the product price inclusive of taxes, select including the tax. If not, select excluding tax.

  • Thirdly, we have the section that specifies whether to display the price including taxes or excluding taxes on the cart page and the checkout page. Since we chose the option of excluding tax, here again, we need to select the option of excluding tax from the drop-down.

Move down the page and click on save settings. Once done, you will see a new link at the top of the page with the name of the tax class that you just created.

The next thing that we need to do is configure the tax class to act accordingly. Click on the link that appeared at the top. Since this is a new class, you will not have any rows within the page. Click on the add row to get started.

Once you add a row, you will find several fields with blank spaces. Enter the values as you want them to be or to put it this way, as per your tax rule

  1. Country Code – This is the country to which you wish to apply the tax rate or the rule. Enter the two-digit country code for the same. In case you wish to make the rule Universal, simply leave the space blank.
  2. State Code – This is the state to which you wish to apply the tax rate or the rule. Enter the two-digit state code for the same. In case you wish to make the rule Universal, simply leave the space blank.
  3. ZIP/Postcode – Enter the zipcodes of the region within the state for which the rules apply. Separate two or more zip codes with a semicolon.
  4. City – Enter the city within the state for which the rules apply. Separate two or more cities with a semicolon.
  5. Rate % – Specify the tax percentage up to 4 decimal places.
  6. Tax Name – Enter a custom name for the tax created.
  7. Priority – Set priorities for the different tax rates.
  8. Compound – Check this option if you want this rate to take over others.
  9. Shipping – To apply the tax rate on the shipping rates, select the checkbox.

Make sure you click on save changes to reflect the same within the store.

Configuring Tax Options in WooCommerce Role-Based Pricing plugin

Now that we know how to create a tax class and configure the same to set rates, the next thing to do is to set the option based on the user role. Assuming that you already have the plugin downloaded and installed within your WooCommerce store, move to the tax settings option in the plugin. Click on WooCommerce -> Pricing and Discount tab.

Now move down to the Tax options settings.

    • The first thing to do is – enable the tax option. Click on the checkbox to do the same.

  • As soon as you click on it, you will see a tax option displayed below:

As you can see from the above image, the table has three major columns.

  • User Role: The user role can be anything from a Dealer to the Administrator, Wholesaler to the Manager, Editor, and the Member. In this field, what you need to do is select a particular user role. To set priorities when setting taxes, simply drag the icon and drop the same in the ideal position. The user who is listed on the top will have the highest priority.
  • Tax Class: The next column is about the tax class. Here we need to specify the tax class applicable for a certain user role. Say, you want the MyTaxClass to be applied for the Dealers. So, under the dealer’s tax class, select MyTaxClass. Click on the drop-down and select the appropriate tax class.

  • Tax Type: The third column is about the tax type. Whether you want to keep it default or change it to display the same without the tax, you can click on the drop-down and select the appropriate option. In case you remember, the conventional WooCommerce settings also have the provision. What makes this unique is that changing here will override all other selections made by you.

Example of setting a tax rate based on user role

Let’s run down an example to understand how to set tax rates depending upon the user role. Here, we take that for the wholesaler, the tax class should be MyTaxClass and the tax type must show the price excluding tax in the shop.

Wholesaler:

We already have the MyTaxClass tax class created. To set this for the wholesaler. Move to the tax setting option of the plugin.

  • Under the user role, select Wholesaler.
  • Next, click on the drop-down of the tax class and select MyTaxClass.
  • Lastly, select the option of show price excluding tax in the shop. Click on the save button to implement the changes and you are done.

The Final Word

Using this quick tutorial, you must have learned how to set up taxes for your WooCommerce store, how to exclude or hide it from the tax calculation as per user roles. If confused, it is any day better to hire WooCommerce support professionals to do the job. Alternatively, you may tell us your concern in the comment box below.

How to Add Additional Tax Classes and Custom Tax Rules in WooCommerce

Running a WooCommerce store, you must be worried about the tax rules to be applied to the store. You aren’t always doing business with people within a particular city or state or country. Your customers can be from two blocks next to your store, or someone miles away from the city. It is important that the tax rules you apply adhere to all factors, starting with the state to a product, and the quantity of the product.

In case you aren’t sure how to add additional tax rules or custom-fit tax classes within your online store, the article will help you with the same. And if you want immediate expert help instead of learning the process, reach out to WPCustomify.

Understanding Tax Classes

To begin with, let’s see what exactly we mean by tax classes and what they are used for. Let’s assume that currently, your store has the option of automated taxes enabled. What this does is that it automates the process of tax calculation and will be added to the checkout page without any hassle.

Sounds good, right?

Now if at any point in time you wish to customize the tax rates or basically target rates based on the geographical location, you would need to modify the settings. This is where the idea of tax classes come into play. Tax classes are specific tax is assigned to the cart depending on the region. For instance, a customer from New York will have a different tax rate as compared to a customer from Chicago.

An easy way out here is to add locations in a spreadsheet and upload the same to the WooCommerce store. This will help you determine and set tax rates for each of them. As it appears to be, specifying tax rates or creating different tax classes is an arduous job and you might feel the need to have a tax professional take over the job.

Well, you can simply consult your tax department to look over the rates. Once you are through, you can then go ahead with adding tax classes within the online store.

Adding A Tax Class

Follow the steps given below to create a new tax class and add it to your WooCommerce store.

Start with logging in to the WooCommerce store and move down the dashboard.

  • Hover around the dashboard and on the left side of the same, click on Settings.
  • The page that opens will have multiple options. Since we are to create a new tax class, click on the Tax tab.
  • Move down the page to the section that says, Additional tax classes.
  • You will find two names already listed there. Remember that you can have only one tax class per line. So move down to the third line and type the name of the tax class that you wish to add and configure for the WooCommerce store.
  • Once you are done with typing the name of the tax class, make sure you hit on the Save changes tab.

Simple as it may sound, we have now added a new tax class to the WooCommerce store. The next step is to configure the same or customize it as per your likes. Move to the top, and click on the link of the tax class that we just defined.

If we assume that the created was named Class A Tax, you will find a link at the top with the same

The page will have a few fields that you need to fill in to configure the tax class and set it for your online store.

Note that you can always modify the settings of the store to determine whether or not the shopping page displays the tax applied.

Display Prices During Cart and Checkout

Similar to the above, you can also decide whether you have the taxes displayed on the checkout page or you omit it. This accounts for the two names, including tax and excluding tax.

Let’s understand this through an example. The two images given below will shed light on what looks like the tax-inclusive price and the ones without taxes.

If you see, the image above has the price printed just adjacent to the total tag. Below, we have a text that says includes tax. This means that the final price displayed has a tax amount added to it.

Custom Tax Rules in WooCommerce

On the other hand, this image has two separate rows. One specifies the tax amount and the other lists the total. Note that the total doesn’t have the tax amount added. This is tax exclusion from the price.

Price Display Suffix

Custom Tax Rules in WooCommerce

Similar to the option of whether you want to display the tax or not, we have something called, display suffix. Let’s assume that you plan to have the amount displayed on the product page. With the price display suffix, you can have a customized text displayed adjacent to the amount.

Custom Tax Rules in WooCommerce

The image here clearly specifies the total amount of the product at $3. Just beside we have a text that says inclusive of taxes. You can similarly modify the settings to omit the suffix and display only the product price.

Display Tax Totals

Lastly, we have the option to Display Tax Totals on the checkout page. What this does is helps you specify if you need to display the final amount as a whole or say the total tax amount as one or list them separately. Click on the drop-down to select the same.

Click on the Save changes button to finally implement the same.

How to set up tax rates?

Now that you are well aware of the modifications that can be done with respect to tax rates on the WooCommerce store, let’s move to the part where we discuss how to set up a tax rate.

Considering that you are under the tax column of the settings tab, you will find all of the tax class names displayed. Click on the one that you wish to customize.

Note that you can also edit an already existing and configured tax class as and when needed.

Custom Tax Rules in WooCommerce

Once you click on the tax class, select insert row. As evident, there are several columns. We go through them one after the other to configure the class.

Custom Tax Rules in WooCommerce

Country Code – The first one is the country code. If you wish to apply the tax rule to a specific country, enter the code. Leave blank (*) to apply the rule to all countries.

State Code – Next to the country code, we have the state code. Similar to the above, simply type in the two-digit state code. If the rule applies to all states in the country, leave the space blank.

ZIP/Postcode – The next field is zip/postcode specific to the tax region. Now, it is possible that there are multiple postal codes. Hence, what you can do is enter the codes and separate them with a semicolon. Resort to wild characters to enter codes within a range or all with the same initials.

City – The fourth one is the city where the tax rate applies. Similar to the postcode, enter the name of the cities and separate them using a semicolon. If the tax rule applies to all, leave the same blank.

Rate % – Enter the rate with four decimal places. For example, if the tax rate is 7%, enter 7.0000.

Tax Name – Enter the name of the tax that will be displayed on the shopping page or the product page.

Priority – Now we set the priority of the tax rates. If there are one or more rates that apply to the same checkout, you would need to specify which rule would outnumber the others.

Compound – In case you wish to have the current tax rate to superimpose on the others, you can select the checkbox here.

Shipping –Another thing to note is where you want the tax rate to be applied to the shipping charges as well. If yes, you can select the checkbox or leave it as it is to omit the same.

Rerun the settings and then click on the save changes button. You are now done with creating custom-fit tax rates for your WooCommerce store.

Tax Rate Example

Let’s assume that you wish to set a tax rate for all the customers in New York. So what we do is,

  • Move to the online store admin page.
  • Click on settings and then select tax.
  • Here, under the option of tax rates, enter the name of the class as NYTax.
  • Now, click on save changes.
  • Next, move to the top and click on the name of the newly created tax class.

Now we need to configure the tax class as seen above in order to implement the same.

  • Moving from left to right, we begin adding the information.
  • Enter the name of the country like the US.
  • In the next field, enter NY.
  • Since we apply the tax rate to all of the zip codes in New York, we leave that section blank.
  • We also leave the city column empty.
  • Next, we need to enter the tax rate. Let’s say we want the tax to be 7.5%. So the input here would be 7500.
  • Enter the tax name as standard.
  • Set the priority of the tax rate as 1 since we want it to apply no matter what.
  • Let’s assume that we want the rate to apply over all other rates for New York, we select the compound option.
  • In case you wish to apply the tax rate on the shipping charges as well, click on the checkbox.

Click on save changes to finally have the rate live on your WooCommerce store.

The Final Word

Adhering to tax rules and handling tax starting from the WooCommerce cart level minimize the additional work for the businesses later. While it may look like a complex task to set up additional tax classes in the beginning, this small step is going to simplify your business life in the long-term. So, make sure that you digitize taxes for your e-commerce business.

How to Set Up Tax Rules, Check Tax Reports and Calculate Sales Tax in WooCommerce?

Setting up tax rates within your WooCommerce store isn’t a choice you make but a mandate necessary for all store owners. When operating in multiple regions across multiple countries, it is important that the tax rates comply with the standard guidelines. This is where you must abide by the law and align your store tax rates accordingly.

In case you are just starting out or to say, you aren’t aware of the process to set up tax rates, this article will help you set up tax rules, calculate sales tax and find tax reports for your store.

Setting up tax rules

Setting up tax rules within your WooCommerce store is pretty easy.

Prerequisites:

  • Log in to the WooCommerce dashboard.
  • Click on settings and then select Tax.
  • Here, you will find all of the tax options listed.
  • Click on the name of the tax option to configure the same, set up tax rules, and get started.

Note: In case you wish to have a separate tax class, move down to the field of Additional Tax Classes. Here, in the next line, enter the name of the Tax Class. Click on save settings. Once you do this, you will find the name listed at the top along with other tax options.

Configuring the tax option

Now that you have the tax class, click on the name and the next page that opens will have multiple fields to be filled up. This is where we set up tax rates for different regions depending upon the need.

If you click on the newly created tax class, you wouldn’t find any row. Either way, click on the tab of Insert Row. As evident from the image above, there are 9 columns for the single row. To set up the custom-fit tax rule, the spaces are to be filled with the appropriate option.

Country Code – The first column asks you to enter the 2 digit country code. For example, if you want the rate to apply in the USA. Enter the US in the country code.

State Code – The second column asks you to enter the 2 digit state code. For example, if you want the rate to apply in California. Enter CA in the country code. In case you wish the rate to apply in all states of the country, leave the box blank.

ZIP/Postcode – Similar to the state code, we have the zip code. To specify the particular areas, you can simply enter the postal code and separate them with a semicolon. Also, you can enter a range of codes together. For example, for all zip codes starting with 90, you can enter ’90*’.

City – The fourth column asks you to enter the city. For example, if you want the rate to apply in Los Angeles. Enter Los Angeles under the city column. In case you wish the rate to apply to all cities of the country, leave the box blank.

Rate % – Here is where you specify the tax rate for the chosen city in the given country. Remember that the field requires you to enter the rate in four decimal places. For example, if you want the tax rate to be 9%, the value to be entered is 9.0000.

Tax Name – Enter the name of the tax.

Priority –It may happen that a particular checkout page has more than one tax rate applicable, accounting for a conflict. To resolve the same, you must set a priority.

Compound – Considering the above, if you want the mentioned rate to take over others, simply click on the checkbox here.

Shipping – Finally, if you want the tax rate to be applied after the addition of the shipping fee, check this box. If not, leave it as it is.

Once done, click on save changes to reflect them in the store.

Calculating Sales Tax

Now that we have the tax rate created, let’s run down a few examples to see how the above works.

Example One: Set up a sales tax of 6% for all of the US.

As evident, we need to calculate sales tax at 6%. Click open the tax option and in the find column, enter the US. Since the rule applies to all of the states, regions, and cities in the US, leave the spaces blank. In the tax rate field, enter 6.0000.

Type in Sales Tax as the name. We now set the priority to 1 and then select that the tax must apply to the shipping fee as well. Click on save and we are done.

If you create a test order, you will find that the tax calculated is 6%.

How to view tax reports?

The next thing we will see is how to view tax reports. WooCommerce has built-in settings that give its owners the ease to view tax reports as and when they want. To do the same, move to WooCommerce > Reports > Taxes > Taxes by date.

This allows you to enter the time frame for which you wish to view the report. From the month to the number of orders placed, total sales, shipping, the tax, and net profit, the report will give you information about all.

Set Up Tax Rules

In case you wish to view the tax report in terms of the tax codes, click on Taxes by Code to view the same.

Set Up Tax Rules

Conclusive Words

Setting up tax rules and calculating sales tax is easy for WooCommerce users. You just need the above-specified procedure and it will be done. In case you want professionals to handle this task for you, WPCustomify has a whole team that is expert in setting up WooCommerce tax, contact us.

How to Set Up Taxes & How Does Tax Work and Manage in WooCommerce?

Irrespective of the type of business you run, taxes are an important part of it. While you charge your customers a certain amount of money in the form of taxes, you are also expected to pay a significant percentage of your income as a tax. But what is a tax? And how is it related to your WooCommerce store? Don’t worry! This article will cover all you want to know about tax and how to manage them in WooCommerce.

Why to Set up Taxes for WooCommerce?

Tax relates to the financial aspect and is one way the government earns money. It is believed that taxes are of primal importance and that it is one of the things that regulates the development, and economic progress of a nation. With taxes coming into play, governments are in a better position to design and build huge infrastructures starting with schools, roads, and other institutions for the welfare of the society.

When it comes to the retail sector, store owners and operators are expected to levy sales tax on the purchase of goods. The money collected in the form of tax is given directly to the government. While having a physical store makes it easier for both the buyer and the seller to pay/collect taxes, things heat up when you need to deal with an online store.

But that’s just one way of saying, you must know how to integrate, setup, and manage the taxes in your WooCommerce store. Here again, let me remind you that this article is all about taxes in the WooCommerce store. So don’t worry about how. Instead, put your seatbelts on to ride through the journey of managing taxes in your WooCommerce store.

Requirements

Starting from scratch, we would need to have a WordPress website with a WooCommerce plugin already installed so that we dive into the process of setting up tax in WooCommerce.

  1. You must have a WordPress website, an account with all the necessary credentials.
  2. The WooCommerce Plugin installed and activated on the WordPress site.

How to Set up Tax in WooCommerce?

Considering that you have the prerequisites in place, let’s begin with the first and the most important thing: set up a tax option in your store.

Enabling Taxes

To edit or modify the tax settings, we first need to make sure that your store has taxes enabled for every purchase. To do so,

  1. Move to the WooCommerce dashboard and click on Settings. Select General.
  2. Here move down to find the option of Enable taxes.
  3. Click on the checkbox to enable tax fares and calculations.
  4. Finally, click on Save changes.

Configuring Tax Options

The next step is to configure taxes:

Move down to the WooCommerce dashboard and then to Settings. Click on Tax. Only when you have the taxes enabled will you find this option.  The screen that opens up will have multiple fields that you need to configure. This section will cover all the details on how to configure taxes, with the field given below.

Prices Entered With Tax

The option is one that gives you the ease to predetermine whether the product price is inclusive of taxes or exclusive. The field has two radio buttons.

  1. “Yes, I will enter prices inclusive of tax”: if you select this option, you can calculate prices along with the base tax of the store in the final price.
    Example: Consider that you are based out of New York. For a product of price $17, you have $3 as the tax. If someone outside your country purchases the product, he/she is liable to pay $14. However, customers from your country would pay $17.
  2. “No, I will enter prices exclusive of tax” With this option, all of the product prices displayed on the page are without the tax amount. Meaning that when they move an item to the cart, additional money is added in the form of taxes.
    Example: Extending the example we used above, in this case, the price displayed on the page would be $14. For buyers in the US, the checkout page has an additional row specifying the tax as $3 whereas, for others, it is $0.

Calculate Tax Based On

The next option is specifying the parameters that regulate the calculation process. Primarily, this option emphasizes the location. You have three main options to choose from:

  1. The shipping address: Taxes are calculated based on the shipping address.
  2. The store base address: Taxes are calculated based on the address of the store.
  3. The billing address: Taxes are calculated based on the customer’s billing address.

Shipping Tax Class

The next field is the shipping tax class. This outlines the tax class to be applied to the shipping methods. Suppose that you want an item that has to be shipping at lesser rates. All you need to do is click on the drop-down and select the option of a reduced rate.

Normally, the shipping class is based on items added to the cart. But you can always change them to comply with the tax jurisdiction of the customer.

Rounding

Additional Tax Classes

The next tab is the Additional Tax Class. This is where you can add one or more tax classes, apart from the ones listed in the shipping tax class option.

To create a new tax class, what you need to do is enter “New Tax Class” in the additional tax classes field.

Once you do the above, click on Save Changes. As soon as the changes are reflected in the store, you will find an additional section added to the tax options. Just as the one we see below.

Configure the newly created tax class(New Tax Class) by filling in all of the appropriate data.

Display Prices in the Shop

This section gives you the ability to decide whether or not you should display the taxes on the checkout page. To put it this way, you can specify whether you want the price to be inclusive of taxes or exclusive. This is directly reflected in the price displayed on the product page.

Display Prices During Cart and Checkout

Similar to the option of displaying the price on the product page, you have the same option for displaying the price in the cart and during the checkout process. You can choose between pricing inclusive of taxes and prices exclusive of taxes.

Price Display Suffix

Wondered how will the buyers know if the product price is all-inclusive or has additional taxes? This is where the price display suffix seems appropriate. With this, you can specifically mention if the price is inclusive of taxes or not.

Choose between {price_including _tax} or {price_excluding_tax} to set the price display the way you want.

Display Tax Totals

Lastly, we have the option to Display Tax Totals while the buyer is advancing towards the checkout page. What this means is whether you want to have a single row of tax with all of the tax amounts or specifically mention each tax line after line along with their amount. Select from the drop-down, ‘As a single total’, or ‘Itemized’ to make your decision.

After you have added all of the above in the desired field, click on Save Changes to reflect them in your WooCommerce store.

How to Set up Tax Rates?

Now that we are done with configuring the taxes, the next thing to do is set up tax rates for the WooCommerce store.

The different tax rates can be viewed under the tax options. You can simply click on one of the tax rates and then add details to configure the same.

Country Code –The first tab is the country code. Enter the two-digit country code relative to the rate. Refer to ISO 3166-1 alpha-2 codes. In case you wish to apply the same to all the countries, enter (*).

State Code – Following a similar notion, the next tab would want you to feed in the state code. Note that this again would be of two digits. In case you wish to have more than one state within the column, simply skip the tab and move to the next.

ZIP/Postcode –Here you need to enter the postal code of the region for which you wish to apply the taxes. There would be more than one zip code for a single region. So to enter all in the given box, enter and separate them with a comma. You can enter numerical ranges and also wildcards for the codes. For instance, if you wish to have all postcodes with the initials 80, you can enter 80*.

City – Assumably, the next is the tab that asks you about the cities. List out the names of the cities while separating them with a comma. If you wish to have all cities within a country, leave the field empty.

Rate % – Mention the rates or to put it this way, enter the tax rate. Note that the rare can be up to 4 decimal places. Like if you need to set a tax rate of 7%, enter 7.0000.

Tax Name – Feed in the name of the tax rate. It could be anything from Sales Tax to VAT.

Priority – If you have a single tax rate for a particular situation, it is obvious that the store would go with it. However, for cases when there are multiple tax rates applicable in a single case, you must set a priority for them. This is what you can do here.

Compound – When you define a tax rate that needs to be applied on top of all other taxes added in the store, you click on this box. For example, if you have an additional tax rate along with the conventional tax added to the cart, click on the checkbox here to apply them.

Shipping – Where few store operators prefer adding taxes to the product price, others add the same to both the product and the shipping rates. This field gives you the ease to select what to do. Selecting the checkbox specifies that taxes are applied both to the product and shipping rates. However, unchecking it would mean that the tax is applied only to the product price.

Finally, click on save changes to reflect them in the store.

How to Delete Tax Rates?

While the above was all about setting up tax rates in the WooCommerce store and further configuring it as per the needs, there are instances when you would need to delete a specific tax rate. Having a single tax rate option in your store makes it easier for you to track and delete the option. However, when you have several tax rate options within the store, you must find the appropriate one before executing the delete operation.

This section will help you understand how to delete the tax rate from the WooCommerce store. Follow the steps given below:

  1. Move to WooCommerce, and then to settings.
  2. Under the tax rate option, identify the different tax rates depending upon the country code and other details added.
  3. Select the row of the corresponding tax rates. Once done, the selected rows turn yellow.
  4. Click on remove selected rows to permanently delete the chosen tax rates from your online store.

In case you want to delete all of the tax rates as displayed in the store, you can do it in a single operation.

  1. Move to the WooCommerce dashboard and then scroll down to the status option.
  2. Here click on tools and then move to ‘Delete WooCommerce tax rates’.
  3. Click on the Delete tax rate button to remove all the tax rates active/inactive in the WooCommerce store.

How to View Tax Reports?

Another operation that you can do and in fact, a majority of the WooCommerce store managers is viewing the tax reports. It is a pretty simple and easy process.

  1. Move to the WooCommerce dashboard and then scroll down to the reports option.
  2. Here click on taxes and then move to Taxes by data.
  3. Here you can view all of the tax reports for the timeline you have selected in the earlier step.

Alternatively, you can also generate reports for the taxes segmenting them based on their codes. Click on Tax by code on the top left corner to achieve the same.

Now that you have all information related to the WooCommerce tax rates. The next section highlights the top plugins that you can refer to and integrate within your WooCommerce store to optimize the performance and enhance the mechanism of tax rate configuration and application.

Best Plugins for WooCommerce Tax

Wondering how you can improve the tax management and set up for your WooCommerce store? Well, we have good news for you. Apart from all the WooCommerce tax options that are present by default, you can always step up the game by downloading plugins for the job.

This section does the job for you. Highlighting the top four plugins that you can consider when optimizing your store for tax rate calculation.

Top 4 sales tax plugins for WooCommerce

Avalara AvaTax

Avalara, one of the leading plugin development companies recently joined hands with WooCommerce to introduce a new plugin named Avalara Avatax. AvaTax is primarily a sales tax plugin and upon integration with the WooCommerce store, it facilitates the efficient calculations of sales taxes for the store. The plugin takes into consideration the data concerning geo-spatial mapping.

By default, the plugin is adjusted to specify the sales tax applied at the time of check out. The plugin comes with added features of conducting audits and embedding automation for the basic tasks. With AvaTax, you can be convinced that the calculation is accurate and that you no longer need to worry about setting and managing.
While the plugin provides its users with a 60-day money-back guarantee, it is recommended to pay for the plugin based on the volume of quarterly transactions in the company.

Features

  • Simplified management of tax rules.
  • Easy assessment of obligation on taxes across every state.
  • Automate collection of sales data from the
  • Woocommerce store.
  • Real-time Integration of taxes at the point-of-sale.
  • Pricing: Free

You can down the Avalara AvaTax plugin: Click Here

TaxJar

Next on our list is TaxJar. It is an excellent WooCommerce Plugin designed to provide tax rates for your store on a monthly basis. This is done to assure that the store is operating well and that the process of tax collection is done without any interruption. The backend of the plugin has most of the operations automated and it also facilitates the generation of reports in a timely manner. If required, you can also automate the process of filing state sales tax regularly. Note that this comes with an added fee.

Unlike AvaTax, TaxJar has a 30-day trial period offered for free. As a matter of fact, the plugin doesn’t require you to enter the details for your credit card too. Free from contracts or any hidden activation fees, the plugin is the best bet for startups and small scale companies.

Features

  • Automate the process of integration of taxes and filing returns.
  • Import sales taxes to determine whether you have met the monthly requirements
  • Build custom-fit sales reports, organize data and save manpower hours.
  • Follows order-based pricing policy.
  • Pricing: $19/month

Click Here to download the TaxJar extension.

Quaderno

Quaderno sales tax plugin is the third in our list and integrates well with the WooCommerce store. Leveraging the plugin, store owners can easily charge taxes from customers across the globe. The plugin adheres to the rules and regulations for tax collection for every country. After levying taxes, the plugin auto generates a tax receipt and can be downloaded by the customer.

What’s fascinating here is that the receipt can be accessed in multiple languages. Also, the plugin has an intuitive dashboard that facilitates the creation of custom-fit reports and even guides in the tax filing process.

Features

  • Compliance with local taxes across the globe.
  • Easy-to-use dashboard for revenue management.
  • Automated notes and receipts on every order.
  • Notifications and alerts.
  • Pricing: $49/month

Click Here to download the WooCommerce Quaderno extension.

Simple Sales Tax

If you are looking for a free solution, Simple SalesTax by TaxCloud is the best bet. It is one of the best and easiest tools for tax management. The solution provides real-time tax calculation facilities and all of these are done over the cloud. With simple SalesTax, you can generate custom-fit reports for the taxes.

Presently, a total of 24 states have the provision of using Simple SalesTax as their tax management solution. For those who seek to use the solution in limited states, the community provides them the ease to opt for a paid version.

Features

  • Setup and installation takes less than 15 minutes.
  • Fill taxes in around 24 states without any hassle.
  • Monthly reports and export them as per your requirements.
  • Pricing: Free

Use this link to download the Simple SalesTax plugin.

Conclusion

Having said all of the above, you can now get started with adding the option of taxes in your WooCommerce store, configure and manage them on the go. Also, check out the plugin and download the one that meets your purpose best. If you fear messing up the installation and setup part, or if you want expert consultation of choosing the best WooCommerce plugin for taxes, reach out to WPCustomify.