Call Us Toll Free - US & Canada : +1-(888) 602-0119

How to Fix WooCommerce Checkout Payment Failures Error

A smooth checkout process is essential if you’re running an online store with WooCommerce. However, sometimes customers experience payment failures, or payment gateways stop working, causing frustration and lost sales.

Understanding why WooCommerce payment failures happen and how to fix them can save your business time and money. In this guide, we’ll explain the common reasons for WooCommerce payment gateway errors and provide step-by-step solutions to resolve them.

1. Common Reasons for Payment Failures in WooCommerce Checkout

Payment failures in WooCommerce can happen for many reasons. Below are some of the most common causes:

1. Insufficient Funds or Payment Declined by the Bank

  • Customers’ accounts might not have enough money in them.
  • The bank might decline the payment due to security reasons.
  • Some banks block international transactions.

2. Incorrect Payment Details Entered by the Customer

  • Mistyped card number, CVV, or expiry date.
  • Billing address mismatch with the card details.

3. SSL Certificate or Security Issues

  • SSL (Secure Sockets Layer) is required for secure transactions.
  • If your website is not using HTTPS, many payment gateways will reject transactions.

4. Payment Gateway API Connection Issues

  • Incorrect API keys entered in WooCommerce settings.
  • The payment gateway’s server is down or experiencing issues.

5. Caching or Session Conflicts

  • Issues can occasionally arise from cached browsers or plugins.
  • Clearing the cache or disabling the plugin can fix checkout issues.

6. Plugin or Theme Conflicts

  • Some themes or plugins can interfere with payment gateways.
  • Conflicts between WooCommerce extensions and third-party payment plugins.

2. Types of Payment Gateway Errors in WooCommerce

1 Payment Method Not Showing on Checkout Page

  • Payment gateway settings might not be enabled.
  • Customer location restrictions may apply.

2. Payment Gateway Not Processing Orders

  • The transaction starts but does not complete.
  • Orders remain in “Pending Payment” status.

3. WooCommerce Checkout Error Message: “Payment Failed, Please Try Again”

  • Error message appears after entering payment details.
  • Possible API or server-related issue.

4. Redirection Issues After Checkout

  • Customers are not redirected to the payment page.
  • Payment is successful, but WooCommerce doesn’t update the order status.

3. How to Troubleshoot and Fix WooCommerce Payment Failures

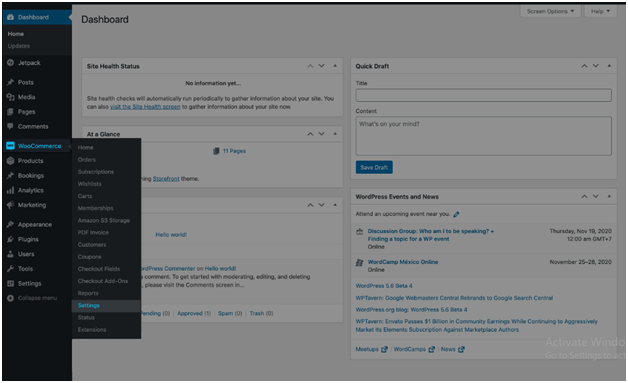
1. Check Payment Gateway Settings

  • Go to WooCommerce > Settings > Payments.
  • Ensure the gateway is enabled and configured correctly.
  • Test different payment methods.

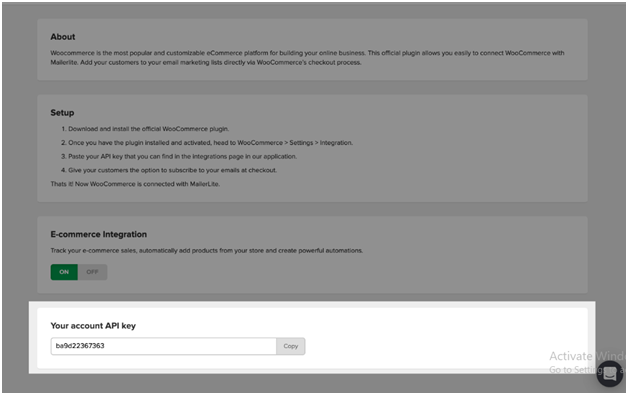
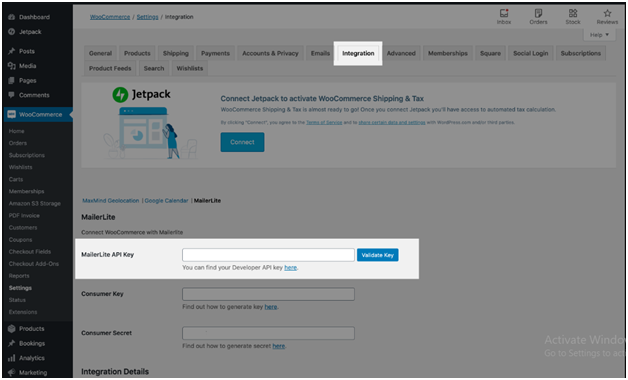
2. Verify API Keys and Credentials

  • Double-check that API keys are correct for both test and live modes.
  • If necessary, regenerate the API keys and re-enter them.

3. Test with Different Payment Gateways

  • If one gateway fails, try another like Stripe, PayPal, or Square.
  • This helps in identifying if the problem is specific to a gateway.

4. Review Error Logs and Enable Debug Mode

  • Go to WooCommerce > Status > Logs to check error messages.
  • Enable debug mode for the payment gateway to see detailed logs.

5. Check for Plugin and Theme Conflicts

  • Deactivate all plugins except WooCommerce and test again.
  • Try a default theme, such as Storefront, and see if there are any issues.

6. Ensure Proper SSL Configuration

  • Verify your SSL certificate is active.
  • Use HTTPS for secure transactions.

7. Clear Cache and Cookies

  • Clear WooCommerce transients and cache from caching plugins.
  • Ask customers to clear their browser cache if they encounter errors.

4. Specific Fixes for Popular Payment Gateways

1. Fixing Stripe Payment Failures

  • Ensure webhook settings are correctly configured.
  • Check for declined payments in the Stripe dashboard.
  • Check that the account is in active mode rather than test mode.

2. Fixing PayPal Checkout Errors

  • Verify that your PayPal account is properly linked.
  • Enable PayPal Instant Payment Notification (IPN) in your PayPal account.

3. Fixing Square Payment Gateway Errors

  • Verify API credentials in WooCommerce > Settings > Payments.
  • Verify if Square is supported in your country.

4. Fixing Razorpay or Other Payment Gateway Errors

  • Confirm that your merchant ID and secret key are correct.
  • Check if Razorpay is in live mode.

5. Preventing Future WooCommerce Payment Failures

1. Keep WooCommerce and Payment Plugins Updated

  • Regularly update WooCommerce and payment gateway plugins.
  • Outdated plugins can cause compatibility issues.

2. Regularly Test Checkout Functionality

  • Run test transactions after updates.
  • Monitor order processing to ensure everything works smoothly.

3. Enable Fallback Payment Methods

  • Offer multiple payment options in case one fails.
  • Consider enabling Cash on Delivery (COD) as a backup.

4. Monitor WooCommerce Logs for Errors

  • Regularly check WooCommerce > Status > Logs for potential issues.

Conclusion

Dealing with payment failures in WooCommerce can be a headache for both store owners and customers. However, you can resolve most issues effectively by identifying common causes and applying the right troubleshooting steps. Routine maintenance, keeping an eye on logs, and updating your payment plugins will ensure a hassle-free checkout process.

If problems persist, don’t hesitate to reach out to your payment gateway provider or seek expert help.

For more WooCommerce troubleshooting tips, visit our website: WPCustomify.

Top Free CDN Plugins for Your WordPress Website

In today’s digital era, ensuring your website is fast and dependable is crucial Whether you’re running a personal blog, an online store, or a business website, speed and performance matter. One way to ensure your WordPress website performs at its best is by using a Content Delivery Network (CDN). The good news is that there are several free CDN options available that can help improve your website’s speed and security without costing a dime. This article will dive into the best free CDN plugins for WordPress and highlight the advantages they offer for your website.

What is a CDN, and Why Do You Need One?

A Content Delivery Network (CDN) is a network of servers distributed across the globe. These servers store duplicates of your website’s static assets, such as images, JavaScript files, and CSS. By delivering this content from a server closest to the user’s geographic location, a CDN minimizes website loading times, particularly for users situated far from the website’s primary server. This ensures faster and more efficient performance for a global audience.

Why should you use a CDN?

  1. Faster Load Times: CDNs minimize latency, ensuring your website loads quickly for users worldwide.
  2. Reduced Server Load: Your hosting server is less stressed when traffic is sent to CDN servers.
  3. Improved User Experience: Websites that load faster have happy users and higher search engine rankings.
  4. Enhanced Security: A lot of CDNs come with free SSL certificates and DDoS protection.

Let’s dive into the top free CDN options for WordPress and how they can help your website.

Top Free CDN Plugins for WordPress

1. Cloudflare

Cloudflare plugin

Cloudflare stands out as a leading free CDN service trusted by websites of all sizes, ranging from personal blogs to large online stores. Its feature-rich free plan includes global content caching, protection against DDoS attacks, and complimentary SSL certificates, making it a reliable choice for improving website performance and security.

Features:

  • A global network of servers: Cloudflare makes sure that the content on your website is sent from the server that is nearest to the user, thus reducing load times.
  • Built-in DDoS protection: Safeguards your site against malicious attacks.
  • Free SSL certificate: Protects your website with HTTPS, boosting user confidence and improving SEO rankings.
  • Easy-to-use dashboard: Offers a simple interface to manage settings and monitor performance.

Why Use Cloudflare? Cloudflare is ideal for anyone looking to enhance their website’s speed and security without spending money. It’s particularly effective for websites with high traffic or those prone to security threats. Additionally, its ease of use makes it a favorite among WordPress users.

2. Jetpack Site Accelerator

Jetpack Site Accelerator

Jetpack Site Accelerator, formerly known as Photon, is part of the Jetpack plugin suite by Automattic, the creators of WordPress.com. This CDN service focuses on optimizing and delivering your images and static files through WordPress.com’s servers.

Features:

  • Image caching: Delivers images faster by storing them on WordPress.com’s global servers.
  • Static file caching: Speeds up CSS and JavaScript delivery.
  • Automatic image optimization: Ensures images load quickly without compromising quality.
  • Simple activation: Enable it easily from the Jetpack plugin settings.

Why Use Jetpack Site Accelerator? This CDN is perfect for image-heavy websites, such as blogs and portfolios. If you’re already using Jetpack, enabling Site Accelerator is a no-brainer. It’s also great for users who want a simple, integrated solution.

3. Optimole

Optimole plugin

Optimole is an excellent option for websites that need both a CDN and image optimization. This service automatically compresses and resizes your images to match the user’s device and serves them through Amazon CloudFront’s global servers.

Features:

  • Real-time image optimization: Reduces image sizes without losing quality, improving load speeds.
  • Responsive resizing: Dynamically adapts images to match the user’s device and screen dimensions.
  • Global content delivery: Uses Amazon CloudFront servers to deliver images quickly.
  • WordPress integration: Comes with an easy-to-use plugin for seamless setup.

Why Use Optimole? If your website relies heavily on images and you want to improve both performance and user experience, Optimole is a fantastic choice. It’s particularly beneficial for e-commerce stores and blogs with large image galleries.

4. jsDelivr

jsDelivr Plugin

jsDelivr is a free CDN specifically designed for developers and resource-heavy websites. It’s ideal for delivering popular JavaScript libraries, CSS frameworks, and other static assets efficiently.

Features:

  • Delivery of JavaScript and CSS: Provides hosting for widely-used libraries such as jQuery, Bootstrap, and FontAwesome.
  • High-performance infrastructure: Utilizes multiple data centers for faster content delivery.
  • WordPress Compatibility: Works seamlessly with themes and plugins.
  • Open source: Completely free for personal and commercial use.

Why Use jsDelivr? If your website uses popular libraries or frameworks, jsDelivr ensures they’re loaded quickly from the nearest server. It’s perfect for developers and websites that rely on third-party scripts.

5. Shift8 CDN

Shift8 CDN

Shift8 CDN is a lesser-known but reliable free CDN service that’s perfect for smaller websites and blogs. It offers global server coverage and straightforward integration with WordPress.

Features:

  • Free global CDN: Ensures content delivery across various regions, covering the US, Canada, Europe, and the Asia-Pacific, for faster performance worldwide.
  • Simple WordPress plugin: Quick to set up and simple to configure.
  • Efficient caching: Speeds up your website by serving cached content.
  • No hidden costs: Completely free for WordPress users.

Why Use Shift8 CDN? If you’re looking for a no-frills, easy-to-use CDN solution for a small website, Shift8 CDN is a great option. It’s an excellent choice for bloggers and small businesses that want better performance without complexity.

Conclusion

Using a free CDN is an excellent way to boost your WordPress website’s performance, enhance security, and improve user experience. Whether you’re running a personal blog or a business website, there’s a free CDN solution that fits your needs.

From the powerful features of Cloudflare to the image optimization capabilities of Optimole, these CDNs offer incredible value at no cost. By implementing one of these solutions, you can ensure your website is fast, secure, and ready to handle traffic from anywhere in the world.

So why wait? Choose a CDN from the list, integrate it with your WordPress website, and watch your website’s performance soar!
For more tips and tools to optimize your WordPress website, visit WP Customify.

Top WordPress Themes for Conferences and Events

Thanks to WordPress themes designed specifically for events, creating a website for your conference or event has never been easier. Whether you’re hosting a corporate seminar, a music festival, or a community meetup, the right theme can help you attract attendees, sell tickets, and share important event details. In this article, we’ll explore the top 10 WordPress themes for conferences and events.

1. Astra

Astra

Astra has earned its place as one of the most trusted WordPress themes due to its speed, flexibility, and ease of use. This lightweight theme is perfect for creating event and conference websites, as it comes with several pre-designed templates tailored for such purposes. Astra’s code is optimized for performance, ensuring that your site loads quickly and delivers a seamless user experience. Whether you’re a beginner or an experienced developer, Astra offers a range of customization options to make your event website stand out.

Key Features:

  • Pre-designed Event Layouts: Astra provides professionally designed templates that are ready to use, making it simple to set up pages for schedules, speakers, and ticket sales.
  • Integration with Elementor and WooCommerce: Seamlessly integrates with popular page builders like Elementor for easy customization and WooCommerce for managing ticket sales.
  • Customizable Header and Footer Options: Offers advanced header and footer builder tools to personalize your site’s look and feel.
  • SEO-Friendly: Built with clean code and schema markup to improve search engine visibility and ensure your event website ranks higher.
  • Lightweight and Fast: Optimized for speed, Astra ensures quick page loading, keeping visitors engaged and reducing bounce rates.

Why Choose Astra for Event Websites?:

  • Its lightweight structure ensures fast loading times.
  • Extensive customization options make it adaptable for any event.
  • Perfect for organizers looking to build an attractive site quickly.
  1. Divi

Overview: Divi is a versatile theme with an intuitive visual builder, making it an excellent choice for anyone who wants complete control over their website design.

Key Features:

  • Drag-and-drop builder for real-time design.
  • Pre-made layout packs for events and conferences.
  • Fully responsive and mobile-friendly.
  • Built-in split testing and advanced design options.

Why Choose Divi for Event Websites?:

  • Offers unmatched customization capabilities.
  • Includes a library of templates specific to events.
  • Great for creating unique, professional designs.

Best For: Users who want maximum customization without coding.

2. Divi

Divi

Divi is a versatile theme with an intuitive visual builder, making it an excellent choice for anyone who wants complete control over their website design.

Key Features:

  • Drag-and-drop builder for real-time design.
  • Pre-made layout packs for events and conferences.
  • Fully responsive and mobile-friendly.
  • Built-in split testing and advanced design options.

Why Choose Divi for Event Websites?

  • Offers unmatched customization capabilities.
  • Includes a library of templates specific to events.
  • Great for creating unique, professional designs.

3. OceanWP

Oceanwp

OceanWP is a free multipurpose theme with premium features, perfect for event websites on a budget. It provides a range of templates, including event-specific ones.

Key Features:

  • Fast-loading and lightweight.
  • Multiple layout options for event pages.
  • Compatibility with popular page builders like Elementor.
  • WooCommerce integration for ticket sales.

Why Choose OceanWP for Event Websites?

  • Provides great functionality at no cost.
  • Excellent support for eCommerce functionality.
  • Ideal for budget-conscious users who still want a professional design.

4. Exhibz

Exhibz

Exhibz is a dedicated event and conference theme that offers robust features like event scheduling, speaker profiles, and ticket sales.

Key Features:

  • Multiple homepage variations.
  • Event countdown timers and schedules.
  • Integration with WooCommerce for ticketing.
  • Speaker and session management.

Why Choose Exhibz for Event Websites?

  • Tailored specifically for conferences and events.
  • Allows detailed management of schedules and speakers.
  • Makes ticket selling easy through WooCommerce.

5. TheGem

TheGem

TheGem is a creative multipurpose theme that includes pre-built demos specifically for events and conferences.

Key Features:

  • Modern, responsive design.
  • Features like countdown timers and schedule displays.
  • SEO-optimized for better visibility.
  • Drag-and-drop editor for customization.

Why Choose TheGem for Event Websites?

  • Focuses on stunning visual design.
  • Provides comprehensive event features in a single package.
  • Ideal for users who value aesthetics.

6. Evently

Evently

Evently is designed exclusively for conferences and events, offering ready-to-use demos and specialized features to simplify your website setup.

Key Features:

  • Nine homepage demos.
  • Speaker, schedule, and sponsor sections.
  • Easy customization with Elementor.
  • WooCommerce support for ticket sales.

Why Choose Evently for Event Websites?

  • Highly focused on event-specific features.
  • Easy to set up and customize.
  • Great for showcasing speakers and sponsors.

7. Ultra

Ultra

Ultra is a flexible and feature-packed theme by Themify, offering plenty of options to create a professional event website.

Key Features:

  • Pre-designed demo sites for events.
  • Drag-and-drop builder for easy customization.
  • WooCommerce integration for ticket sales.
  • Parallax scrolling and animated sections.

Why Choose Ultra for Event Websites?

  • Offers advanced design options with minimal effort.
  • Ideal for adding engaging visual effects.
  • Supports complete eCommerce functionality.

8. Uncode

uncode

Uncode is a performance-oriented creative theme with stunning visuals and demos for event and conference websites.

Key Features:

  • Event calendar and ticketing features.
  • WPBakery page builder for customization.
  • Optimized for speed and SEO.
  • Multiple layout options for schedules and speakers.

Why Choose Uncode for Event Websites?

  • Excels at visual storytelling.
  • Great for complex event schedules and layouts.
  • SEO-friendly to boost event visibility online.

9. Neve

Neve

Neve is a lightweight and versatile WordPress theme, making it an excellent choice for beginners looking to build an event or conference website without any prior experience. Designed with simplicity and performance in mind, Neve ensures your website loads quickly, keeping your audience engaged. It features a library of starter templates that cater to various industries, including events and conferences, allowing users to set up a professional-looking site in minutes.

Key Features:

  • Super-fast performance.
  • Fully responsive and AMP-compatible.
  • Starter sites for quick setup.
  • SEO-friendly for better search rankings.

Why Choose Neve for Event Websites?

  • Extremely user-friendly for beginners.
  • Quick setup with pre-built templates.
  • Offers a fast-loading experience for users.

10. Jevelin

Jevelin

Jevelin is a stylish multipurpose theme with pre-built demos for events and conferences. It offers a mix of design flexibility and ease of use.

Key Features:

  • Drag-and-drop builder for customization.
  • Pre-designed layouts for events.
  • Event schedules and photo galleries.
  • WooCommerce compatibility for ticketing.

Why Choose Jevelin for Event Websites?

  • Combines style and functionality seamlessly.
  • Great for showcasing event highlights through galleries.
  • Easy to use even for beginners.

Conclusion

Having the right WordPress theme can make or break your event’s online presence. From Astra’s speed and simplicity to Jevelin’s stylish designs, each theme on this list brings unique features to the table. Whether you’re on a tight budget or need advanced event management tools, there’s a theme here for you.

So, explore these themes and choose the one that fits your event’s needs best. Don’t forget to share your favorite theme or ask questions in the comments below!

Explore WP Customify for insightful tips, in-depth reviews, and expert guides on the best WordPress themes and plugins!

Top QR Code Plugins for WordPress and WooCommerce

QR codes are a great way to simplify tasks and engage users. They make sharing information, processing payments, and managing tasks easier. If you run a WordPress or WooCommerce site, adding QR codes can take your website to the next level. Here are the best QR code plugins you can use today.

Why Use QR Codes on Your Website?

QR codes make it easy to share and access information. Here are a few benefits of adding them to your WordPress or WooCommerce site:

  • Simplify WooCommerce Payments: Let customers pay instantly by scanning a code.
  • Share Information Quickly: Display links, contact details, or promo codes with a scan.
  • Boost Engagement: Use QR codes for event management, discounts, or product promotions.
  • Track Analytics: Advanced plugins let you measure how users interact with your QR codes.

Need help optimizing your WordPress site? Check out our custom WordPress solutions.

Best QR Code Plugins for WordPress and WooCommerce

Let’s explore the top plugins with details on their features, pros, cons, pricing, and use cases.

1. Shortcodes Ultimate

Shortcodes Ultimate

Shortcodes Ultimate is a versatile plugin that lets you add QR codes anywhere on your site. Its shortcode generator lets you customize the size, color, and style of the QR codes. It’s an excellent choice for bloggers, WooCommerce store owners, and event managers.

  • Features:
    • Generate QR codes using shortcodes.
    • Customize size, color, background, and error correction.
    • Works with WooCommerce, posts, and pages.
  • Pros:
    • Easy-to-use interface.
    • Supports multiple shortcode options.
    • Regular updates and reliable support.
  • Cons:
    • Limited advanced features like analytics.
    • Requires manual input for each QR code.
  • Pricing: Starts at $39/year.
  • Best Use Cases:
    • Bloggers sharing links.
    • WooCommerce stores showcasing product details.
    • Event managers promoting tickets.

2. Automator QR Code Generator

Automator QR Code Generator

This plugin is part of the Uncanny Automator suite and excels in automating workflows involving QR codes. It’s perfect for creating QR codes based on user actions.

  • Features:
    • Generate QR codes automatically for specific actions.
    • Integrates seamlessly with WooCommerce and LMS plugins.
    • Allows conditional workflows for enhanced automation.
  • Pros:
    • Highly customizable and automated.
    • Supports advanced workflows.
    • Great for e-learning and business websites.
  • Cons:
    • High pricing for small businesses.
    • Requires integration with Uncanny Automator.
  • Pricing: Starts at $149/year.
  • Best Use Cases:
    • E-learning websites generate course access codes.
    • WooCommerce stores automate checkout processes.
    • Membership sites manage unique user data.

3. Kaya QR Code Generator

Kaya QR Code Generator plugin

Kaya QR Code Generator is a beginner-friendly plugin offering essential features for free. It’s a great option for small businesses and personal blogs.

  • Features:
    • Add QR codes to posts, pages, and widgets.
    • Customize QR code size and style.
    • Use built-in widgets for easy placement.
  • Pros:
    • Completely free.
    • Simple and user-friendly.
    • Suitable for non-technical users.
  • Cons:
    • No advanced features like analytics or tracking.
    • Limited to static QR codes.
  • Pricing: Free.
  • Best Use Cases:
    • Personal blogs sharing links or contact info.
    • WooCommerce stores promoting product pages.
    • Small businesses offer discounts via QR codes.

4. Qyrr – QR Code Designer

Qyrr – QR Code Designer

Qyrr is a stylish plugin for designing branded QR codes. It offers free and premium versions, with advanced features like dynamic QR codes and analytics in the premium tier.

  • Features:
    • Create QR codes with custom logos and colors.
    • Generate dynamic QR codes for marketing campaigns.
    • Track performance with QR code analytics.
  • Pros:
    • Highly customizable for branding.
    • Supports dynamic QR codes.
    • The premium version offers detailed analytics.
  • Cons:
    • The free version lacks advanced features.
    • Premium pricing can be high for small websites.
  • Pricing: Starts at $39/year.
  • Best Use Cases:
    • Marketing campaigns requiring dynamic QR codes.
    • Businesses promoting branded QR codes.
    • WooCommerce stores tracking product engagement.

5. UPI QR Code Payment Gateway for WooCommerce

UPI QR Code Payment Gateway for WooCommerce

This plugin focuses on simplifying payments for WooCommerce stores in India. It enables customers to pay directly using UPI apps like Google Pay and PhonePe.

  • Features:
    • Generate QR codes for UPI payments.
    • Compatible with all major UPI apps.
    • Supports real-time payment processing.
  • Pros:
    • Completely free to use.
    • Simplifies payment processes for Indian customers.
    • Easy integration with WooCommerce.
  • Cons:
    • Limited to UPI-based payments.
    • Not useful for non-Indian markets.
  • Pricing: Free.
  • Best Use Cases:
    • WooCommerce stores in India.
    • Small businesses looking for quick payment solutions.
    • Service providers accept direct UPI payments.

How to Add QR Codes to Your WordPress Site

  1. Choose a Plugin: Pick one of the plugins mentioned above based on your needs.
  2. Install the Plugin: Download it from WordPress.org or the developer’s site.
  3. Customize Your QR Codes: Use the plugin’s settings to design and generate QR codes.
  4. Add Codes to Your Site: Place them on your pages, posts, or products using shortcodes or widgets.

Need step-by-step guidance? Chat with WordPress experts.

Conclusion

QR codes are a must-have for modern websites. Whether you want to simplify payments, share links, or engage users, there’s a plugin for you. From free options like Kaya QR Code Generator to advanced tools like Automator QR Code Generator, you can find one that fits your needs.

Looking for more WordPress tips? Visit our blog for useful insights. Need professional help? Explore our WordPress services.

Benefits of Teachable WooCommerce integration

Teachable is Avante-Garde coaching creation and online courses. This tool allows businesses, creators, and entrepreneurs of all sizes to develop personalized coaching products and engaging online courses. You can manage these with quizzes, lectures, and videos.

You can collect your payments using Teachable. Hence, you can manage anything around author payments, taxes, and VAT.

You can easily host your course with these incredible tools.

What does Teachable Offers?

  • User Management
  • Course hosting
  • Checkout system
  • Affiliate management
  • Web development suite

WooCommerce is an open-source and flexible e-Commerce plugin with customizable options. It allows you to add features as well as functionalities to your online store. This plugin can help you to handle humungous endeavors like managing merchandise and other store activities.

Benefits of Teachable WooCommerce Integration

  • Usability

With Teachable WooCommerce integration, you can build your website and manage all the admin tasks. People with no technical knowledge can easily check for click navigation.

You get multi-selection options for making huge changes to the courses that you uploaded earlier.

  • Branding and identity

You can display your content uniquely by integrating Teachable with WooCommerce. You can tweak details more aesthetically.

  • Accepts Multiple Currencies

Any business can easily bestow the advantages and profits from Teachable WooCommerce integration. You can implement different types of gateways like Apple Pay, PayPal, Stripe, etc.

How to do Teachable WooCommerce Integration?

WP Customify can help to integrate Teachable with WooCommerce. You can host your online courses effortlessly. We can help to build your online shop easily. We have specialized experts in fixing technical glitches and complex errors.

Mailjet integration WooCommerce: Complete process

Email marketing is one of the best ways to connect with purchasers. You can term it as the right adrenaline that can fuel your business adequately. The developers of Mailjet innovate and upgrades their service regularly.

This tool is the right suit for your enterprise needs. You can relish effective services in the WP Dashboard. It will help to maintain the reputation of your brand and is GDPR-consistent. Therefore, best suitable to integrate with any type of platform and CMSs. Most businesses are doing Mailjet integration WooCommerce.

Julien Tartarin and Wilfried Durand are the developers of Mailjet. With it, you can design and track emails easily. You will never think of jumping from this platform because of its superlative functionalities. It was introduced in 2010 and is highly acclaimed as the best email delivery system. Mailjet is a cloud-based email tracker.

Features that you can enjoy with Mailjet integration WooCommerce

  1. You can manage as well as create transactional/ marketing campaigns via email. This can be easily managed through the Admin panel.
  2. With Mailjet WooCommerce integration, you can craft and develop subscription widgets.
  3. You can employ HTML builder/ email manager to craft alluring and engaging emails. Things can be managed from the Admin panel of your WordPress site.

The complete process of Mailjet integration WooCommerce

Log in to WordPress. In the Administrator Profile, hit “Plugins” and then “Add New” for Mailjet WooCommerce integration.

Add new plugin

Click “Install Now” for installing the marketing plugin.

Mailjet

Hit “Activate” for Mailjet.

Activate Mailjet

Set up your account by tapping the option “Setup account”.

Maijet for wordpress

Press “Mailjet” go to “Mailjet settings”. Hit “API key” and add “Secret key.”

Tap the option “Connect”. This step allows you to make the connection with the account of Mailjet.

Mailjet Plugin

Select the email list from the dropdown that you plan to synchronize. If the default list does not suit your business you can create it. For this, hit the option “Create a new list” for Mailjet integration WooCommerce.

Wordpress users

Do not forget to miss the checkbox. Press “Create a new list” for Mailjet integration WooCommerce. Browse to “Apply and Continue”.

Apply and Continue

Navigate to the setting of Mailjet. Hit “Configure” under “Configure WordPress email sending”.

Configure wordpress email sending

Click “Settings” under “Update settings” for Mailjet integration WooCommerce.

Update Settings

Browse to “Sending Settings” for Mailjet integration WooCommerce.

Next, on the option “Enable Sending through Mailjet”, check it. You can forward the email via Mailjet SMTP relay. With this step, you can mark the activities in real-time.

Sending settings

Check the test mail to check if the settings are properly configured.

Browse to “Subscription settings” to integrate Mailjet with WooCommerce. Check the boxes if it is aligned according to your business goals. Go to “User Access” and hit “Save.”

Navigate to “Integrations” and you will see the options like:-

  • “Display ‘Subscribe to our newsletter”
  • “Add subscribers to this list”
  • “Enable WooCommerce Integration”

Click these options and will only work for those who have WordPress or WooCommerce stores.

Integration

You can add new people to the new list.

In a conclusion

Mailjet integration is the best way for building efficient email campaigns. Our tech-mavericks are seasoned at solving your technical challenges.

Whether you are looking for any support to set up a new shop or to fix your broken website, we are right behind your back with our WooCommerce support. Connect with us!

Benefits of Bexio WooCommerce integration

Bexio is a Swiss business software that can make the process of administration simpler for SMEs. This software is cloud-based that ensures that the data is secure via Swiss data centers. It is a point that is essential for sensitive accounting topics.

This software tool is best for contact management, orders, invoices, offers, and banking & accounting. Hence, it is best for businesses who want to automate their accounting with Bexio WooCommerce integration.

The functionality of Bexio at a Glance

1. Contact Management

You can get all the contacts in a central location and can access and change them. All the other functionalities are relied upon this data and can only be accessed through Bexio mobile app. You can enter notes for categories facilitating organizations or contacts. The import of contact is also supported through CSV or Excel.

With Bexio WooCommerce integration, you can manage your contact simply.

2. Orders, Invoices, and Offers

Creating Invoices, orders, offers, and credit notes is the most basic functionality of Bexio. You can use text modules to craft it. The resulting PDF docs can be generated in numerous languages. In addition, you can customize the design.

3. Accounting

You can maintain the journal for all bookings in Bexio. This enables receipts storage and clarity. Adding to it, you can map the booking of your invoices to debtors and supplier invoice. Things are legally compliant.

4. Banking

Integrating e-banking with Bexio will allow you to have financial status overview apart from paid/ open invoices. The data is automatically updated and can be transferred to e-banking from Bexio.

Benefits of Bexio WooCommerce integration

  • Develop great journeys for customers
  • Saves time for managing administrative tasks
  • Optimized and lean processes for business
  • Attain time for activities that add value
  • Plenty of potentials to grow through scaling
  • Sustainable and innovative business processes
  • Less error-prone and seamless processes

WPCustomify is a leading service provider that gives extravagant WooCommerce support. We are an established name that provides efficient custom-fit solutions to enhance the function of the WooCommerce store.

Call us @ +1-(888) 602-0119 to know more.

A quick way to do MailerLite WooCommerce integration

MailerLite is a magnificent marketing tool that can help you to create aesthetic newsletters. You can easily boost your business using automated e-Commerce campaigns.

This tool allows you to win back the deals that are lost.

Why MailerLite?

You need to consider MailerLite because you can:-

  • Sync the account of MailerLite with newsletter customers and subscribers.
  • Store the details like the information related to orders, Name, email address, phone number, etc.
  • Build segments automatically to the subscriber group of MailerLite.
  • Monitor the revenues and emails and understand how it affects sales. Using this, you can optimize the content of email for better business.
  • Import the order information within seconds from an eCommerce store.
  • Integrate images, links, and text directly into the MailerLiter newsletter builder.
  • Send abandoned cart emails.
  • Send automated messages and offers.
  • Generate landing pages and pop-ups.

How to do MailerLite WooCommerce integration?

1. Hit the option “Integrations” from the menu of the dropdown for MailerLite WooCommerce integration. This you will find under the section MailerSupport.

Integrations

2. Hit “WooCommerce” and click the option “Use”.

Select Woocommerce

3. Browse the section E-commerce Integration and click the option “ON”.

On E-commerce Integration

4. Go to “Your account API key”. Hit “Copy” for MailerLite WooCommerce integration.

Account API Key

5. Visit the WP dashboard.

6. Hit “Plugins” for MailerLite WooCommerce integration and click “Add New”.

Install Plugin

7. On the search field type, “WooCommerce-MailerLite”.

8. Hit “Install” and then “Activate” to integrate MailerLite with WooCommerce.

Mailerlite Plugin

9. Hit “WooCommerce” and click “Settings”.

10. Click “Integrations”.
11. On the Mailer Lite API field, paste the API from 4 Step to integrate MailerLite with WooCommerce.
12. On the MailerLite API field, paste the API. Paste the details from Step No. 4. Click “Validate Key”.

Woocommerce settings

Mailerlite API key

13. Pick the subscribers group for the checkout process.
14. Implement “Consumer Key” as well as “Consumer Secret” to integrate MailerLite with WooCommerce.

Go to “WooCommerce” to get Consumer Key or Consumer Secret.

Hit “Settings” to integrate MailerLite with WooCommerce and then click “Advanced”. Choose “REST API” and navigate to “Key”.

Hit “Generate API key”. Copy as well as paste it.

15. Finally, click “Save changes”.

You are done with MailerLite WooCommerce integration.

WP Customify can help to do MailerLite WooCommerce integration. We are also adept in providing maintenance services. We are 24×7 available for WordPress and WooCommerce support.

How to Get Your WordPress Blog Listed in Google News?

Google dominates the major market share of search engines. This is the reason why bloggers and businesses seek alternative ways to increase website traffic.

The best way to get your content noticed is by getting your WordPress blog listed in Google News. This step will improve your visibility as Google gives higher priority to top stories.

Earlier, bloggers or businesses had to go through a long process for being considered for Google news listing. However, since 2019 things have become quite easier for bloggers and entrepreneurs because Google changed its policy.

To be a Google news publisher, you just need to comply with Google news publisher guidelines. Additionally, you need to ensure that your content is of the best quality.

What is Google News?

Google News is a phenomenal approach by Google to display the latest stories and news for its users. The main intent of this concept is to give recent news headlines and updates from all across the globe. This concept was introduced in 2022.

Google News has plenty of sources for content. You can check the Google news publisher’s content in numerous languages. For this, you need to click the dedicated tab “News” in Google and check for the latest news/ topic.

Google News

Google News is a syndication platform that categorizes and collects news stories. Even though there are huge benefits that you can enjoy by featuring in Google News. But, getting your content features and submitting your website are two different scenarios.

Wordpress Blog Listed in Google News

You can even know about the recent news for the keyword ‘Top stories’. This news will appear in Google’s featured snippets.

Why should you consider getting your WordPress blog listed in Google news?

It is one of the credible windows that people look for. Getting your website or WordPress blog listed in Google news can improve your organic traffic. It is the best way to reach maximum audiences.

This approach can build the authority and credibility of your business brand. The reason being your content/ site will more likely be displayed next to leading brands. It is a great message that the content displayed on your website is quality and trustworthy information.

Apart from this, you will see a great positive impact on your SEO. Publishers will be picking your content as a source. A great way for backlinks. Hence, your WordPress site will also rank for other keywords too.

Eligibility and Requirements

Google news publisher guidelines or policies must be followed by the publisher. Google has specified the guidelines for the content. Your content must adhere to the conditions mentioned in this policy, otherwise content will be rejected.

Tips to submit your business website

Use the Google news publisher center and fill in all the essential details. This includes the URL of your website, topical category, etc. The verification may take 2-4 weeks. So, be patient!!

In the Publisher Center, you need to tap the button, “Verify in Search Console”.

You do not have to submit your website to Google News to get categorized and indexed as a news publication. But, it is recommended to do so.

  • Create a Google News Sitemap

This is the first consideration that you need to pay attention to. To Google News, you need to submit the website once you set up the news sitemap.

Google identifies new content and displays the content using a sitemap. AIOSEO is one of the amazing tools that you can use to create a Google News sitemap.

  • Submitting WordPress website

When you are done with your sitemap, you need to submit your site to Google News.

For this, visit the website of Google Publisher Center. Login via your Google account. You will see a Welcome Note. Tap “Got It” to get your WordPress Blog listed in Google News.

Publisher center

Next, press ‘Add publication’ shared on the menu.

Google Publisher Center

You will see and popup. Here, you need to share the title of your WordPress blog. Make sure to choose the location and enter its URL.

When done, check the box. This certifies that the Google news publisher is permanently and principally located in the country they have chosen. Then tap the button “Add Publication” to get your WordPress blog listed in Google News.

Add publication

To the Publisher Center, the publication will be added. Next, tap the button ‘Publication settings’ to get your WordPress blog listed in Google news.

From the dropdown, choose your “Primary Language” and edit the Publication name (if you want). You can even edit the location.

You can tap “Verify” if you have not verified your site earlier. On a pop-up, you will be asked to open Google Search Console. Here, you need to do the verification of your website’s ownership.

Once verified, browse to Publication Settings and check for more options. Tap “Next”. You can implement a logo in the next step.

When done, hit the button, “Save” to get your WordPress blog listed in Google news. Next, click “Edit”.

Fill in all the Basic details such as meta description. This is one of the strategies that WordPress SEO experts apply so that users find the content easily.

Next, choose the class of the Publication.

Basic Information

Scroll to “Distribution Settings”. Here, you can choose the preferred countries. Otherwise, your publication will be available in all countries.

When done, hit “Next”.

Distribution

In Google News, you will have to Add Sections. Here, you can add your feed, web location, videos, etc.

Hit the ‘+ New section’ and go for your preference. You get the upper hand to restrict sections for specific people. For this go to the settings of “Access groups”.

Acess Groups

Tap “Next” when you are done with your access group settings.

Google News Publication status

Under ‘Google News app publishing status’, you can review the issues such as finding the missing items This is the best way to test the application.

Before you submit for publication, scroll down to the section and hit ‘Testing your publication’ and ‘Follow publication’.

Testing your Publication

Next, press the button “Publish” and check the box.

You are done!!

WP Customify, the leading WordPress and WooCommerce support service provider can assist you to get your WordPress blog listed in Google News. We have helped many bloggers to set up their publications listed per Google news publisher guidelines

How to increase WordPress website CTR?

Valuable content with superior quality is considered The Ultimate Path To Achieving Great Goals. It will help to rank prominently on search engines. Now, this does not guarantee that users will click on your link just because you are appearing in search results.

Some make the mistake of tweaking the descriptions and titles of their web page to boost their organic CTR. Well, it is a wrong practice. There are plenty of factors that affect the CTR of your website significantly. Fortunately, they are within your control. You can optimise it easily to improve organic clicks or increase WordPress website CTR.

You need to understand this general rule! Visitors turn into readers and then your loyal customers.

CTR is the main director that takes the lead in this situation. Hence, it is recommended to improve organic CTR. This will build your presence in the internet world, increase website traffic, and generate revenue.

An introduction to organic click-through rate

It is defined as the users (percentage) who tap on the link that appears in the search results.

For instance, your blog appeared 100 times for a specific keyword. And 5 users clicked on your link to read the blog. So, the click-through rate for your log will be 5%.

The algorithms of search engines use organic CTR to evaluate the website’s/ web content’s performance in the search results. The pages with higher CTR do great on the search result.

CTR and search engines are intimately connected. So, the better the CTR you possess, the greater the chance to get traffic to your website.


Prominent tools to increase WordPress website CTR

1. Google Search Console

Tools such as Google Search Console is a great assistance for knowing the performance of the website.

Make sure to check and select “Average CTR”. You will see a detailed report while you scroll down. Under the tab “Queries”, you can check the keywords for which you are performing great. This will be marked with the position, average clicks, CTR, and impression.

a. Figure out the content with low CTR

Visit the “Search Analytics Report” of your Google Search Console. Next, you have to turn on your CTR filter.

Search for the pages with low CTR and ranking well. Why?

Well, it denotes that your page is ranking higher but nobody is tapping on your snippet. Hence, it is recommended to improve the snippets and increase website traffic.

Search Analytics

b. HTML improvements

Browse to “HTML Improvements” on the Google Search Console to figure out meta descriptions and SEO titles. Check for long, short, and duplicates, and fix them to increase WordPress website CTR.

2. Yoast SEO

  • Improve the Meta Descriptions or SEO titles

You can use the Bulk Editor of Yoast SEO to edit the meta descriptions or SEO titles. You do not have to visit each page individually to manage this. Rewriting is the best way to increase WordPress website CTR.

The Bulk Editor will not help you with the focus keywords. Rather, it will tell you whether your meta description or SEO title is too long or short.

  • Craft the title

Yes, you can use this tool to craft your title. You can research your primary and secondary keywords and craft the elements.

Other Tools:-

You can even use the tools like UberSuggest, AIOSEO, etc., to increase WordPress website CTR.


Top ways to increase WordPress website CTR

1. Employ Long-Tail Keywords

You need to use long-tail keywords to increase WordPress website CTR. This should be especially implemented in your title tags and headlines. These types of words are descriptive in nature. Hence, it will match the search intent.

When a user comes across your descriptive long-tail keyword, they will click your URL.

2. Craft powerful meta descriptions

This is a just answer for those who want to improve organic traffic. Compelling meta descriptions are a great source to increase website traffic. These are the best mediums that will help your users understand what your business page is all about.

Your keywords must be displayed strategically so that the users may know that your web page is the right answer for them.

Strategic steps:-

Answering queries

Answering the queries of the user in the meta description is the best way to win half battles. It will boost your organic click-through rate.

Relevant and specific

You only get a bandwidth of 160 characters to share your message in a meta description. Hence, share your message as relevant and specific as possible.

Persuasive language

It is better to use persuasive language. You can use sentences that can emotionally target the user. Through your post, you can improve organic CTR and increase website traffic.

3. Use structured data

This is one of the best ways to let the search engine know about your message. Using the tools, you can change the content into code that can be processed by a search engine easily.

This approach will help search engines display interactive and rich search results. They are termed rich snippets.

With rich snippets, you can:-

  • Appear higher on SERP
  • Appealing than the plain URLs
  • Shares your content details at a glance more effectively

Using structured data will increase WordPress website CTR as users are prone to divulge interactive content.

4. Mobile Optimization

It is no BIG NEWS that people are more prone to using smartphones than desktops. And the recent trends clearly depict that mobile devices will continue to hold their position. This is the reason why it is advised to optimize the page for smartphone devices to increase WordPress website CTR.

5. Value-added URL Slugs

WordPress is one of the best platforms that employ SEO-friendly URL structure. You can generate meaningful URLs with this.
You can use a “URL slug” to generate your WordPress page title/ post automatically.

A leading WordPress support company like WP Customify can help to increase WordPress website CTR. We are a highly acclaimed service provider that provides WordPress help all across the globe. Our developers are available 24×7 and can help to increase website traffic more strategically.