The First Data Gateway is a custom-fit solution that offers a simplistic buying experience. It is one of the easiest methods to induce the features and functionality of the payment gateway within a WooCommerce store. In addition to the above, the first data payment gateway renders an entire suite of assets leveraging which you can grow your online business.
While there are multiple ways to integrate the first data payment gateway in your online store, this article will tell you the correct solution. It is one of the best solutions and also the simplest. To put it this way, it enhances the payment capabilities of the website.
Further, the Virtual Terminal renders quick access to a centralized location that eases the process of executing transactions. As a matter of fact, it helps you with everything you need to complete a transaction.
- Empower transactions with a secured infrastructure
- Design your website in a way that helps process transactions for you.
- Eliminate the possibility of fraudulent activities
- Generate customized reports on every transaction with the same.
First Data Payment Gateway
When planning to integrate the first data payment gateway within your online store, you need to be careful about the methods chosen and the process followed. Here, we will help you understand the different ways to set up payment options using the first data payment gateway within your WooCommerce store.
When it comes to the WooCommerce store and the first data payment gateway, you can accept credit card payments without any hassle. In terms of the payment modes, the first data plugin has two different gateways:
- Payeezy Gateway: The first is the Payeezy Gateway that allows you to accept payments via a credit card directly on the site embedding the First Data plugin.
- Payment.js: The second one is the API method called payment.js. The Payeezy Gateway merchants have the provision to level up their Payeezy and benefit from the features offered by the Payment.js library. Besides supporting all the Payeezy Gateway features, Payment.js also aids tokenization of the client-side card information before sending the same. This adds to security, reducing the burden of PCI compliance.
Feature:
Now that you know what the first data payment gateway is, let’s find out what makes this different from others. With the first data payment gateway, you can induce a variety of payment options within the online store. From Visa to MasterCard®, JCB, Diner’s Club, American Express®, and Discover®, the gateway encompasses all.
Integrating First Data Payment Gateway in WooCommerce Store
-
- The first thing to do is log in to your dashboard. Enter the URL given here the do the same: http://www.firsdata.com/ecommerce

- Here, you are required to enter the store ID and the user ID along with a password to login to the first data account.

The details of the client are stored in the Owner Certificate p12 File.
The certificate stored in the *p12 file has the name as storeID.p12. For instance, if the store is something like 1210145234, then the client certificate file would have the name: 1210145234.p12.
This file will help you validate the client’s identity for Payment Gateway
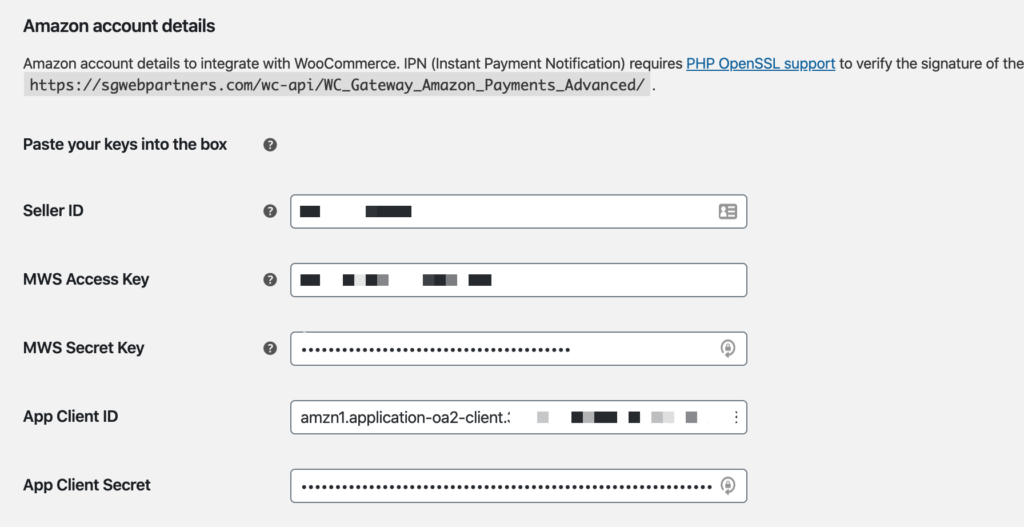
So we have the store ID, next, we require a user ID and the password.
User ID is the user with access to the virtual terminal. When creating the merchant account, you might have had access to the same. The password would be the chosen password allowing the user to bypass authorization.
Once done, the next thing to do is sign in to your account. Click on the URL given here: globalgatewaye4.firstdata.com.
Now, move to the top right corner and click on Administration. Next, click on Terminals. The page will display your e-commerce terminals. Select the one to be edited.

Make changes to the different fields as and what needed. Move down and finally add the token value in the field that says Transarmor Token for the chosen terminal. The token can be any random four-digit value when you are testing the same.
![]()
This way you can easily configure the TransArmor Multi-Pay Tokenization with First Data Payment Gateway.
Accept Credit Card Payments with a breeze using First Data Payment Gateway.

Note that the payment gateway allows you to process refunds when the sale was initiated through the same card.

Now is the time to download and use the First Data Payeezy for WooCommerce plugin to set it up and the payment gateway for your online store. Use this download link and move to the next section.
How to set up the First Data Payeezy Payment Gateway?
Step 1: Login into WordPress dashboard

Step 2: Scroll down to the plugin section and click on Add new.
Step 3: Search for the plugin and download the same.
Step 4: Complete the setup and configuration process.
Step 5: Move to the WooCommerce settings and then click on Payment. Select WorldPay.
Step 6: Click on enable the plugin and then manage.
You are all set to use the plugin.

Now, in the WooCommerce > First Data Payeezy tab, you will be able to see options to set up the accepted card types, title, merchant token, transaction type, etc. fields. Fill in the desired values and Save Changes.
How the Automatic Refund Process can be initiated?
WooCommerce First data is the foremost gateway that allows store owners to process the refund automatically once initiated. You just need to go to the order, look for the refund button and click on it. The amount will be refunded to the same credit card from which it was received. To send it to another credit card, use the Refund manually button.
If you are sceptical about configuring First Data Payment Gateway for your WooCommerce store, you can hire WPCustomify experts to handle the task for you.