Call Us Toll Free - US & Canada : +1-(888) 602-0119

How to Set Up PayFast Payment Gateway in WooCommerce?

Pay Fast Payment Gateway is designed specifically for South African online sellers including charities, individuals, and businesses (both small and big market players) to receive the payments through secure sources. It comes with multiple payment options such as debit card, mobicred, credit card, MasterPass, Instant EFT, and SCode. With this, merchants don’t need any bank account, but a PayFast account to process the payment.

The extension benefits both online customers and merchants. Plus, it comes with matchless security features eliminating the possibilities of fraud. Pay Fast can be integrated with more than 70 platforms. PayFast accepts payments from all verified cards such as MasterCard or Visa card. Plus, buyers can also use Maestro and Visa Electron debit cards to make the payment on the platform.

PayFast Payment Gateway Features

  • It allows the users to schedule time and date of product availability.
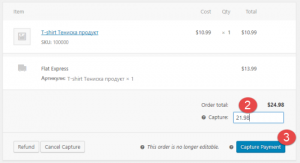
  • With this extension orders can be charged automatically when it’s available
  • It offers the flexibility of changing product release date
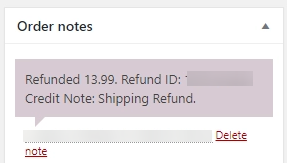
  • Automates the email process (for pre-ordered items)
  • Pre-order cancellation when the item isn’t available

Which plugin is used for the PayFast Payment Gateway?

You may download the plugin using this link. With Pay Fast the customers get the flexibility of scheduling their payments – weekly, annually, or monthly as per their convenience. You can hire WPCustomify experts to configure this gateway in a matter of minutes or read ahead to do it on your own.

Steps to Registering a Payfast account

Step 1 – Sign up on Pay Fast
Step 2 – Register for a PayFast account

Step 3 – Next, proceed with account verification
Step 4 – Click on Pay Fast > Settings > Integration
Step 5 – You’ll get access to Merchant Key and Merchant ID (keep a copy of it as it will be used when setting up your site.

How to Find Merchant ID and Merchant Key?

Merchant Key and Merchant ID are needed to link Pay Fast and online shopping sites during the integration process. To find the Merchant Key and ID go to the PayFast dashboard. You’ll find the details towards the top-left corner of the page.


Alternatively, you can go to Settings > Integration to get a copy of your Merchant Key and ID.


Merchant ID & Merchant Key:-

It is important to configure Merchant ID and Key before using the payment gateway with your online store.

You can find the details with the process mentioned above. After filling in the details select “Activate” button.

How to Setup and configure PayFast?

Follow the steps listed below for PayFast setup

  • Sign in to your PayFast account using your credentials

  • Click on WooCommerce > Settings > Payments > Pay Fast
  • Enable “PayFast” method and click on “Setup” option.

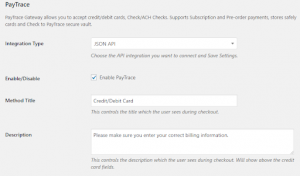
  • You will be redirected to the settings page where you can customize the available options.

PayFast Payment Gateway

  1. Check the “Enable PayFast” option.
  2. Fill in the “Title” sandbox. Your customers will see this title on the checkout page.
  3. Now fill in the “Description” sandbox as needed
  4. Check “PayFast Sandbox”
  5. Next, add Merchant ID and Merchant Key. (Source the details using the process mentioned above).
  6. Add Passphrase
  7. Tick Send Debug Emails checkbox.
  8. Add an email address where Debug notifications are to be sent
  9. Check/Uncheck “Enable transaction logging for gateway” box
  10. Finally, click on “Save changes”.

How to test the integration?

Pay Fast offers a sandbox (test) option to the users in order to ensure proper functioning of the integration. Sandbox mode can be activated by ticking on “Enable in sandbox (test) mode” checkbox. You can find the option in the PayFast activation window.

test the integration

How does pre-order work in PayFast Payment gateway?

Setting up pre-orders for your online store

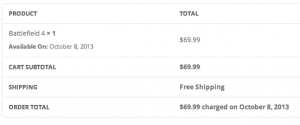
On setting up product pre-orders for online stores your customers will be able to place orders for various products and services far before their availability. The info can be released either manually or automatically. You may take the orders when ready. The extension takes care of the process thereafter.

Pre-order settings can be easily customized. PayFast offers both ‘upon release’ and ‘up front’ charging options.

PayFast Payment Gateway

Customization of Pre-order product settings

Merchants can customize the display look of their pre-order products with the help of in-built tools including product messages, button text, Cart/Checkout Display text, and Staging/text. Set the timer so that customers can keep track of the countdown.

To reach the settings page select Woo commerce > Setting > Pre-orders

Customize the settings accordingly.

PayFast Payment Gateway

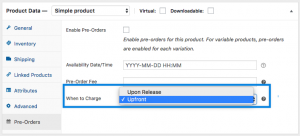
Note- You’ll need to set an initial fee amount for the Pre-Orders. There are two methods for charging pre-orders fee –

  • Upon Release – In this case merchants charge a nominal Pre-Order Fee.

PayFast Payment Gateway

  • Upfront – Customers pay full charges of the product when placing the order. In this case charging a Pre-Order Fee isn’t mandatory.

PayFast Payment Gateway

Conclusion

PayFast makes it easier for South African e-commerce businesses to accept online payments from both international and local purchasers. Also, it offers the benefit of invoice and e-ticket sales management.

How to Set Up eWAY Payment Gateway in WooCommerce?

The WooCommerce eWAY extension is an ideal option for the merchants to accept card payments from their store without. It eliminates the need to redirect the customers to the partner sites for making the payment. The payment gateway easily integrates with Refunds API and Subscriptions for WooCommerce. Additionally, merchants can also receive token payments through this extension.

The WooCommerce eWAY payment gateway uses version 3.1 API of eWAY which is not only PCI compliant but also offers the benefit of 3D security. It processes the payments much faster and allows purchasers to save their card details for future reference.

Buyers with billing addresses in Singapore, Australia, Macau, and Hong Kong can reap the benefits of eWAY. So, your WooCommerce store must have it configured. Want WooCommerce support services to set up? Use this link. Otherwise, learn How to set up an eWAY payment gateway in WooCommerce by reading ahead.

Requirements

  1. A WooCommerce version 3.5.0 website
  2. A verified SSL certificate
  3. eWAY account
  4. The currency in the account should be MYR, AUD, SGD, NZD, or HKD (corresponding to the nation an individual signs up for) so that you can easily receive the payment.

How eWAY Payment Gateway is a better option?

  • Quick setup – eWAY can be set up in a single day (for the merchant accounts that are approved).
  • Matchless data security – With this payment gateway in use the data of customers’ is completely safe as eWAY is PCI-DSS compliant.
  • Customer support – The customer representatives of the platform are available 24/7 to handle relevant issues.
  • No chance of fraudulent activities – eWAY has high-end fraud protection capabilities. You need not to worry about any kind of theft.

eWAY Payment Gateway Features

  • It is capable of hosting flash sales instantaneously.
  • Helps in generating discount coupons so that customers can get the best deals.
  • Allows customers to publish product reviews on site.
  • Allows Cross-Selling and Up-Selling of the products.

Which plugin is used for the eWAY Payment Gateway?

You may download using this link – https://woocommerce.com/products/eway/ .

Setting up and Configuration of eWAY Gateway

eWAY Plugin Installation

  • Sign in to your WordPress account.

  • Select WordPress Admin > Plugins > Add New and then click on “Upload Plugin” and then “Choose File” buttons. Use the downloaded file for uploading on the site.
  • Now click on “Install Now” and “Activate”.

Setting up and configuration process

  • Select WooCommerce > Settings > Payments > eWay
  • Disable/Enable the eWAY plugin
  • Select “Manage”

Setting up eWAY on the website

  • Click on WooCommerce > Settings > Payments
  • Select eWAY.
  • Click on “Set Up/Manage” and you’ll be redirected to the settings page.

Configure the settings

  • Check/Uncheck to Enable/Disable use of eWAY.
  • Add “Title” in the given sandbox. Keep in mind this title will be displayed before your customers on the checkout page.
  • Next add “Description” – here you can add detailed information for your purchasers.
  • Now enter the “eWay Customer Password” and “eWay Customer API Key” in the given space.
  • Deselect or Select the different “Allowed Card Types” – JCB, Visa, Discover, Mastercard, Diners, AmEx, Laser, Maestro, and UnionPay.
  • Check the “Enable Saved Cards” box.
  • Check “Enable eWay Sandbox” to test the settings before making your site available for public.
  • If you want to enable troubleshooting then turn on the “Debug Mode”.
  • Click on “Save changes”.

After entering the credentials the checkout gateway page will feature the credit card form where the customers can add their details for making the payment.

How many Payment methods are there in eWAY?

eWAY facilitates both customers and merchants with Direct Debit through Credit Card and Bank Account. Plus, Direct Deposit is another payment method featured on eWAY that allows customers to pay directly through their bank account.

Where can the users check eWay transaction history?

eWAY Transaction history allows the individuals to filter transaction dates ranging from a year. Run the report for every particular year if you need transaction data for multiple years. Use export option for obtaining the data in a spreadsheet. Read on to know how you can access the report –

  • Sign in to your MYeWAY account
  • Go to Reporting > Transaction Report

Now you can view all the transactions that have been processed on the platform. You can enhance the scope of your search using “Search Transactions”. Personalize the Duration, Start Date, End Date, Currency, and Transaction ID to filter your search. After entering all the details click on the “Search” button.

Once you are done with the above step you’ll find a detailed list of payments. You may now review and compare the details. Note that the reports can be exported in the file type of your choice. Use the “Export/Print Report” option for the same.

Conclusion

WooCommerce eWAY extension offers countless benefits to both customers as well as merchants. From easy checkout to secure data storing the extension can meet all your unique requirements efficiently. The best part is that it’s accessible through any device. It’s one of the top online payments solution providers indeed. Now you can accept payments anytime, anywhere.

Complete introduction to WooCommerce PayTrace Payment Gateway

Planning to integrate a payment gateway within your online store but not sure if you should go with a free version or a paid. Wondering which plugin to choose for either of the cases?

Don’t worry, as this article is prepared by WooCommerce support experts to introduce a premium payment gateway plugin. Throughout the article, we will talk about the plugin, features offered followed by the step-by-step guide to integrate the plugin within your WooCommerce store.

Without further ado, let’s get started.

What plugin is used?

When setting up a WooCommerce store, you are bound to have a payment portal. However, you cannot pick any gateway as this might threaten the privacy and security of Customer information. Don’t have any plugin in mind? Well you don’t have to scour the web to find the best payment gateway plugin.

PayTrace is one of the paid payment gateway plugins offering all that you need to set up a hassle-free payment system within your store.

As an online payment processing company, PayTrace is one that offers a robust, and secured infrastructure facilitating seamless payment processes. No matter which type of card your customers prefer, PayTrace is compatible with all including Visa, American Express, MasterCard, Discover, and JCB. Additionally, the portal also accepts payments made in US dollars.

When making online payments, it is important that your site has SSL certificates installed and activated. This will encrypt the network ensuring that your customer’s data is safe and protected. With respect to the PayTrace plugin, it renders support to both PayTrace JSON API and PayTrace Post API.

Features:

  • Promotes Sales or Authorization Only transaction
  • Renders support for Subscription-based product payments.
  • Has a system with automated refunds on order cancellation.
  • Pre-Order product payments.
  • Captures information from the past transactions reducing the time taken to process payments.
  • Click Here to download the PayTrace Payment Gateway plugin.


How to connect with WooCommerce?
Now that we have enough information about the plugin, let’s see how we can integrate the same within a WooCommerce store.

Setup and Configuration
Setting up the plugin isn’t as simple as it has been with other WooCommerce plugins. Find below the step-by-step process to install and configure the PayTrace plugin.

Integration Type Settings
Integration Type: To begin with, select the Integration API that would be used. When you land on the Settings page, this one appears at the top and is an important field. Select the right API and save the settings before moving ahead

General Settings

Important note: Only if you select Together in the Payment Forms Display Settings, will you need to fill the Method Title and Description. See “Forms Display Settings” for more information.

  • Enable/Disable: Select the checkbox to activate the plugin and enable the same.

  • Method Title: Add a specific tile. Note that this would be visible to the users.
  • Description: This is the description as viewed by the users.

Credentials Settings

  • PayTrace User Name: This is related to your accessibility. Add a username that you will use to login in.
  • PayTrace Password: Make sure you have a strong password set for the validation.

Form Display Settings

The last section is related to form display settings.

Payment Forms Display: Depicts the manner in which the form is shown on the page.

  • Together‘ shows both Card and Check forms in a single payment method, within the method description.
  • Separate‘ will have separate forms displayed as different methods.

  • Card Method Title (separate only): Determines the title of the method displayed during checkout.
  • Card Method Description (separate only): Regulated the card method description as visible to the users at the time of checkout.

  • Check(ACH) Method Title (separate only): Regulates the title of the Check method visible to users at the time of checkout.
  • Check(ACH) Method Description (separate only): Regulates the description of the Check method visible to users at the time of checkout.

Card Payment Settings

Accepted Cards: You can enter the different types of credit cards that will be displayed at the time of payments.

Check Payment Settings

  • Accept eCheck Payments: Allow the store customers to make payments through eChecks.
  • Set “On-Hold” status for orders paid by eCheck: Displays ‘On-Hold’ for orders that are paid by eChecks. However, if you do not select this, orders are referred to as ‘Processing’.

Vault Settings

  • Enable Payment Vault: To save the Payment information for future references. This will keep saving the last 4 digits of the Credit Card, along with the expiration date, and custom-generated user ID. Users will have the ease to check their information by visiting their ‘My Account’ Page from the dashboard.
  • Require CVC when paying with saved cards: Allow users to enter their CVC number to complete the payment.
  • Save Your Payment Method Text: Display a message on the screen asking customers to save their card information.

Transaction Settings

  • Transaction Type: The transaction type shows whether it is sales or authorization.
  • Send Order Description with Transaction: Selecting this would dispatch the order details to the PayTrace portal.

Client-side encryption:

Enabling client-side encryption means that the card data is encrypted at the client’s end. PayTrace JavaScript Encryption Library is used for the same. What’s important to note here is that the data once encrypted can only be read by PayTrace. None but the PayTrace portal can decrypt the information in a way reducing exposure to PCI compliance.

Note that data encryption is specifically meant for credit or debit card information. In order to set up the feature, do the following:

  • Visit the Paytrace Dashboard and enter your login credentials to validate the same.
  • Next move to the “Integration > Download Public Key“ to get access to the public key.

  • Next, go to WooCommerce, Settings, and then click on Payment (Checkout for WC < 3.4). Here select PayTrace.
    1. Click on plugin settings and then select “Use Client-Side Encryption” setting
    2. Here, enter the Public Key and also the location.

WooCommerce PayTrace Payment Gateway

Process Refunds

In order to automate the order refund process, you can do it using the plugin. Follow the steps given below to see how to process refunds.

  • Move to the Order Edit Page of the Admin.
  • Here, under the meta box of Order Items, select the Refund button.

WooCommerce PayTrace Payment Gateway

  • Now add the amount that you want to return to the users. It could either be a partial amount or the total order amount. Finally, click on the button of Refund.

WooCommerce PayTrace Payment Gateway

  • Once you do that, you will see a prompt on the screen to confirm that you want to refund the said amount to the user. Click on it to start the refund process.
  • In case the refund is successfully transferred, an order line item appears along with an informatory note.

WooCommerce PayTrace Payment Gateway

Process Capture

Lastly, we see how to capture a transaction. To process a transaction capture, there are two different ways.

Capture from “Order Actions”:

  • Move to the “Order Actions”
  • Click on the drop-down to select “Capture Payment (xx.xx)”
  • Either update or click on the arrow just below the drop-down.

Capture from the “Order Items” meta box:

  • Here, tap on the Capture button

WooCommerce PayTrace Payment Gateway

  • Add the figure that you need to capture and click on the Capture Payment button.

WooCommerce PayTrace Payment Gateway

  • You can select “Cancel Capture” to stop the process.

Conclusion

With that being said, you can now get started with the process of downloading the plugin and adding it to your WooCommerce store.