Call Us Toll Free - US & Canada : +1-(888) 602-0119

How to Setup WorldPay as a Payment Gateway to Online Store?

Worldpay gateway plugin allows the users to multiple payment options including PayPal, Visa, Mastercard, and more. If you own a WooCommerce store and are willing to set up this payment gateway, you have made the right choice.

When the customers fill in their card details on checkout they are redirected to the payments page automatically where they can enter the necessary details. Worldpay gateway processes the payment and authorization is sent back to the site.

Now, let us tell you how to set up WorldPay as your online store’s payment gateway. If at any point, you feel like the process is tough and you might mess it up, just come back to this section and hire professionals for this purpose.

Requirements

  • A WooCommerce version 3.0.0 website
  • A Worldpay account. Users who haven’t already signed up can create their account here.
  • An SSL certificate

Which plugin is used for the WorldPay Payment Gateway?

‘Online Worldpay for WooCommerce’ is the best plugin for World Pay Payment Gateway. You may download it using this link. In this tutorial, we are going to use the same.

World Pay Plugin Installation

Follow the steps below to install the plugin –

  • Sign in to your WP account.
  • Next, select ‘Plugin’ and then ‘Add new’.
  • Install the plugin and then ‘activate’

World pay Set up and Configuration – How to setup and configure World pay?

  • Click on WooCommerce, and then select Settings, Payments, and then World pay
  • Enable ‘Online Worldpay CC Gateway’ and ‘Online Worldpay PayPal’ plugins and select ‘Manage’.

API Settings and How to Find API of World Pay?

  • Select ‘API Settings’
  • Now got to Environment and choose ‘live’ from the given Drop Down menu
  • Next, complete the API Settings
  • Last, ‘Save Changes’.

Credit Card Gateway

  • Once you are done with the API settings click on ‘Credit Card Gateway’ tab
  • Check the ‘Enable Credit Card Gateway’ box
  • Select ‘iFrame Form’ in Form Type sandbox
  • Fill in ‘Worldpay’ in the Title sandbox. Check other settings of the form similarly.
  • Now ‘Save Changes’.

PayPal Gateway

  • Click on ‘PayPal Gateway’ tab
  • Check ‘Enable PayPal’ box
  • Complete the ‘General Settings’
  • Select ‘Save Changes’

Webhook Settings – How to Setup Webhook in Worldpay?

Follow the steps below to Setup Webhook in Worldpay –

  • Select ‘Webhook Settings’
  • Go to Webhook Url sandbox and select the given link.

  • Now sign in to World pay
  • Next, go to Dashboard, then Setting, and then Webhook
  • Paste the website url
  • Select ‘Save’

Setup WorldPay Payment Gateway

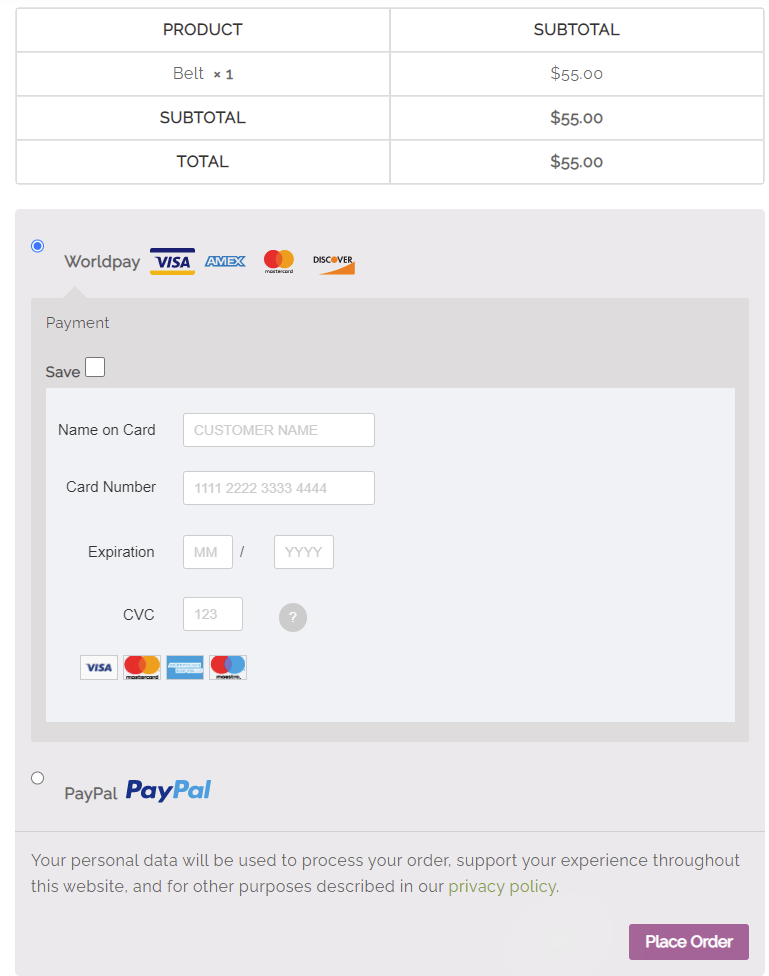
Find the checkout page of your WooCommerce website and check PayPal and Credit Card Worldpay.

Setup WorldPay Payment Gateway

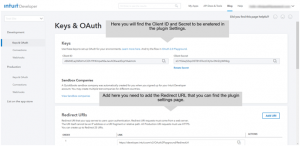
Finding WorldPay API

  • Sign in to your Worldpay account using this link.
  • Click on Dashboard > Setting > live > API Keys
  • Copy both Service key and Client key

Setup WorldPay Payment Gateway

Worldpay Online Setting Details

Enable/Disable – Allows enabling or disabling the payment gateway. Checking the box means you have enabled the feature and the customers are allowed to pay using Worldpay Online.

Checkout Form – This in-built checkout form in WooCommerce ensures an integrated and seamless experience to your customer on checkout. Merchants with no an SSL certificate can untick the Checkout Form option.

Testing – Merchants need to check the Testing option in the initial stage of setting up their website. You may uncheck the option once live orders can be processed for money.

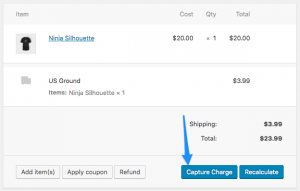
Payment Action – This option allows immediate capturing of the payment or authorizing the card instantly/ capturing the payments later. All your orders with Authorized marking can be easily captured from site.

Title – The title you fill in the sandbox is displayed on the checkout page.

3DS Enabled – It facilitates an extra step on checkout which is for additional safety and security of customer data. Enabling 3DS shows whether the buyer’s bank leverages the 3D secure Solution.

Card-on-file Payment / Tokens – Facilitate your customers with easy and secure storing of their payment method and card details. This ensures quick checkouts in the future. The entire card details are stored at Worldpay and not in the database. Though the site’s database has a token for saving the cards that can be automatically charged on checkout. Note that Tokens are best suited for Authorized orders, Subscription orders, and Pre-Orders.

Live Service Key – Use live service key for processing live orders. You can find it in your Worldpay account.

Live Client Key – This key is also needed for processing live orders. Like the Live Service key it can be also found in the Worldpay account.

Settlement Currency – Merchants can select their preferred currency using this option Worldpay will pay you in the selected currency only.

Test Service Key and Test Client Key – Merchants who have both these keys can reap the benefits of test orders. It can be found in your Worldpay account.

Transaction manager – Using this option you can process the payments from your online shop’s back-end.

Dedicated Support Worldpay Team

Worldpay has a team of dedicated support teams accessible 24/7. You may reach out to them whenever you need any help related to your Worldpay account.

Migration/Deactivating World Pay Form

Users with a Worldpay account can add the keys to their account’s settings to deactivate the Form. Note that migrating Subscription payment amounts from your Worldpay Form to Online Worldpay account is a complex process. Your customers’ cache will be cleared – even the cards saved with your store’s account will get removed. So, in case you reactivate it again, they will have to fill in all details again. However, you have one facility here – all the outstanding payments will still be collected through Future Pay service by WorldPay.

Conclusion

WorldPay WooCommerce Payment Gateway Extension is indeed a great thing as it allows merchants to collect payments on their store automatically, eliminating the need for redirecting buyers to a third party website.

Moreover, WorldPay enables merchants to take payments anytime, anywhere, through mobile/desktop. The entire process takes place on the site. Hence, you can receive info about your order status in real-time. Plus, the platform comes with an Unlimited License Agreement for an online store. Worldpay provides payment solutions meeting merchant demands.

How to Integrate Square Payment Gateway in WordPress Website?

The Square Payment Gateway for WooCommerce is an amazing tool that can be easily integrated into customer data, sales, inventory and other channels. It enables instant acceptance of payments through a single centralized solution. This means WooCommerce store end-users can start using Square right away without waiting for hours. Also, there aren’t any hidden charges. You are charged only when you earn sales revenue.

Thinking about setting up and integrating Square Payment Gateway on the WordPress website? This article will tell why and how you can do that. And if you have already made up your mind and are looking for experts to help you in doing the same, hire professionals at WPCustomify for excellent and fast services.

Features of Square Payment Gateway for WooCommerce

a) Saves Card and Customers Details

Regular customers can easily save and secure their card details. Plus, it also allows them to label their mode of payment making it easier for them to identify the method when needed in future.

b) Authorize Capture

Square allows the merchants to authorize customer order when a transaction is made by the customers and the payment is captured when order is shipped.

c) WooCommerce Pre-Orders and Subscriptions Support

WooCommerce Pre-Orders is an ideal option to add pre-orders buttons in your online store for various products and services. With this extension you can accept upfront payment for the pre-orders and set any time and date according to the availability.

d) Business Security at Zero Cost

Payment disputes are obvious where sale and purchase take place. There is always a risk of issues with the purchase from the customer’s end. Square’s team of professionals resolve the matter by verifying the authenticity of concern raised by customers. The end decision is made by them accordingly.

f) Dispute Dashboard for Easy Work Management

Square’s Disputes Dashboard allows users to submit e-copies of the important documents to the extension. It eases the job of merchants by handling the stressful, time-consuming, and hefty work of sorting bank related issues of the customers.

g) Account Protection and Fraud Prevention

The dedicated fraud protection team of Square ensures complete account security. Not only do they keep 24/7 watch on the account activities but ensure a holistic approach towards the extension’s ecosystem. Plus, they keep analyzing different signals in order to keep themselves abreast of the latest fraud trends.

h) Advanced Data Security

Square’s advanced features enable it to protect all the business related data. It records every business activity and transaction. You need to worry about the safety of your business and confidential info with Square in use.

i) Up-to-date and accurate inventory

Square integration eliminates the need to maintain a manual record of sales and inventory. The extension automates the entire process and helps in keeping the track of the WooCommerce inventory. With tools in use merchants can easily sync any offline or online changes in the stock.

What Plugin is used to Set Up Square?

Requirements

  • An SSL Certificate
  • WooCommerce version 3.0+
  • PHP version 5.6+
  • WordPress version 4.6+
  • A Square account

Setting up and Configuration Process

  1. The process starts with buying and downloading the plugin needed for integrating Square extension with the site.
  2. “Square For WooCommerce” is the best plugin for the purpose. You may purchase and download it from this link.
  3. After the plugin is downloaded proceed with installing and activating it to your business website.
  4. Next, click on WooCommerce > Settings > Square tab for completing the configuration.
  5. Now Sign in and set up your Square account. Next, select the “Connect with Square” option.
  6. Manage app permissions to connect Square with your website automatically.
  7. Now you’ll be redirected to your website.

How to Manage Inventory and Synchronize Woo with Square?

  1. Find the Product in your Square account.
  2. After selecting the product click on ‘Sync with Square’ option. Note that this option is limited to the products having a SKU and an attribute.
  3. Lastly, click on Update.

Synchronizing Inventory and Products Manually

Wondering how to Synchronize Woo with Square? Follow these steps:

  1. Select WooCommerce, then Settings, and then Square.
  2. Next, click on ‘Update’.
  3. Now select ‘Sync Now’

The above steps help in managing and synchronizing the inventory/products with things listed below –

  • Product Price
  • Product Name
  • Inventory Count
  • Product Category
  • Product Image
  • Product Description

Capturing the Charges

The payments can be captured manually if the ‘Transaction Type’ of the gateway is ‘Authorization’. It can be done from the Orders page on WooCommerce.

Users can capture the authorized transaction for a maximum of 6 days. Post this period you’ll have to ask your customers for transaction re-authorization for capturing payment. You’ll have to follow this procedure for every Square transaction. Note that the amount which is captured has to be similar to the authorized amount. Square doesn’t permit for partial captures.

Automatic Refunds

The refunds can be issued automatically on the website. You won’t have to check in to Square account for refunds.

How to Setup Recurring Payments Setup?

To Set Up Recurring Payments you need to allow the customers to save the payment method and card details in their profile for future reference. It helps merchants for pre-orders and product subscriptions.

Conclusion

Square WooCommerce Payment Gateway makes the eCommerce site both flexible and powerful. All the changes made to the inventory in WooCommerce are synced to the gateway automatically. It is a robust, easy to use, and affordable solution to manage online sales – a perfect package for small business owners, artists, and others. Do you still need more reasons to start using this gateway? We guess not.

How to Integrate Stripe Payment Gateway in Your Website?

The Stripe Payment Gateway allows the merchants to accept easy payments onsite. It can be used for both mobile and web transactions.

This plugin lets the customers stay on the online platform and eliminates the needs of redirecting them to a third-party host page during the process of checkout in WooCommerce.

In other words, you’ll be benefitted improved conversion rates. With Stripe, you can add Payment Request buttons to your site (including Google Pay and Apple Pay). And this article guides you to deploy this gateway properly for your buyers. Alternatively, you can take help of the best WooCommerce support service providers.

How to Setup Stripe?

Requirements

    • An SSL certificate is needed as a proof of the merchant’s credit card detail. Note that this plugin has the power of Stripe JS for tokenizing credit card details for data security.
    • Stripe abides by the Strong Customer Authentication standards crucial for safe and secure transactions that come under European Economic Area.

What Plugin is used to Setup Stripe?

Stripe plugin for WooCommerce is available for downloading here.

Installation and Setting up Stripe Plugin

Follow the steps listed below after downloading the plugin from the link given above.

      • Sign in into WordPress site as an Admin
      • Now click on ‘Plugin’, then ‘Add new’. Once the plugin is installed, click on ‘Activate’.
      • Here you need to setup and configure the plugin as directed below –
        1. Go to WooCommerce then click on ‘Settings’, then ‘Payments’ and then on ‘World pay’
        2. Now select ‘Enable’ > ‘Manage’
        • Type in the API keys for Stripe relevant to live mode or test mode

        • Check the ‘Force Secure Checkout’ box to enable the feature and then select ‘Save’

        • Fill in all the details on the checkout Page and click on ‘Place Order’.

Finding API on Stripe

Simply follow the following steps –

        • Sign in into your Stripe account using this link and then select ‘Setting’ followed by ‘Connect Settings.’

        • Get your Stripe API keys by clicking on ‘Developers’ > ‘API Keys’

        • Enable ‘Viewing Test Data’ or ‘Viewing Test API keys’ as per your requirement.

        • Now go to the Publishable Key and you’ll find a value in the Token column – pk_live_somelongrandomvaluelikeVqFze9etc. Copy it.

        • After saving the Publisher key click on ‘Reveal live key token’ which is in the secret key row.

      • Copy the secret key. It will be used in the website’s stripe setting.

Payment Request Buttons and Subscriptions Extension

Payment Request buttons support Variable and Simple products in cases when the WooCommerce Subscriptions extension is used. WooCommerce Subscriptions and WooCommerce Stripe extension use allow merchants to have a good number of subscriptions in their online store.

How to Find a Webhook in Stripe?

Step 1 – Extract the signatures and timestamp from Stripe header

Start with splitting the header by using the character “,” (comma) as your separator. This step is crucial to get the elements list. Next, split all the elements with “=” (equal to) sign. You’ll get a value and prefix pair.

Step 2 – Creating the signed_payload string

It can be easily prepared by linking character, timestamp and JSON payload all together.

Step 3 – Finding the signature

HMAC computing with the hash function SHA256 is required for the purpose. Signing secret of the endpoint can be used as your key, while the signed_payload string will serve the purpose of the message.

Step 4 – Comparing the signatures

You need to compare and mark the difference between the header and expected signatures. Consider how different is the current timestamp from the received timestamp and then map the difference with your tolerance.

How to Set Up Recurring Payment in Stripe?

Requirements

Setting up a recurring payment becomes easier if you have all the things available with you. Here is all you need to arrange to begin the process –

      • Stripe account with Subscription plans
      • Qwilr integration with Stripe account
      • Qwilr Page should have the payments enabled

Setting up Recurring Payments

After collecting payment through your Qwilr Page the merchant’s Stripe account gets a new customer record. Here are the steps to set up recurring payments –

      • Once you reach your Stripe account, find the record page of the customer where the recurring subscription is to be added.
      • Now go to your Active Subscriptions and select ‘Add Subscription’ button which will be on top of the page.

Now you’ll be redirected to ‘Create a Subscription’ page. After you are done adding a product, click on ‘Start subscription’ and you are done.

Concluding Word

Stripe is one of the exceptional ways of accepting online payments. It allows the merchants to accept Diners Club, Visa, American Express, JCB, MasterCard, and Discover cards. You can even accept Bitcoin on your online store with this plugin in use. The best part is that you won’t have to bear any setup or monthly charges. Also, you won’t have to face the hassle of hidden costs. Users are charged only when they get earnings which are transferred to the registered bank account within a week’s time.

×

DO YOU NEED HELP?

24x7wpsupport
Join the Course