Klarna is one of the most trending online payment gateways, based in the United States. The main USP of the company is its “Buy Now – Pay Later” option. As a payment gateway, the company is getting a lot of hype. The fact that they are getting so many international clients at such a short span is a testament to their success. Meanwhile, the article is not about what Klarna is offering.
Today, we will discuss how to integrate Klarna payment solution to the WooCommerce platform, which is a part of a WordPress website. We will discuss WooCommerce briefly, but this article is primarily about a plugin called Klarna Checkout (ask for support services using this link). With this WooCommerce supported plugin, you can integrate the Klarna payment solution along with all its features in a WordPress site.
WooCommerce and the Klarna Plugin – A Quick Intro
WooCommerce is the most popular eCommerce module that you can find for a WordPress site. With the help of this open-source plugin, you can integrate a payment solution for your business. So, you can sell your products or services in a WordPress site using WooCommerce.
Now, with the passing days, selling products has become more robust. That is why people look for more features inside WooCommerce. The 3rd-Party companies then introduced their products as they wish to inject their business into the WordPress platform. Klarna also followed this trend and built two different plugins, which you can use with the WooCommerce platform. The names of the plugin are Klarna Checkout and Klarna Payments. We will learn more about the plugins now.
Understanding Klarna Checkout
Klarna Checkout essentially replaces the current WooCommerce layout and functionalities and gives a modern look alongside additional payment checkout options. You can use the “Buy Now, Pay Later” option as well as the “Pay later in Instalment” option. Of course, you can set up the direct payment option too. Overall, when you need some extra features while you want to sell your product or service, we recommend you to use Klarna Checkout.
Understanding Klarna Payments
Klarna Payments is, as you can say, a conventional payment gateway that you can use with WooCommerce. You should know that this plugin doesn’t change the layout, neither it adds any additional features at the time of checkout. If you are looking for a simple payment gateway solution that accepts most modes of payments, then Klarna Payments is ideal for you. You can also add PayPal working together with the plugin.
Some significant reasons to integrate Klarna into WooCommerce:
There are several significant reasons to use Klarna instead of conventional WooCommerce modules. Some of the notable features are as follows:
- Both the plugins add robust payment features which you will not get in the regular WooCommerce module. That would apparently boost sales by 15% to 20%.
- Klarna is a user-friendly payment solution that approaches customers with a more interactive manner. So, the chance of conversion is getting high every time you use Klarna.
- Of course, the payment gateway offers the Buy Now, Pay Later feature which has its own appeal to a particular set of customers.
- The platform offers a wide range of payment modes which a customer can use to make a payment. Nowadays, everybody wants these flexibilities as there are loads of promotional offers and deals that people love to implement while they make a payment.
- Klarna is a secured platform that comes with features like Post-purchase support. So, it gives the customers an extra layer of safety while they make any payment; something they will not get if you choose to use WooCommerce’s default modules.
- It does amazing order management – you can read more about the same on their official website here.
What are the charges involved?
At the time of writing this article, the costs involved in transactions through Klarna checkout for your end-users (that you must know about) are:
- For an onsite transaction, they charge £0.20 along with 2.49% of the transaction.
- In case it is an offsite payment, the fee is £0.20 plus 2.99% of the transaction.
- Apart from that, there is a monthly fee involved – £30.00.
What are the prerequisites in using Klarna Checkout?
Before we go deep into procedures, it would be best to know what we need before the installation and configuration of Klarna Checkout:
- The first thing that you need is an account with Klarna. For that, visit the official and create one.
- It would be best if you update WooCommerce to the latest version available.
- We advise an SSL certificate attached with the domain.
- We also recommend upgrading the PHP version to the latest one available.
Klarna Checkout Installation and Configuration
- From the WP Dashboard, move the mouse pointer over Plugins, and click on “Add New.

- On the search bar, type “Klarna Checkout,” and you should see it. Then you need to click on install. After a few moments, you will see Activate, which you need to click. We hope you did that right which means the plugin is installed and activated.
- After that, from the WP Dashboard menu, hover the mouse pointer on to WooCommerce now, and you should see Settings. Click on that. Once you see further options, click on “Payments,” which should give you all the payment gateway options.
- Find “Klarna Checkout,” and enable the feature using the toggle switch.
- Then, on the right-hand side, click on ‘Setup.’
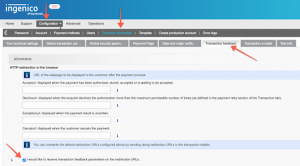
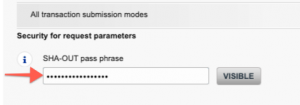
- You need to provide some basic information – a Title, a payment description, order confirmation email address, shipping address if any, product URLs, customers types, and of course, the merchant credentials. Note that you will get these data from Klarna. You also need to put down the API keys, which you will also acquire from Klarna.

- Then, you should make a test transaction to know if everything is working fine or not. After that, you can go live and accept payments.
Klarna Payments Installation and Configuration
The prerequisites to install and configure Klarna Payments are the same as the other plugin. So, without repeating the same thing, let us go straight into the installation process:
- The first step is to find the correct plugin and install it. For that go to the “Add New” section of the Plugin option. In the search bar, this time type “Klarna Payments,” and you should see the plugin is flashing first. Please make sure you are installing the right one as there two plugins with almost the same name.
- Install and activate the plugin accordingly.
- From the WP Dashboard menu, go to the Settings section of WooCommerce. Click on ‘Payments,’ which should route you to the page where you can see all the gateways listed. Find Klarna Payments, and click on it enable toggle switch to avail the service.
- Then, click on ‘Setup,’ which will again route you to the page where you need to put all the data to make the payment gateway work.
- The information includes Title, Description, Test mode options, Product URLs if any, Production Username & Password, and a few more. You need to provide all this information correctly. Of course, you will get all the details from Klarna’s original account dashboard. If not, then we suggest you contact the support team.
- The next step is to test the payment gateway with test transactions. If everything is done correctly, you can receive payments.

The Conclusion
It can take up to 3 business days from the day the product gets shipped to receiving the amount to your bank account with this payment gateway. To conclude, Klarna is an incredible payment gateway with an approach to target modern-day customers, and both the WooCommerce plugins provide every bit of support to attain that goal.