Call Us Toll Free - US & Canada : +1-(888) 602-0119

How to Fix WooCommerce Stock Not Reducing After an Order (2026 Guide)

Introduction

WooCommerce stock not reducing after an order is one of the fastest ways to oversell a product. The order lands. The money arrives. But the quantity on the product page never drops. So the next shopper buys an item you no longer have. This problem has several different causes, and they need different fixes. Guessing wastes an afternoon. Start with the check below instead. It tells you in about three minutes which branch you are on.

Run This Three-Minute Check First

Open any recent order in WooCommerce → Orders. Scroll to the Order notes box on the right. You are looking for one line.

WooCommerce writes a note that begins “Stock levels reduced:” whenever it takes stock off a product. The note names the item and shows the old and new counts. That note is the truth. Everything else on screen can lie to you.

If the note is there, stock did reduce. Your real problem is display. Something is showing a stale number, and you can skip straight to the caching section below. If the note is missing, stock never reduced at all. Keep reading in order.

Now check two more things on the same screen. First, the Status field at the top left. Note what it says. Second, whether this order was placed by a customer or created by you in the dashboard. Admin-created orders behave differently, and that catches a lot of people out.

Do this on three or four orders, not one. A single odd order tells you little. A pattern tells you everything. If every order missing the note shares one status, you have found your cause already.

Pick a mix of orders for this test. Include one paid online, one paid on delivery, and one you entered by hand. Include a variable product too, such as a size or colour option. Those four cover almost every path stock can take through a store. Write down which ones had the note. That short list points you at the right section below.

Know When WooCommerce Actually Reduces Stock

Stock does not come off the moment a customer clicks Place Order. It comes off when the order reaches a status that counts as paid or held.

WooCommerce reduces stock when payment completes, and when an order moves to Processing, Completed, or On hold. It does not reduce stock for an order sitting in Pending payment. It does not reduce stock for a Failed order either. That is by design. An unpaid order should not lock away your inventory.

The reverse also happens. Move an order to Cancelled, Pending payment, or Failed, and WooCommerce puts the stock back. Many owners see this as a bug. It is not.

So if your orders sit at Pending payment, the count is behaving correctly. Your gateway is not confirming payment. That is a payment problem wearing a stock costume. Our guide to errors preventing order completion covers why orders stall at that step.

There is one more rule worth knowing. WooCommerce marks each order once stock has been taken. It stores a flag so the same order can never reduce stock twice. This protects you from double deductions when a gateway sends two notifications. It also means a manual status change on an old order will not reduce stock again, because the flag is already set.

Turn On Stock Management in Both Places

Stock tracking has two switches. Missing either one produces the same symptom.

The first is store wide. Go to WooCommerce → Settings → Products → Inventory. Tick Manage stock at the top. With this off, WooCommerce keeps no counts at all. Products can only be marked in stock, out of stock, or on backorder. No number will ever move.

The second switch is per product. Edit the product, open the Inventory tab in the Product data box, and tick Manage stock?. A Quantity field appears once you do. Enter your real count and update.

Here is the part people miss. The store-wide switch does not turn on tracking for products you created earlier. Each product keeps its own setting. So a store can track ten products correctly and ignore forty others. Use the Products list to check quickly. The Stock column shows a number for tracked items and a plain “In stock” label for untracked ones. Any product showing the plain label is not being counted.

Fix them in bulk. Tick the products, choose Edit from the Bulk actions menu, and apply. Set Manage stock? to Yes, then set the quantity per product afterwards.

Fix WooCommerce Stock Not Reducing on Variable Products

Variable products have a third layer, and it trips up nearly everyone.

A variable product can track stock at the parent level or at the variation level. These are separate settings. Ticking Manage stock? on the parent tracks one shared pool for every variation. Ticking it inside a single variation tracks that variation on its own.

Open the product and click the Variations tab. Expand a variation. You will see its own Manage stock? checkbox. If that box is clear, the variation has no count of its own. It falls back to the parent. And if the parent is not tracking either, nothing reduces anywhere.

Watch for a half-configured setup. Some variations tracked, others not, is the most confusing case of all. Sizes that sell out correctly sit beside sizes that never move. Owners then chase a plugin conflict that does not exist. Expand every variation and check each one.

Bulk editing helps here too. Above the variation list is a dropdown of bulk actions. Choose Toggle “Manage stock” to switch them all at once, then set quantities. If your variations misbehave in other ways as well, see our guide on WooCommerce product variations not working.

Manual, Imported and Edited Orders Behave Differently

Orders you create yourself do not touch stock on their own. This surprises almost every store owner the first time.

Add an order in the dashboard, add line items, set it to Processing, and the counts stay put. WooCommerce waits for you to say so. Open the order, find the Order actions box, and choose Reduce stock. Click the arrow to run it. A “Stock levels reduced:” note then appears, and the counts move.

Phone orders and wholesale orders are the usual source of drift here. A shop can look perfectly configured and still creep out of sync, purely because staff never run that action.

Imported orders behave the same way. A CSV import writes the order record without firing the normal status hooks. So no stock changes. If you migrated a store recently, expect your counts to be wrong from day one. Do a physical count and reset the numbers rather than trying to replay the history.

Editing line items on an existing order is the third trap. Change a quantity after stock was already reduced, and the adjustment is not always clean. Check the notes afterwards. If the numbers look wrong, correct the product quantity by hand. It is faster than tracing the edit. Exporting your orders first makes that audit easier, and our guide on exporting orders from a WooCommerce store shows how.

The Count Reduced but the Page Shows the Old Number

This is the branch you reach when the order note is present. Stock moved. The page did not.

Check the truth first. Open the product in the dashboard and read the Quantity field. If that number is correct, your data is fine and only the front end is stale.

Page caching is the usual culprit. A cached product page holds whatever count was true when it was saved. Clear your cache and reload in a private window. Many hosts run caching at the server level as well, so clearing a plugin cache alone may not be enough. Clear both.

Object caching causes a quieter version of the same thing. It stores the product record itself, so even a fresh page render reads an old number. Flush the object cache after any manual stock edit.

A content delivery network adds a third layer. Purge it last, after the other two, or you will simply pull the stale copy back in. If a page still shows the old count after all three, check whether your theme is printing a hard-coded stock message.

Shop and category pages can lag behind single product pages too. They are cached separately and often for longer. If only your listings look wrong, our guide on a WooCommerce shop page not showing products covers how those archives are built.

Settings That Make Stock Look Wrong When It Is Not

Three settings on the Inventory screen change what customers see without changing the count itself.

Hold Stock (minutes) holds inventory for unpaid orders. When the limit passes, WooCommerce cancels the pending order and releases the stock. So a count can appear to bounce back up on its own. That is the hold expiring, not a fault. Note that this applies only to orders in Pending payment, not orders On hold.

Out Of Stock Threshold sets the count at which an item is treated as sold out. Leave it at zero and a product stays buyable until it hits zero. Set it to two and the product reads out of stock while two units remain. Stock is still reducing correctly. The label just changes earlier.

Stock Display Format controls what shoppers see. Choose Never show amount and the page shows only “In stock”. The number is still moving behind the scenes. Set it to Always show stock while you are testing, so you can watch counts change in real time.

Backorders are the last piece. If a product allows backorders, it keeps selling past zero and the count goes negative. Customers then see a “Available on backorder” label. Nothing is broken. Turn backorders off in the product Inventory tab if you do not want that.

Get Expert Help With Your WooCommerce Store

Overselling costs more than the refund. It costs the customer. Someone pays for an item, waits, and then gets an apology email instead of a parcel. That is the sale you do not get back. So it is worth fixing properly rather than patching one product at a time.

Most stores in this position have two or three causes stacked together. A few untracked products. A batch of phone orders that never reduced. A cache holding old numbers on top. Fix one and the symptom half improves, which makes the remaining causes harder to see. That is why a full audit beats a quick guess.

Our team traces the whole path for you. We check every product and variation setting, confirm the order statuses your gateway actually sets, review the caching layers, and reconcile your counts against a real stock take. Then we set up the alerts so you hear about low stock before a customer does.

If your inventory numbers have stopped making sense, we can help. Visit WP Customify and tell us what your order notes show. We will find the cause, correct the counts, and make sure the next order reduces stock the way it should.

How to Fix WooCommerce Product Variations Not Working (2026 Guide)

A store with WooCommerce product variations not working loses sales quietly, and the cause is nearly always one of five things. Four are setup mistakes. One is a script conflict. They look identical from the shop page, which is why people fix the wrong one. This 2026 guide starts with a two-minute check. It tells you which fault you have. Then it gives you the exact steps for that fault, and what to try when the obvious fix does nothing.

Run This Two-Minute Check First

Open the product page as a customer would. Use a private browser window. What you see there tells you the cause.

No dropdowns at all. The page shows one plain price and a normal Add to cart button. Your product is not set as a Variable product, or the attribute is not marked for variations.

Dropdowns appear but stay empty. The select boxes are there. They contain nothing to choose. Your attribute has no terms assigned to this product.

Dropdowns work, but no price or button appears. You pick a size and colour. Nothing loads underneath. Your variations have no price set.

You get an error message. Note the exact wording. Two different messages point at two different faults, covered in their own sections below.

Nothing responds at all. The dropdowns are dead. Selecting a value changes nothing on screen. This is a broken script, not a setup problem.

Pick the line that matches. Then read only that section. Skipping this step is how a ten-minute fix turns into a whole morning.

Why WooCommerce Product Variations Are Not Working After Setup

Variations need four separate things to be true. Miss any one and the front end goes quiet. Most stores miss the same one.

Open the product and look at the Product data dropdown. It must read Variable product. Simple product is the default, and it cannot hold variations at all. Change it and the tabs on the left change with it.

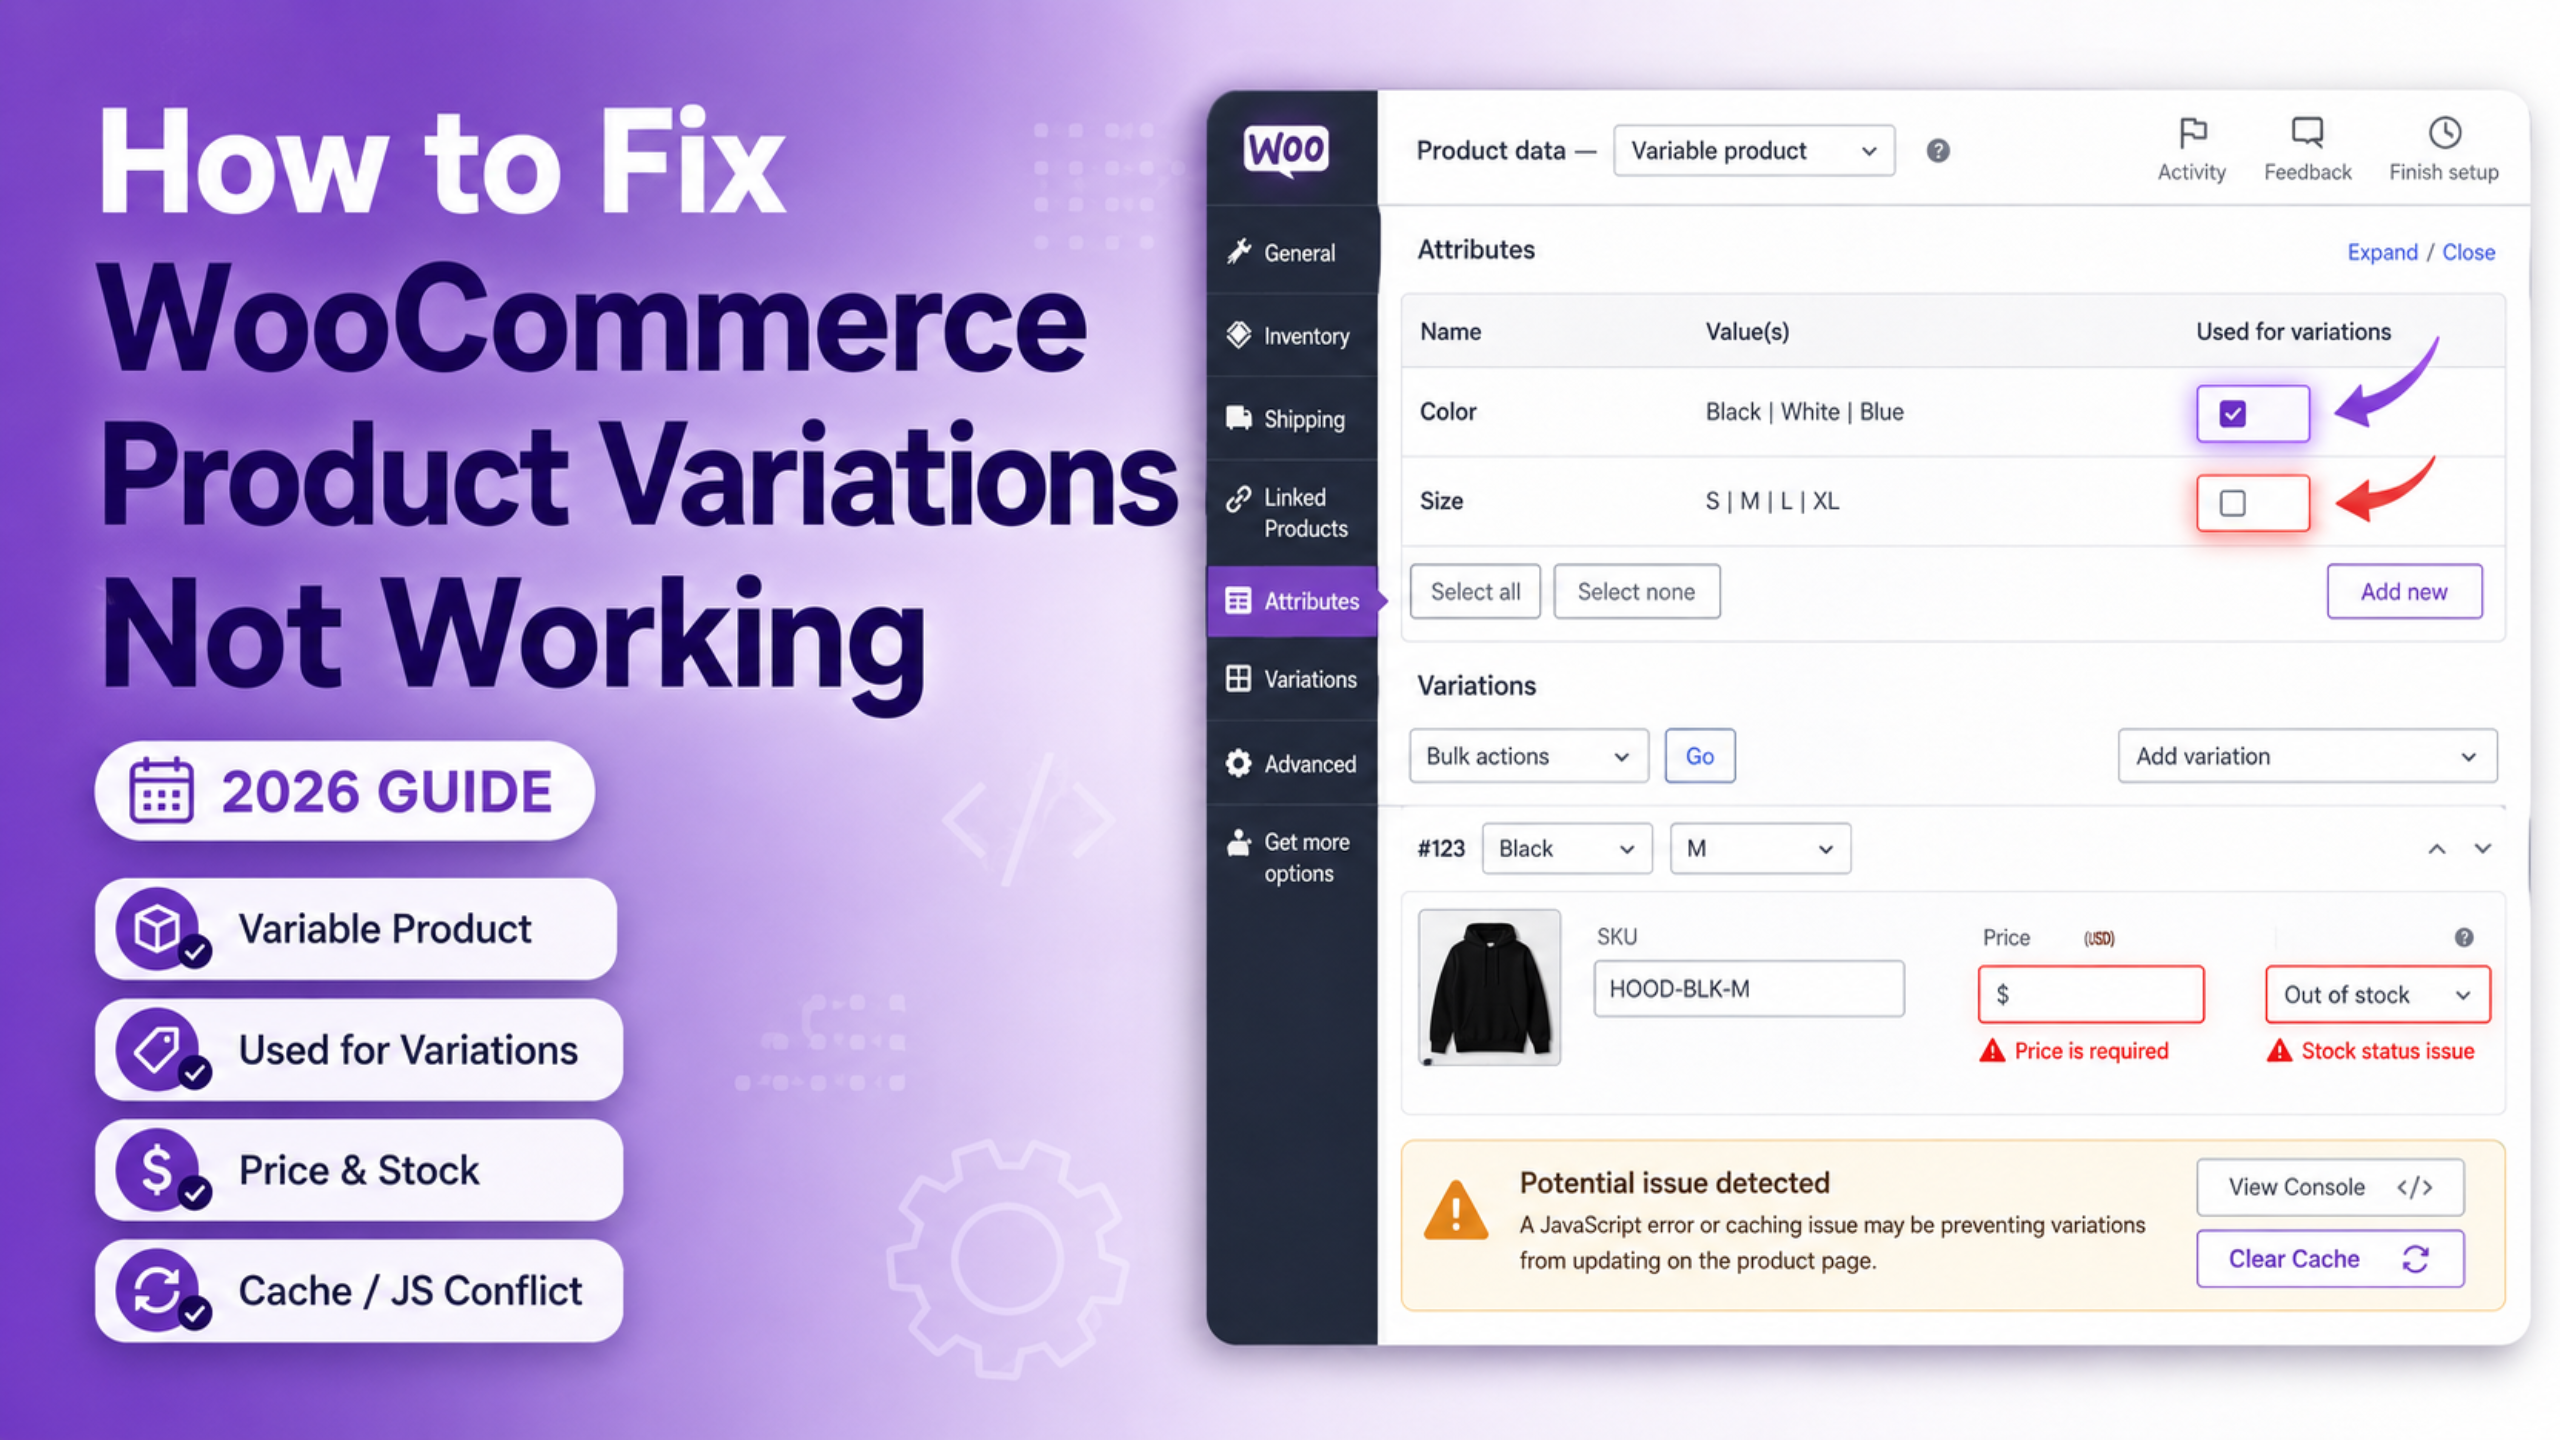
Next, open the Attributes tab. Add your attribute, then add its values. Now find the checkbox labelled Used for variations. Tick it. Click Save attributes and wait for the panel to reload. This checkbox is the single most missed step in WooCommerce. Without it the attribute is treated as plain product information. It shows in the description table and does nothing else.

Then open the Variations tab. Attributes alone create nothing. You must generate the combinations. Use Generate variations to build them all, or add them one at a time.

Finally, give every variation a price. This is the fourth condition and the quietest one. A variation without a price is treated as unavailable. It will not appear, and it throws no warning.

Free items trip people up here. Leaving the price box empty does not mean free. Type a zero instead. Then the variation is valid and customers can add it to the cart.

Fix Variations That Never Appear on the Product Page

You saved everything and the dropdowns are still missing. Work through these three checks in order.

Check that the attribute terms are on this product

Global attributes behave differently from custom ones. A global attribute lives at Products > Attributes and holds its own list of terms. Adding the attribute to a product does not add its terms. You have to select them in the Attributes tab, on that product. An attribute with no terms selected renders an empty dropdown or none at all.

Custom attributes work the other way. Their values are typed into the product itself, separated by a vertical bar. They are quick to set up but cannot be filtered or reused. Convert them to global attributes if you plan to grow the catalogue.

Check the variation stock status

Open the Variations tab and expand each row. Look at Stock status. A variation set to Out of stock still shows in the dropdown. It just cannot be bought. If every variation is out of stock, the whole product reads as unavailable. Managed stock is stricter. A variation with a quantity of zero and backorders off behaves the same way.

There is a setting worth knowing here. Under WooCommerce > Settings > Products > Inventory you can hide out of stock items from the catalogue. Turn that on and sold-out variations vanish from the dropdowns rather than showing as unavailable.

Check the product is actually visible

If the product itself is hidden, nothing on it will render. Look at Catalog visibility in the Publish box. Also confirm the product is Published, not draft or private. A scheduled product behaves like a draft until its date arrives, and it gives no warning on the front end. Our guide on how to hide products in WooCommerce explains what each visibility option really does. If whole sections of your catalogue are missing, read our fix for the WooCommerce shop page not showing products instead.

Fix “No Products Matched Your Selection”

The full message reads “Sorry, no products matched your selection. Please choose a different combination.” It means the customer picked a set of options that has no matching variation.

Sometimes that is correct. You may genuinely not stock a red item in extra large. More often it is a gap you did not intend.

Go to the Variations tab and count. Two attributes with four values each need sixteen variations for full coverage. If you built ten, six combinations are dead. Every dead combination shows this message.

There are two ways to close the gaps. Regenerate all combinations, then delete the ones you do not sell. Or use the Any option. Setting an attribute to Any on a variation makes it match every value of that attribute. One variation with Any Colour and size Large covers every colour in Large. This keeps large catalogues manageable.

Watch for a subtler cause. If you edit or rename attributes after building variations, the links break. The variation still exists but points at a value that is gone. Rebuild the variations after any attribute change. This is the most common reason a working product suddenly stops working.

Fix “Please Select Some Product Options”

This message appears on Add to cart. The full text is “Please select some product options before adding this product to your cart.” WooCommerce is saying it did not receive a full selection.

The honest cause is the common one. Your product has two attributes and the customer only chose one. Both must be set. Nothing to fix there.

The frustrating cause is different. The customer did choose everything, and the message still appears. That means the form value did not reach the server. Check the attribute slug first. Go to Products > Attributes and look at the slug column. Accented letters, ampersands, slashes and spaces in a slug can break the form field name. Rename the slug to plain lowercase letters and hyphens. Then rebuild the variations, because the old ones point at the old slug.

Long attribute names cause the same failure. WordPress limits taxonomy names to 32 characters. An attribute name that runs past that limit gets truncated behind the scenes. The form then submits a value the product does not recognise. Keep attribute names short and this never happens.

What Changes Above Thirty Variations

Variation behaviour changes once a product passes a threshold. By default that number is thirty. This surprises store owners who add a size and suddenly find the page acting differently.

Below the threshold, WooCommerce loads every variation into the page. The dropdowns are smart. Choose Red and the sizes you do not stock in red grey out immediately. Customers cannot pick a dead combination.

Above the threshold, that data is too heavy to send. WooCommerce switches to loading each variation on demand instead. The dropdowns now show every value all the time. Nothing greys out. The customer only learns a combination is unavailable after selecting all of it, and then they see the no-match message.

Nothing is broken here. It is a deliberate trade for page speed. If your product has forty variations and you want the smart dropdowns back, a developer can raise the threshold with the woocommerce_ajax_variation_threshold filter. Raise it carefully. Every extra variation adds weight to the page, and slow product pages cost more sales than clumsy dropdowns do. Products with hundreds of variations are usually better split into several simpler products.

Rule Out Cache, Theme and Script Conflicts

If the dropdowns are completely dead, your setup is probably fine. A script is failing before it can run.

Start with the browser console. Right-click the product page, choose Inspect, then open the Console tab. Reload the page. A red error naming a missing file or an undefined function tells you where to look. The variation form depends on a WooCommerce script called add-to-cart-variation. If that file fails to load, every dropdown goes inert.

The usual culprit is optimisation. Combining or minifying JavaScript can reorder files and break dependencies. Deferring scripts can run the variation form before its libraries exist. Turn off JavaScript optimisation for product pages and test again. If that fixes it, add the variation script to your optimiser’s exclusion list.

Caching plugins cause a slower version of the same problem. A page cached before you added variations keeps serving the old markup. Clear every layer. That means the plugin cache, any server cache, and any network cache in front of the site. Then test in a private window.

If the console is clean, do a conflict test. Switch to a default WordPress theme. If variations work, your theme overrides the variation template. If they still fail, disable other plugins one by one. Filter, swatch and speed plugins are the usual suspects. For pages that will not render at all, see our guide on not being able to view WooCommerce product pages.

Get Expert Help With Your WooCommerce Store

Broken variations are expensive in a quiet way. The product page still loads. Nothing looks obviously wrong. Customers simply cannot buy, and most of them leave without telling you. A single unpriced variation can hide a whole product line for weeks.

The good news is that the causes are few and they repeat. An untouched Used for variations checkbox. A variation with no price. A renamed attribute that orphaned its combinations. A minifier that broke one script. Run the two-minute check at the top of this guide and you will land on the right one straight away.

It is also worth tidying the product pages while you are in there. Clear option labels and a good summary reduce the questions that reach your inbox. Our guide on how to add a short product description in WooCommerce covers that part.

If your variations still refuse to behave, we can take a look. Our team fixes WooCommerce stores every day. We check the product setup, the attribute data, your theme templates and your script stack. Then we tell you plainly what is wrong and what it takes to fix it. Visit WP Customify for expert WooCommerce support today.
How to Export Orders From a WooCommerce Store (2026 Guide)

Store owners who try to export WooCommerce orders usually hit one of four walls. The download never starts. The file arrives but rows are missing. The WordPress export tool hands back an empty file. Or the totals do not match the store. Each wall has its own cause. Fix the wrong one and you lose an afternoon. This 2026 guide shows you how to tell them apart in about two minutes. Then it walks you through the fix that matches your store.

Start With the Symptom, Not the Fix

Most guides open with a long list of steps. That wastes your time. Order exports fail in four distinct ways. Match your symptom first, then jump to that section.

Nothing downloads. You click Download and the screen just sits there. Nothing lands in your downloads folder. This is normal for larger date ranges. Your file is being built in the background and mailed to you.

The file arrives, but rows are missing. You know there were 90 orders last month. The file holds 61. This is almost never a bug. It is a filter you did not know was on.

The file is completely empty. You used the WordPress export screen, not the store report. That screen reads the wrong database table on modern stores.

The numbers look wrong. Your report data is cached. It may also be keyed to a date field you did not expect.

Write down which line matches you. One of these four covers nearly every case. The sections below follow the same order.

How to Export WooCommerce Orders From the Analytics Report

WooCommerce ships with a working order export. You do not need to add anything. It lives inside the reports, which is why so many people miss it.

Go to Analytics > Orders in your WordPress admin menu. This is a separate top-level menu from WooCommerce. Set your date range with the picker at the top. You get presets such as Today, Last Week and Last Month. Pick the Custom tab if you need exact dates.

Now scroll to the table below the chart. Look at the top right corner of that table header. There is a Download link. Click it.

What happens next depends on size. If every row fits on one screen, the file saves straight away. If the data runs to more than one page, WooCommerce builds it in the background instead. It then emails you a link. That email goes to the address on your own WordPress user profile. It does not go to the store admin email.

The default page size is 25 rows. So any export above 25 orders takes the email route. That single number explains most “my export never downloaded” reports.

You can raise the rows per page in the table footer. Set it higher than your order count and the file downloads on the spot. That trick is handy for a quick check of forty or fifty orders. It is a poor idea for a full year, because the browser has to hold the whole report.

The same Download link sits on every Analytics report. Revenue, Products, Coupons and Taxes each export the same way. Learn it once and you can pull any of them.

Why Your Order Export Is Missing Rows

A short file is the most common complaint. It has three usual causes, and all three are settings.

Some order statuses are hidden by default

Go to Analytics > Settings and look at Excluded Statuses. Out of the box, WooCommerce leaves out Pending payment, Cancelled and Failed orders. Those orders exist in your store. They simply never reach the report, so they never reach your file. Uncheck a status to bring it back in. Do this before you download, not after.

This matters most for tax work and fraud reviews. It matters less for revenue reports. If you are chasing orders that stalled before payment, our guide to errors preventing order completion covers why they pile up.

The report uses Date paid, not Date created

Still on Analytics > Settings, find Date type. The default is Date paid. An order placed on 30 June and paid on 1 July lands in July, not June. Bank transfer and cheque orders can sit unpaid for weeks. Those orders fall outside your chosen range entirely. Switch to Date created if you need the order date instead.

Pick one setting and stick with it. Half your team exporting by paid date and half by order date is how month-end figures stop agreeing. Note your choice somewhere your bookkeeper can see it.

The report data is out of date

Analytics keeps its own cached tables. On recent versions it refreshes on a schedule, roughly every twelve hours. Very new orders may not be in there yet. Look for the data status line at the top of the report. It shows the last update and gives you an Update now button. Use it, then export again.

Older orders are a different case. If you moved from another platform, or turned reports on late, that history may never have been indexed. Go to Analytics > Settings and scroll to Import historical data. Run it once with the range set to All. Large stores should import a year at a time to spare the server.

Why the WordPress Tools Export Comes Back Empty

Many store owners reach for Tools > Export in WordPress. It offers an Orders option. It produces an XML file. On a modern store, that file is often empty or badly short.

The reason is a storage change. WooCommerce now uses High-Performance Order Storage, known as HPOS. Orders live in their own database tables. They are no longer stored as posts. The WordPress export tool only reads the posts table. So it finds nothing to hand you. This is a known gap, not a broken install.

You have two clean options. The simple one is to stop using that screen and use the Analytics download instead. It reads the correct tables.

The second option suits anyone mid-migration. Go to WooCommerce > Settings > Advanced > Features. There you can switch order storage back to legacy posts, or turn on syncing between both. Syncing copies orders into the posts table as well. The old export tool then sees them. Be careful here. Syncing costs write time on busy stores, so switch it back off when you are done.

If you are unsure which mode your store runs, check WooCommerce > Status. The report names your order storage method near the top.

When the Download Email Never Shows Up

You clicked Download. A notice said the file was being prepared. Nothing landed in your inbox. Work through these in order.

Check the address on Users > Profile first. The link goes to the email on your own account. On sites with several admins, only the person who clicked gets the mail. A shared login with an old address is a common trap.

Next, check your spam folder. The mail carries a download link, so filters are harsh on it. Whitelist your own domain if this keeps happening.

If nothing arrives at all, your site probably cannot send mail. Most hosts block the default PHP mail function. Test this by asking WordPress to send a password reset to yourself. If that does not arrive either, the export is not the problem. Your whole site is silent, which also means customers get no receipts.

One more cause is worth knowing. The file is built by a queued background task. If that queue is stuck, the job never runs. Look at WooCommerce > Status > Scheduled Actions. A long list of pending actions with old dates points at a stalled queue. A real cron trigger on the server fixes this for good.

Make the File Match Your Accounting Records

An export that opens is only half the job. It also has to reconcile. Three habits save hours here.

First, decide what counts as revenue. Completed orders are money you kept. Refunded orders reduce it. Export both statuses in one range so the net figure is right. Exporting only Completed gives you a gross number that never ties out.

Second, be precise about tax. Order totals include tax unless your store is set to show prices without it. If your books need net figures, pull the Taxes report separately for the same range. Mismatched tax settings cause most reconciliation gaps. Our notes on tax misconfiguration issues in WooCommerce explain the usual setup errors.

Third, watch how the file opens. A CSV is plain text. Spreadsheet software often guesses badly at it. Long order numbers turn into scientific notation. Leading zeros vanish. Dates flip between day-first and month-first formats. The safe route is to import rather than double-click. Use the import option in your spreadsheet tool, then set the encoding to UTF-8 and the delimiter to comma. Accented customer names stay readable that way.

Exporting Before a Store Move or a Backup

A report export is a snapshot for analysis. It is not a backup. This distinction catches people out during migrations.

The Analytics file holds what the report shows. It does not hold every custom field on the order. It skips internal order notes. It skips refund records tied to each line. It does not carry the link between an order and a registered customer account. Restore from that file and you get a spreadsheet, not a working store.

For a real move, take a full database export instead. Ask your host for a database dump, or use the backup tool built into your hosting panel. That captures the order tables intact, along with everything attached to them.

There is a second trap in migrations. Order numbers are not guaranteed to survive. Sequential numbering is often added by a plugin. Move the store without it and numbering can restart. Record your highest order number before the move. Check it afterwards. If you are also rebuilding the front end, our guide to checkout process issues in WooCommerce is worth reading before you go live.

Get Expert Help With Your WooCommerce Store

Order data sits at the centre of every store. When exports go wrong, the fix is rarely a plugin. It is usually a setting three menus away from where you were looking. Excluded statuses hide rows. The date field shifts orders into the wrong month. A stalled queue swallows the file before it is built. None of that is obvious from the screen you are on.

That is where most owners lose time. They try tool after tool when the store was fine all along. Working through the four symptoms above in order will save you that trip.

If your store still will not hand over clean order data, we can look at it for you. Our team works on WooCommerce every day. We check your storage mode, your report settings, your mail delivery and your scheduled tasks. Then we tell you plainly what broke and what it costs to fix. Payment problems are a common neighbour to this one, so it is worth reviewing why a WooCommerce payment gateway is not showing as well. Visit WP Customify to get started with expert WooCommerce support today.
How to Add a Short Product Description in WooCommerce (2026 Guide)

Adding a short product description in WooCommerce takes thirty seconds once you know where the field is. Finding it is the hard part. It hides behind a checkbox on some sites. It moves to a new panel depending on which product editor you run. And on many stores it saves fine, then never shows up on the front end. Owners then hunt through theme settings for a problem that lives elsewhere.

This guide covers all three cases. Where the field lives in each editor. What to write in it. And how to find the exact reason yours is not showing.

First, Identify Which Product Editor Your Store Uses

Everything below turns on this one answer, so settle it first. WooCommerce ships two ways to edit a product. The short description sits in a different place in each.

Open any product for editing. Look at the top of the screen. Do you see a row of tabs marked General, Inventory, Shipping and Linked Products in a box titled “Product data”? That is the classic product editor. It is still the default on most stores.

You may instead see a side menu listing General, Organization, Pricing and Inventory as one long form. That is the newer product editor. It is opt-in. The switch lives under WooCommerce → Settings → Advanced → Features.

One more split matters. Your product template may be classic PHP, or built from blocks. Check Appearance in your admin menu. An Editor item instead of Customize means you run a block theme. Note the answer. It decides which fix below applies to you.

Adding a Short Description in the Classic Product Editor

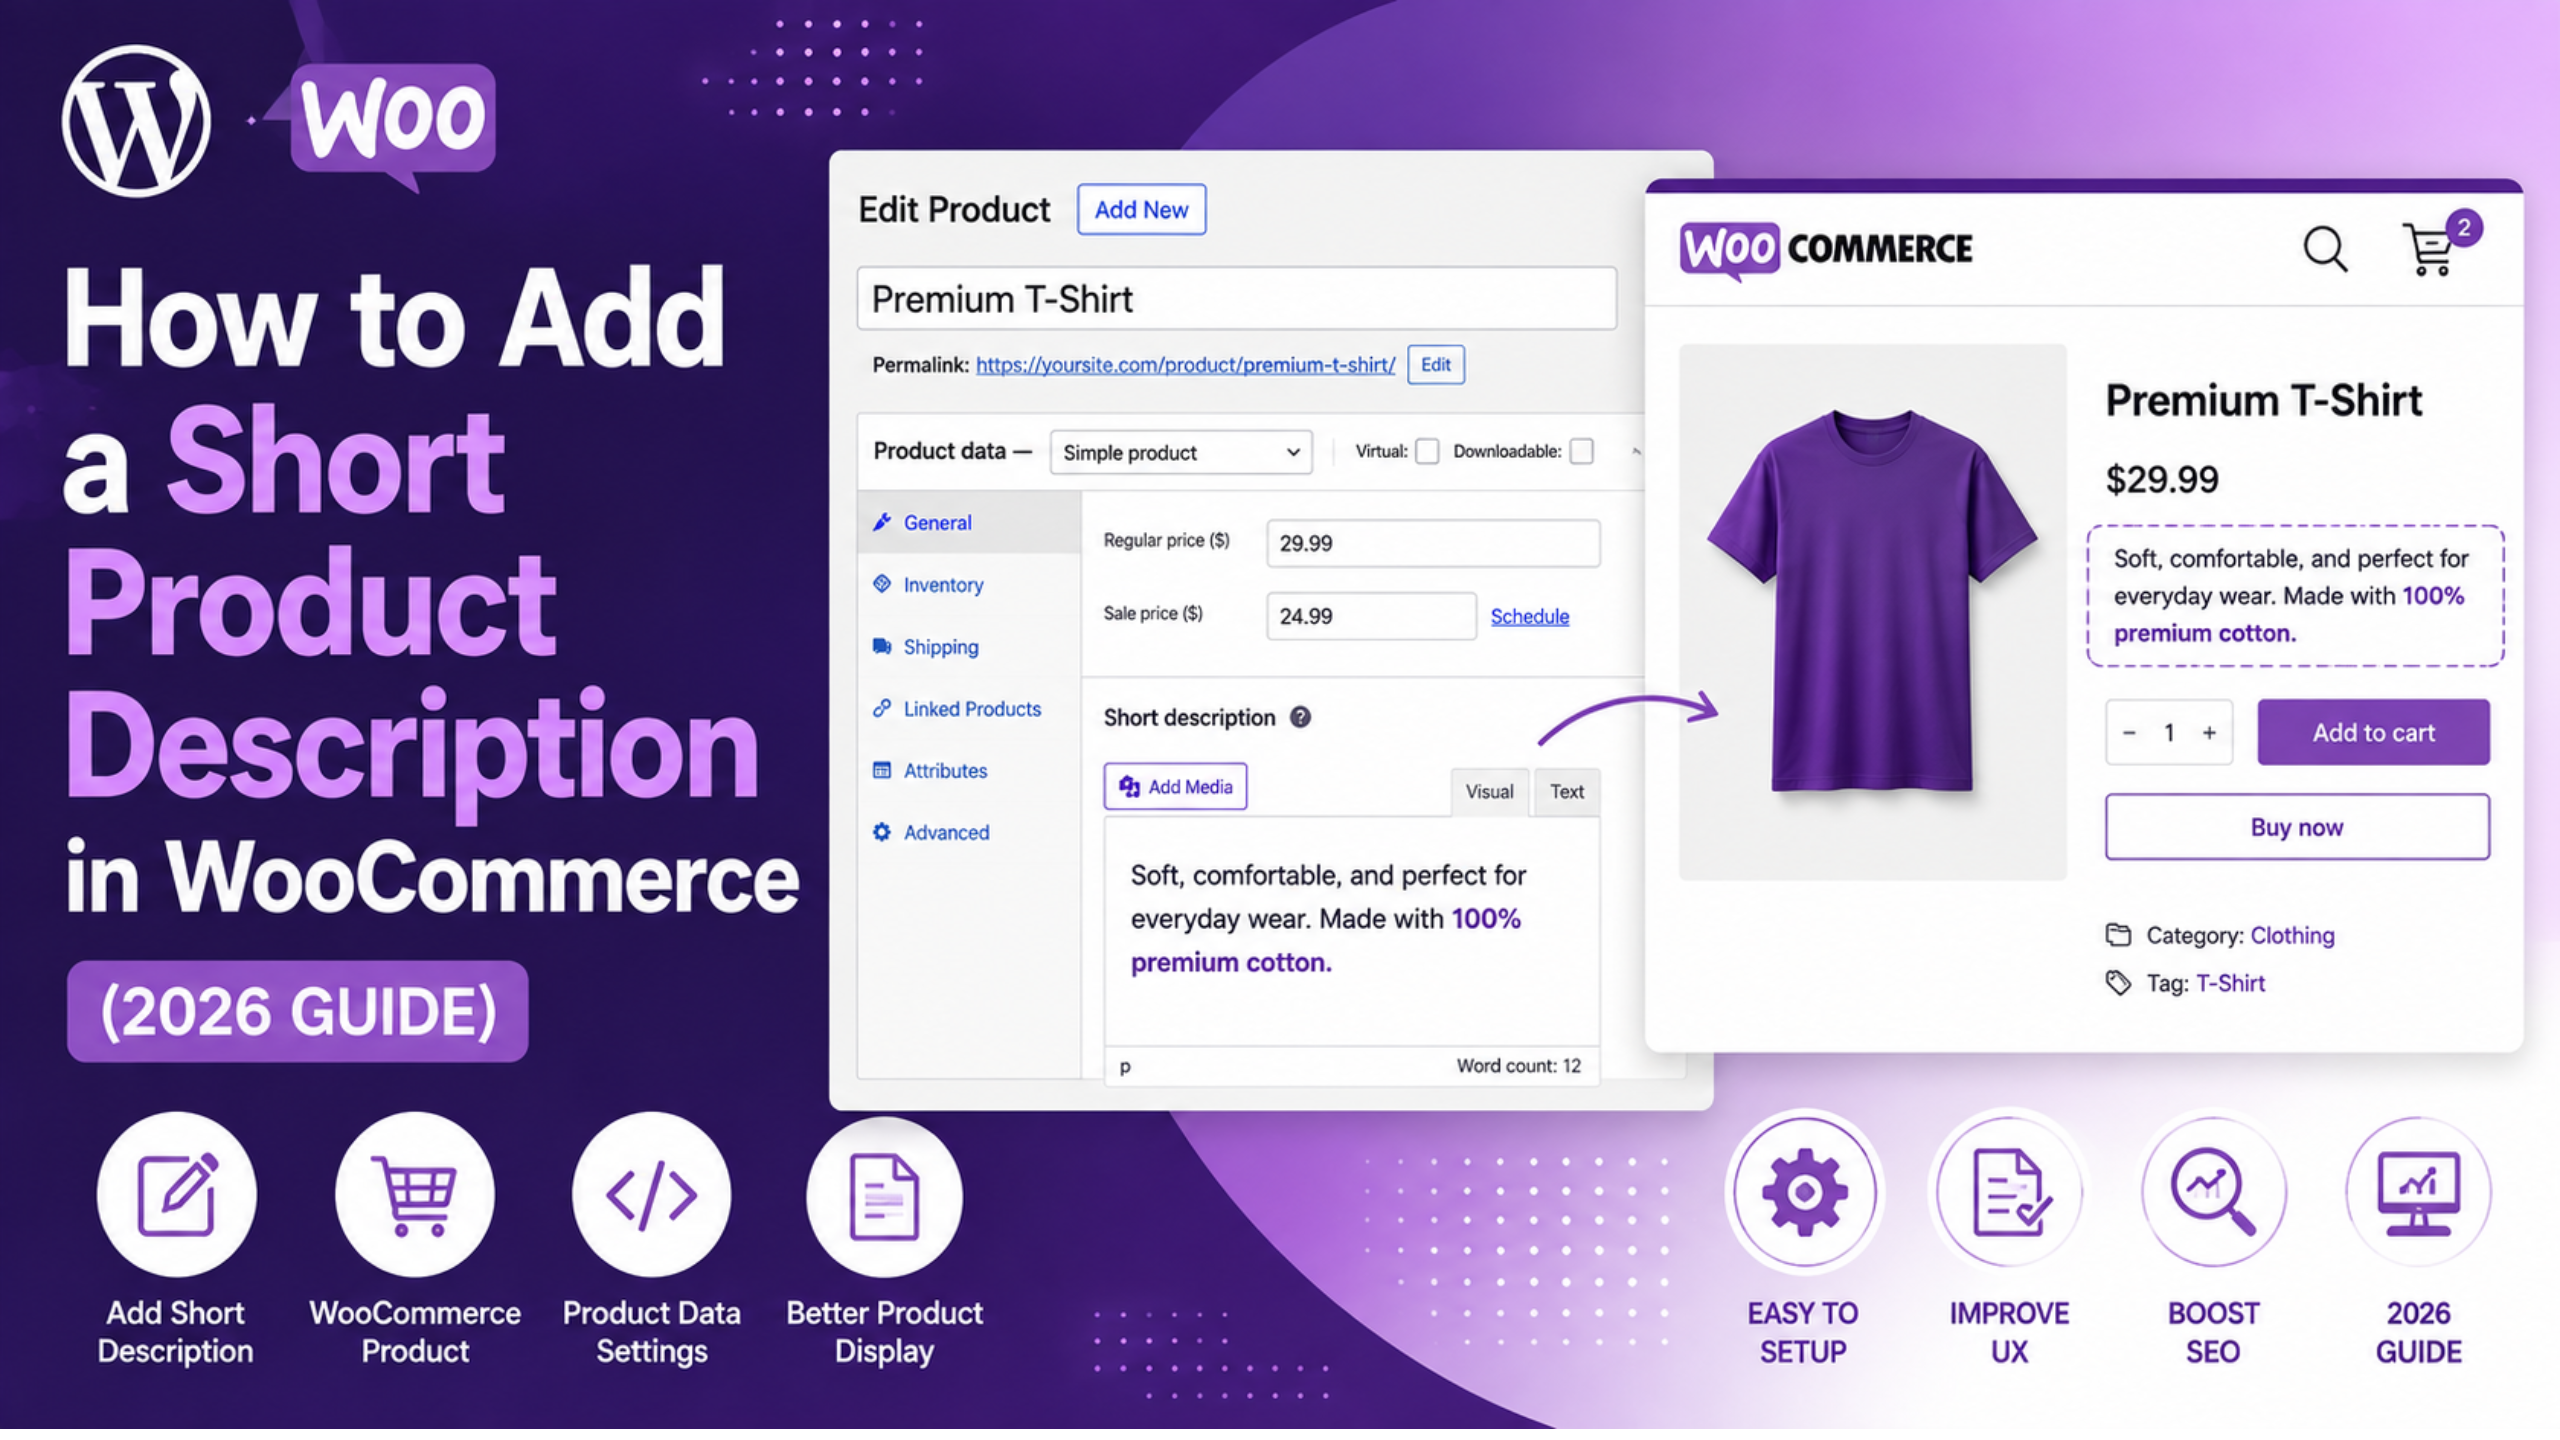
Go to Products → All Products and open the product you want to edit. Scroll past the main text box and past the “Product data” box. Below both sits a panel titled Product short description, with its own small toolbar.

Type your text there and click Update. That is the whole job. The panel takes basic styling, so bold text, italics and bullet lists all work. Switch to the Text tab in the corner to paste or clean up HTML.

When the Short Description Panel Is Missing Entirely

This is the top reason people think WooCommerce has dropped the feature. It has not. The panel is a standard WordPress box, and those boxes are switched off per user. So a panel one admin can see may be hidden for the next admin on the same site.

Click Screen Options in the top right of the product edit screen. Find Product short description in the list and tick it. The panel shows up at once. The setting is stored against your own account. So a colleague who reports the field missing must tick it in their own login, not yours.

If the checkbox is not in Screen Options at all, something is removing the box. That is nearly always a page builder or a bulk product add-on that replaces the default edit screen. Turn off suspects one at a time. Check Screen Options after each.

Why the Field Is Sometimes Labelled “Excerpt”

Under the hood, this is not a special WooCommerce field at all. It is the standard WordPress post excerpt, stored in the post_excerpt column and simply renamed for products. That fact is worth holding on to, because it explains several odd quirks. Import and export tools often map the data to a column called “excerpt” instead. Custom code that changes excerpts will hit your product text too, whether the author meant it to or not. And any tool that claims excerpt support will work here with no changes at all.

Adding a Short Description in the New Product Editor

In the newer product editor the field sits in the General section. It is marked Summary, not “Short description”. You will find it just below the main Description area. It uses a block-style writing space with a small toolbar for bold, italic and links.

Two quirks here catch people out. First, this field is simpler than the classic panel by design. Complex HTML may be stripped on save. Keep products that rely on tables or custom markup in the classic editor. Second, text edited through the block screen does not always save. The field then reads as empty after a refresh. If your text vanishes, move that product back to the classic editor and use the Product short description panel. The data lands in the same column either way, so mixing the two costs you nothing. Check one saved product on the front end before you write the rest. You will catch this in a minute, not after fifty products.

What to Actually Write in a Short Description

The short description takes the most valuable space on your product page. It sits beside the image, above the fold, under the price and next to the buy button. It is the last text an unsure buyer reads before they decide. Treating it as a cut-down copy of the long text wastes that spot.

How Long It Should Be

Aim for two to four sentences, or 30 to 50 words. Most SEO tools flag text over 50 words as too long for this slot. Under about 150 characters looks thin beside a large product image. There is no hard limit in the code. But themes rarely hold more than a few lines of space. Anything longer pushes the buy button below the fold on a phone. That one result matters more than any word-count rule. So test a long version on a phone before you roll it out across the store.

A Structure That Converts

Open with what the product is and who it suits, in plain words. Follow with the one fact a buyer needs at this stage. That may be a size, a material, a capacity or a fit note. Close with the doubt that most often stops a sale. Often that is fit, delivery time, or whether the item works with what they own. Save the full spec table, care notes and tech detail for the long text below.

Write each one fresh. Copied text creates near-identical pages. This text also feeds marketplace listings, so the copying spreads well beyond your own site. For variants of one base product, change the opening line and the key fact, not just the colour name.

Diagnosing a Short Description That Will Not Display

You saved the text. It is still there after a refresh. The product page shows nothing. Before you change any settings, run this two-minute check. It tells you which of three causes you have.

Open the product page and view the page source in your browser. Search that source for a phrase from your text. Is the phrase in the HTML but not on screen? Then your theme’s CSS is hiding it, and you have a styling bug. Is the phrase missing from the source? Then the template never printed it. Skipping this check is why people spend an afternoon clearing caches for a CSS bug.

The Text Is Missing From the Page Source

On a classic PHP theme the text is printed by woocommerce_template_single_excerpt(). That function hangs off the woocommerce_single_product_summary hook at priority 20. It loads the template file single-product/short-description.php. Two things break that chain. A theme or child theme may have replaced the product template and dropped the call. Or a snippet may run remove_action on that hook, often left over from old custom work.

Switch to a default WordPress theme for a moment and reload the product. If the text appears, the override lives in your theme. If it still does not, the cause is code in a plugin or a snippets tool.

Block Themes and the Product Summary Confusion

Block themes drive a growing share of these reports. In a block-built product template, a block reads the post excerpt and prints it. That block may be set to build an excerpt from the long text on its own, and ignore what you wrote. Or it may cut the text at a fixed word count, mid-sentence.

Open Appearance → Editor and edit the single product template. Click the summary block. Check its settings for an excerpt-length or auto-build option. Set it to show your own text in full. If the block is missing, add it above the buy button.

Formatting Is Stripped but the Text Appears

Do your bullets and bold text print as one flat block? Then something is stripping the tags. The output runs through the woocommerce_short_description filter. SEO plugins and theme code both hook that filter to clean or shorten text. Either can strip markup you wanted to keep. Some block templates treat the excerpt as plain text as well, and drop tags by design. Test on a default theme with other plugins off to find the layer to blame. Then unhook it, or move that styling into the long text instead.

Adding Short Descriptions in Bulk

Editing several hundred products one by one is not real work. The built-in CSV importer is the route for a large store. Export from Products → All Products → Export, open the file, and fill in the Short description column. Import it back through Products → All Products → Import. Tick Update existing products on the import screen. Miss that box and you copy your whole store instead of updating it, which is slow to undo.

Map the column with care at the import step. If the tool leaves Short description unmapped, or ties it to the wrong field, your text lands in the long description and wipes what was there. Run a test import with five products first. Check the result on the front end before you load the full file.

Two warnings apply to any bulk run. Take a backup first, because the importer has no undo. And watch your row count on shared hosting. Large imports can time out part way and leave half the store updated.

Showing Short Descriptions on Shop and Category Pages

By default, WooCommerce prints this text on product pages only. Shop and category pages show the title, price and button. Many owners want a line of copy in the grid too. That helps most in stores where product names alone do not tell items apart.

On a block theme, edit the shop template in Appearance → Editor. Add an excerpt block inside the product template area. Then cap its length so the grid stays even. On a classic theme you hook the output onto an archive hook in your child theme’s functions file. Either way, keep the grid version short. Long text in a grid makes rows of uneven height. That ragged layout costs you more than the extra copy earns. Are products missing from those pages altogether? That is a separate issue, covered in our guide to fixing a WooCommerce shop page that is not showing products.

Mistakes That Quietly Cost You Sales

A few patterns show up again and again in store audits. Pasting maker copy is the worst one. That same text sits on every rival page stocking the item. Search engines then get no reason to pick yours. Repeating the product title wastes the slot, since the title sits right above it. Stuffing the keyword in three times reads badly to the only audience that counts. One natural mention is enough. The rest is noise a buyer has to read past.

Filling the field on some products and leaving it blank on others makes the layout uneven. The gaps read as a broken site, not a choice you made. Remember too that this text does nothing if the product itself is hidden. That is worth checking against our guide to hiding products in WooCommerce. And if the page will not load for buyers at all, start with our article on product pages you cannot view in WooCommerce.

Get Expert Help With Your WooCommerce Store

Short descriptions are small. But they sit at the exact point where a visitor decides to buy. A template fault that hides them across a whole store is easy to miss and costly to leave. The fix is rarely hard once you know which layer is at fault. Finding that layer is where most owners lose a day.

Maybe your text will not show on a block theme. Maybe a bulk import has scrambled your product data and you need it pulled back from a backup. Maybe your store just needs several hundred lines written well. Our WooCommerce team handles all three. We work on live stores without taking them offline. Visit WP Customify to talk to us about a one-off fix or ongoing support. Tell us what your product pages do now, and what you expected. We will name the layer at fault before you spend a thing. In most cases we can do that from your product URL alone.

How to Fix WooCommerce Shop Page Not Showing Products (2026 Guide)

A blank shop page is a scary sight. Your products sit safely in the admin area. Yet the shop page shows nothing at all. Every minute it stays empty, you lose sales. The good news is simple. This problem almost always has one small cause. Most store owners fix it in under ten minutes.

This guide covers every common reason for a WooCommerce shop page not showing products. We start with the fast checks. Then we move to the deeper ones. Work through the steps in order. Reload your shop page after each step. That way you learn exactly what fixed it.

Why Your WooCommerce Shop Page Is Not Showing Products

A WooCommerce shop page not showing products is a symptom, not a fault on its own. WooCommerce builds that page from a database query. If anything blocks that query, the page loads but stays bare. The layout still appears. The product grid does not. Some stores show the message no products were found matching your selection where the grid should be. Others load a completely empty space.

There are seven usual causes. The shop page setting points at the wrong page. Your products are drafts instead of published items. Catalog visibility is set to hidden. Permalinks are stale after a move or an update. A cache is serving an old copy of the page. A plugin or theme is filtering the query. Or the product lookup tables have fallen out of sync, which more often distorts sorting and filtering than empties the page completely.

Notice what is missing from that list. Losing your products is very rare. The data is almost always safe in the database. Something is simply stopping it from reaching the screen. You are hunting a blocked query, not lost data.

One more tip before you start. Open your shop page in a private browser window. Logged-in admins often see a different version of a page. A private window shows you what real shoppers see.

Step 1: Check the Shop Page Setting in WooCommerce

In our support work this is the first thing worth checking. WooCommerce needs to know which page is your shop. If that link is empty or wrong, the page renders as a plain, blank page.

Go to WooCommerce → Settings → Products → General. Look at the field marked Shop page. It should name your real shop page. If the box is blank, pick the right page from the dropdown. Then click Save changes at the bottom.

What to do if the shop page is missing

Sometimes the page itself was deleted. Check Pages → Trash first. If it sits there, restore it. If it is gone for good, create a new page called Shop. Leave the content area empty. WooCommerce fills the page for you. Then point the setting at that new page and save.

Now reload your shop page. If products appear, you are done. If the page still looks bare, move to the next step. Do not undo this change. A correct shop page setting matters for the rest of the fixes too.

Step 2: Fix Product Status and Catalog Visibility

Two settings explain most cases of WooCommerce products not showing on the front end. WooCommerce hides products that are not published, and products marked as hidden. Both are easy to miss because they look fine in the admin list.

Open Products → All Products. Look at the counts along the top of the screen. You will see links such as All, Published, Draft and Trash. If the Published count is zero, that is your answer. Your items are drafts or pending review. Tick the boxes next to them. Choose Edit from the Bulk actions menu and click Apply. Set the status to Published and update.

Check catalog visibility on each product

Catalog visibility is a separate setting. A product can be published and still stay hidden. Open any product for editing. In the Publish box on the right, find Catalog visibility. Click Edit next to it. Choose Shop and search results. Click OK, then Update the product.

You can fix many products at once. Select them on the All Products screen. Use Bulk actions, then Edit. A Catalog visibility dropdown appears in the panel. Set it to Catalog & search and click Update. If you have deliberately hidden items in the past, our guide on how to hide products in WooCommerce explains each visibility option in detail.

Step 3: Reset Permalinks and Clear Every Cache

WordPress stores its URL rules in the database. Those rules can break after a site move, a plugin update or a core update. When they break, the shop page loads the wrong template. The result is a page with no products.

The fix takes ten seconds and is completely safe. Go to Settings → Permalinks. Do not change anything. Just click Save Changes. That single click rebuilds all the rewrite rules. Now reload the shop page.

Clear your caches in the right order

Caching is the second half of this step. A cache can keep serving the broken version of your page long after you fix it. Clear them in this order for the best result.

Start with your caching plugin and purge everything. Next, clear your host’s server cache from your hosting panel. Then purge your CDN if you use one. Finally, clear your own browser cache, or just open a private window. Test the shop page after each purge.

Step 4: Find the Plugin or Theme Conflict

If the page is still empty, something is filtering the product query. A WooCommerce plugin conflict is the likely culprit, and your theme is the next suspect. Conflict testing sounds risky, but it is safe when you do it properly.

Never test on a live store during busy hours. Use a staging copy if you have one. If you must test live, pick your quietest hour and work fast.

How to run the conflict test

Deactivate every plugin except WooCommerce. Reload the shop page. If products appear, a plugin is the cause. Now switch them back on one at a time. Check the shop page after each one. The plugin that breaks the page is your answer.

If the page is still empty with only WooCommerce active, the theme is next. Switch to a default WordPress theme for a moment. Reload the shop page again. If products appear, your theme is filtering them out. Switch back to your own theme right after the test. Then contact the theme author with what you found.

Keep a note as you go. Write down each plugin name and what the shop page looked like after it.

Common conflict sources to check first

Some plugin types cause this far more often than others. Product filter and search tools rewrite the main query. Membership and role-based pricing tools can hide products from certain visitors. Multi-currency and regional tools sometimes hide items with no price in the active currency. Import tools can leave products in a half-finished state. Start your testing with these groups and you will usually find the cause quickly.

Recently updated plugins deserve a look too. Check your update history and note anything changed in the last week. That is often where the fault began. If one plugin turns out to be the cause, roll it back to the older version first. Then report the bug so the author can fix it properly.

Step 5: Fix Block Theme and Product Collection Issues

Block themes changed how the shop page works. With a block theme, the shop page is a template, not a classic page. WooCommerce fills it using the Product Collection block. That block has its own filters, and those filters can empty your grid.

Go to Appearance → Editor → Templates. Open the template named Product Catalog. Click on the product grid to select the block. Now open the settings panel on the right.

Check the block filters

Look at the Filters section. Common traps include a stock status filter set to In stock, a category filter pointing at an empty category, and an attribute filter with no matches. Remove any filter you do not need. Save the template and reload the shop page.

Watch the “Products per page” value too. A very high number can time out on a large catalog. Set it to 12 or 16 and test again. If the message reads “There are no products to display”, the block is working but the filters return nothing. That message is a clue, not a failure. It tells you the fault is in the filters, not in your data.

Step 6: Repair the WooCommerce Product Lookup Tables

WooCommerce keeps copies of key product data in lookup tables. These tables make the shop page load fast. They also break silently. A failed import or an interrupted update can leave them out of sync. When that happens, WooCommerce queries the tables, finds nothing, and shows an empty grid.

Go to WooCommerce → Status → Tools. Find the row called Product lookup tables. Click Regenerate. The button changes to show progress. Do not refresh the page while it runs. Large catalogs can take several minutes.

While you are on this screen, look for Reset product count cache as well. It rebuilds the counts shown against each category and attribute. Run it if your categories list numbers that do not match what the shop page displays.

If the regeneration gets stuck

The job runs through the scheduler in the background. If the scheduler is stalled, the job stalls too. Go to WooCommerce → Status → Scheduled Actions and check the Pending tab. A long queue of old pending actions means your cron is not firing. Ask your host to check the server cron, or trigger it manually.

While you are on the Status screen, open the System status tab. Look for red warnings about database tables. A missing table here explains a lot of odd behaviour across the store, including problems like product pages that will not open.

How to Keep Your Shop Page Working

Fixing the page is only half the job. Keeping it working is the part that saves you time later. A few habits make a real difference.

Update on staging first, never straight on the live store. Test the shop page right after every WooCommerce or theme update. Keep a short list of the plugins that touch products, so conflict testing starts in the right place. Set up simple uptime monitoring on the shop URL itself, not just the home page. A blank page still returns a healthy status code, so monitor the page content, not only the response.

It also helps to know the shortcode fallback. If your template is broken, you can drop the products shortcode onto any page. That gives you a working product grid while you repair the real one. Our guide to WooCommerce shortcodes lists the ones worth keeping to hand. Finally, take a backup before any conflict test.

Get Expert Help With Your WooCommerce Store

A WooCommerce shop page not showing products almost always comes down to one of the six steps above. Work through them in order and you will find the cause. If your WooCommerce shop page is still not working after all six steps, the fault usually sits deeper. A large catalog, heavy customisation or a stack of old plugins can hide the real fault. Broken product queries often sit alongside other store problems, such as issues in the checkout process, and those need a careful look.

If your shop page is still empty, do not keep guessing while sales slip away. Our WooCommerce experts fix these faults every day. We find the cause, repair it safely, and harden your store so it does not happen again. Talk to the WP Customify team today and get your products back in front of buyers.

Tips to hide products in WooCommerce

The visibility of WooCommerce products is an essential feature. Some businesses hide it while some remove the products from an online store. But do you know deleting the product may hurt your search ranking?

WooCommerce, the genius platform gives you an option to hide products. Yes, you read it right. You can hide products in WooCommerce from your wholesale or retail customers.

Reasons to hide products in WooCommerce

Some businesses face selling distress because they simultaneously handle B2B buyers and retail users (clients). Or, the business owners want to share exclusive products with members only.

There are numerous methods to hide products in WooCommerce. Let us check some cases where hiding products is proven beneficial.

Read also: How To Test WooCommerce Checkout And Payments?

  • Shipping is not possible for specific locations

Amazon.com (see the image below) is not shipping this product to certain locations in India.

Shipping

Source

Have you seen similar cases while browsing the internet?

Some items cannot be internationally shipped. This may be because of legal or logistical reasons. It is better to hide products in WooCommerce for shoppers who are outside your shipping zone.

  • Some products in your inventory are seasonal

There are certain products that are sold at a specific time of the year. For instance, Christmas trees, Halloween costumes, etc. It does not make great sense if you display it off-season unless you are planning for a clearance sale.

  • You sell custom tailored or branded products

There may be cases wherein you have to hide items if they are exclusively meant for a certain person or store. You may have to hide products in WooCommerce for other users. These products will not be visible to the people who are not on the list.

  • Products for registered users (clients)

There may be occasions when you want to give special offers to your loyal customers. You can buy the products in WooCommerce from shoppers who are not your members yet. It is also the best way to instigate a user to create an account with your business for exclusive deals.

Tips to hide products in WooCommerce

A. Use WooCommerce Settings to hide products in WooCommerce

When you go for this method, there is a caveat. Your product will be hidden from your shop pages. Now, if your user gets a link to the product page, then they can access it.

Hence, this method is not a mere solution as you cannot make your product private entirely. It is inefficient because you have to manually make the changes for each product.

You will be stressed to efficiently assign the products to a particular category and then hide it.

If you do not have any problem accessing the product using a direct link, then go for this.

1. Log in to the account of WooCommerce

Go to the admin dashboard on your WordPress website, and log in for this.

2. Click “Products Menu”

Please check the image for reference. Tap the button “Product Menu” and navigate to the product. Hide it by using the option of visibility.

Product Menu

3. Choose Product

To access the product you need to edit the screen. From the list, select the product you wish to hide. Tap the button “Edit”.

Products

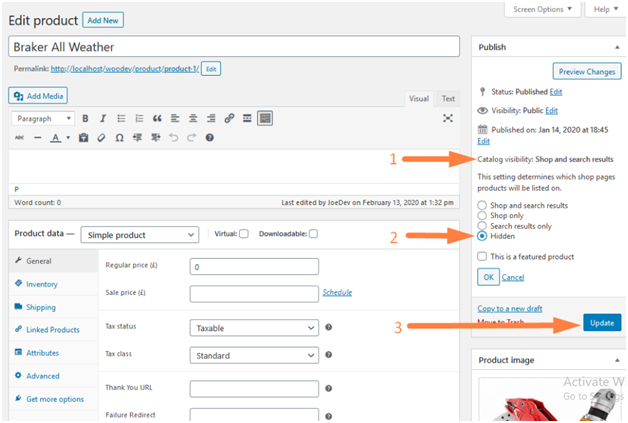
4. Press “Catalog Visibility”

On the editing screen, you will see the option “Catalog visibility” on the product’s right side. Please check it below to publish the meta box.

Click the link for the dropdown menu and tap “Hidden”.

5. Go for “Hidden”

Tap “OK” when you check “Hidden” and press “UPDATE” to complete.

Edit Product

It’s done!! Please try other methods if this one does not work well for you.

B. Use Plugin to hide products in WooCommerce

Here you can see how to hide products on WooCommerce using the plugin.

You can use the plugin “WooCommerce Members Only”. This plugin gives an upper hand to hide items on WooCommerce in many ways.

It can help you to hide all products, individually, or by category.

  • Hide products

Open this on the Edit Product Page to hide WooCommerce products individually. Next, you have to scroll to the area of Product data. Choose the option “Members only”.

Simple Products

Select “ Restriction method” from the menu of the dropdown.

For instance, if you choose the option “Password”, you will see prompt messages for password. Only through this, the users may unlock the product.

Now if you want to hide WooCommerce products based on the category, visit WooCommerce. From the WordPress website’s admin panel, you need to click “Settings” and click “Members Only”.

Restricted Content

Make sure to set the option “Restricted Content” after selecting “Restriction Method” to specified categories.

C. Hide products in WooCommerce as per User Role

Based on the roles of the user, you can hide products in WooCommerce. You can do this for an individual product or multiple products.

Please remember that you have set this up in a few minutes.

Restricted method

Visit “WooCommerce” and go to “Settings”.

Navigate for “Members Only” and choose “Restriction Method” for the user role.

Using the option of “Restricted Content”, make a decision whether you want to hide all/ certain category product (s).

If you are choosing “Specified Categories” the section on Restricted Categories will allow you to define the restriction. Please note this is for WooCommerce product categories.

Under the section “Permitted User Roles”, pick one or more user roles. The users with this role can access the hidden products of WooCommerce.

D. Hide products in WooCommerce based on log-in status

If you own a membership website you can hide the WooCommerce products based on the log-in status of the user. You can even create hidden items of WooCommerce by log-in status.

Login Status

Browse for “WooCommerce” and tap “Settings”. Click “Members Only”. You need to set “Log in Status” for the Restriction Method.

Use the option Restricted Content. Come into a decision whether you want to hide all/ certain category WooCommerce products.

You need to specify the product categories of WooCommerce in the section of Restricted Categories.

E. Hide products in WooCommerce with Passwords

You can apply for single or multiple passwords using the WooCommerce Members Only plugin. You can also apply it for WooCommerce products and WooCommerce product categories in your shop.

This is the best solution for business owners who are looking for simple methods to execute promotions and marketing campaigns.

Password

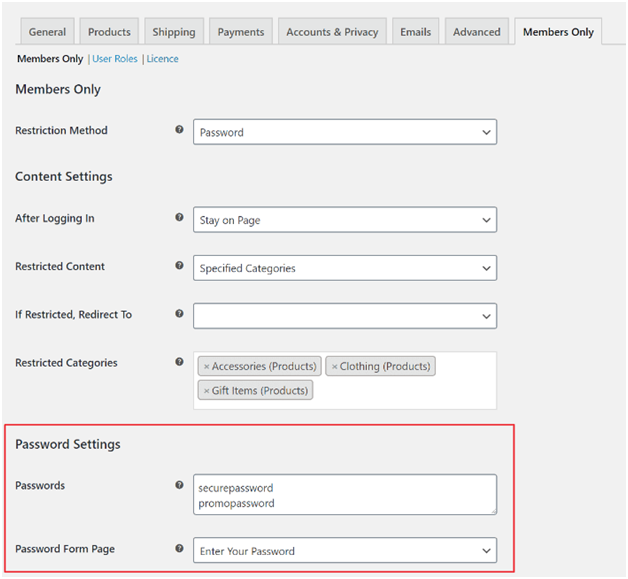
Navigate to “WooCommerce” and tap “Settings”. Go for “Members Only”. For the Restriction Method, you have to set the Password.

Make a decision whether you are planning to hide one or all products of WooCommerce using the option of Restricted content.

Choose the categories of the WooCommerce product that you want to hide in the section of Restricted Categories. The option of Password Form Page will allow you to pick the page to display the password form.

With a multiple or single password, you can hide individual WooCommerce products. Head to the tab “Members Only” for this. Please check this in the settings of Product data.

Products Data

F. Hide individual products in WooCommerce by User ID

On occasion, you may have to hide particular products of WooCommerce. This is in the case wherein you want a few members to access the WooCommerce product.

Users

To initiate this, you have to navigate for the product you plan to hide. You need to scroll to the section of Product data. Hit “Members Only”.

Set “By User” to set the Restriction Method. Make sure to place the User ID. This is for the users to which you plan to give access.

User Existing add

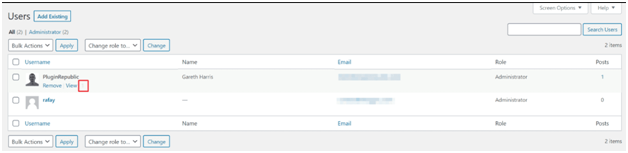
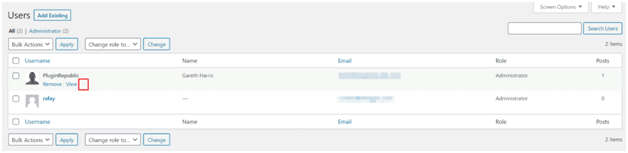
Browse to the “Users” to get the USER IDs. On the WordPress admin dashboard, press “All Users”. Check for the desired users. You can see the USER ID next to the username.

Make sure to check the box “Next”. This is next to the option “Archives”. You can choose to hide the items of WooCommerce in archives. This can be your tag archives, category pages, and the main store page.

How do you redirect users from hidden products?

You can redirect your users if they try to access your hidden products. This is a great approach for membership websites.

My Account

Stop over to the WordPress admin panel, and hit “WooCommerce”. Then click “Settings” and “Members Only”.

Pick “Restriction Method” from the dropdown.

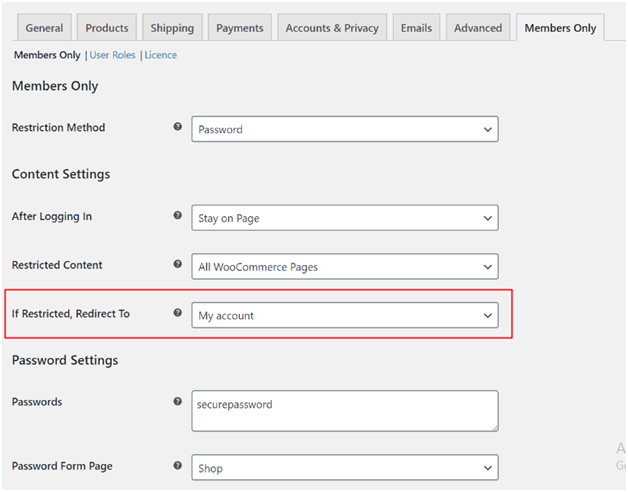
Redirect to the page that you want your unauthorized user should go to. You can redirect them to a personalized landing page or any of your one WooCommerce default pages.

For this, you need to choose the action settings “Redirect To section” or “If Restricted”.

Facing challenges to hide products in WooCommerce? Hire WP Customify!!

Our team can accelerate your business efficiency with a design thinking approach, smart planning, and the latest technologies.